The Fender Telecaster – tone at the expense of intonation?

Why do we need intonation adjustment?

On string instruments, the fret spacing along the fretboard is calculated according to a mathematical formula. This formula is theoretical, though, and doesn’t take into account variables, such as string tension (tuning), string thickness (gauge) and string height (action). These variables make the actual pitch of a string, which is pressed down against a fret, deviate from the theoretically correct pitch. To compensate for this pitch offset, you need some sort of intonation adjustment that sets the correct intonation (or octave compensation) for each string.

Martin_D-42K_2006_brdt_opt

On acoustic guitars correct intonation is achieved by an angled bridge saddle, often carefully shaped to fine-tune the compensation further.

Jazz guitar bridge

Early electric guitars were basically modified archtop acoustics, which carried on using traditional rosewood (or ebony) archtop bridges with carved ”steps” presetting the intonation. Overall intonation adjustment was carried out by moving the whole bridge carefully closer to (or further away from) the neck.

****

Fender 52 Reissue

The advent of the – much clearer-sounding – solidbody electric guitar necessitated a more precise approach to the problem of intonation adjustment.

52 Tele Bridge

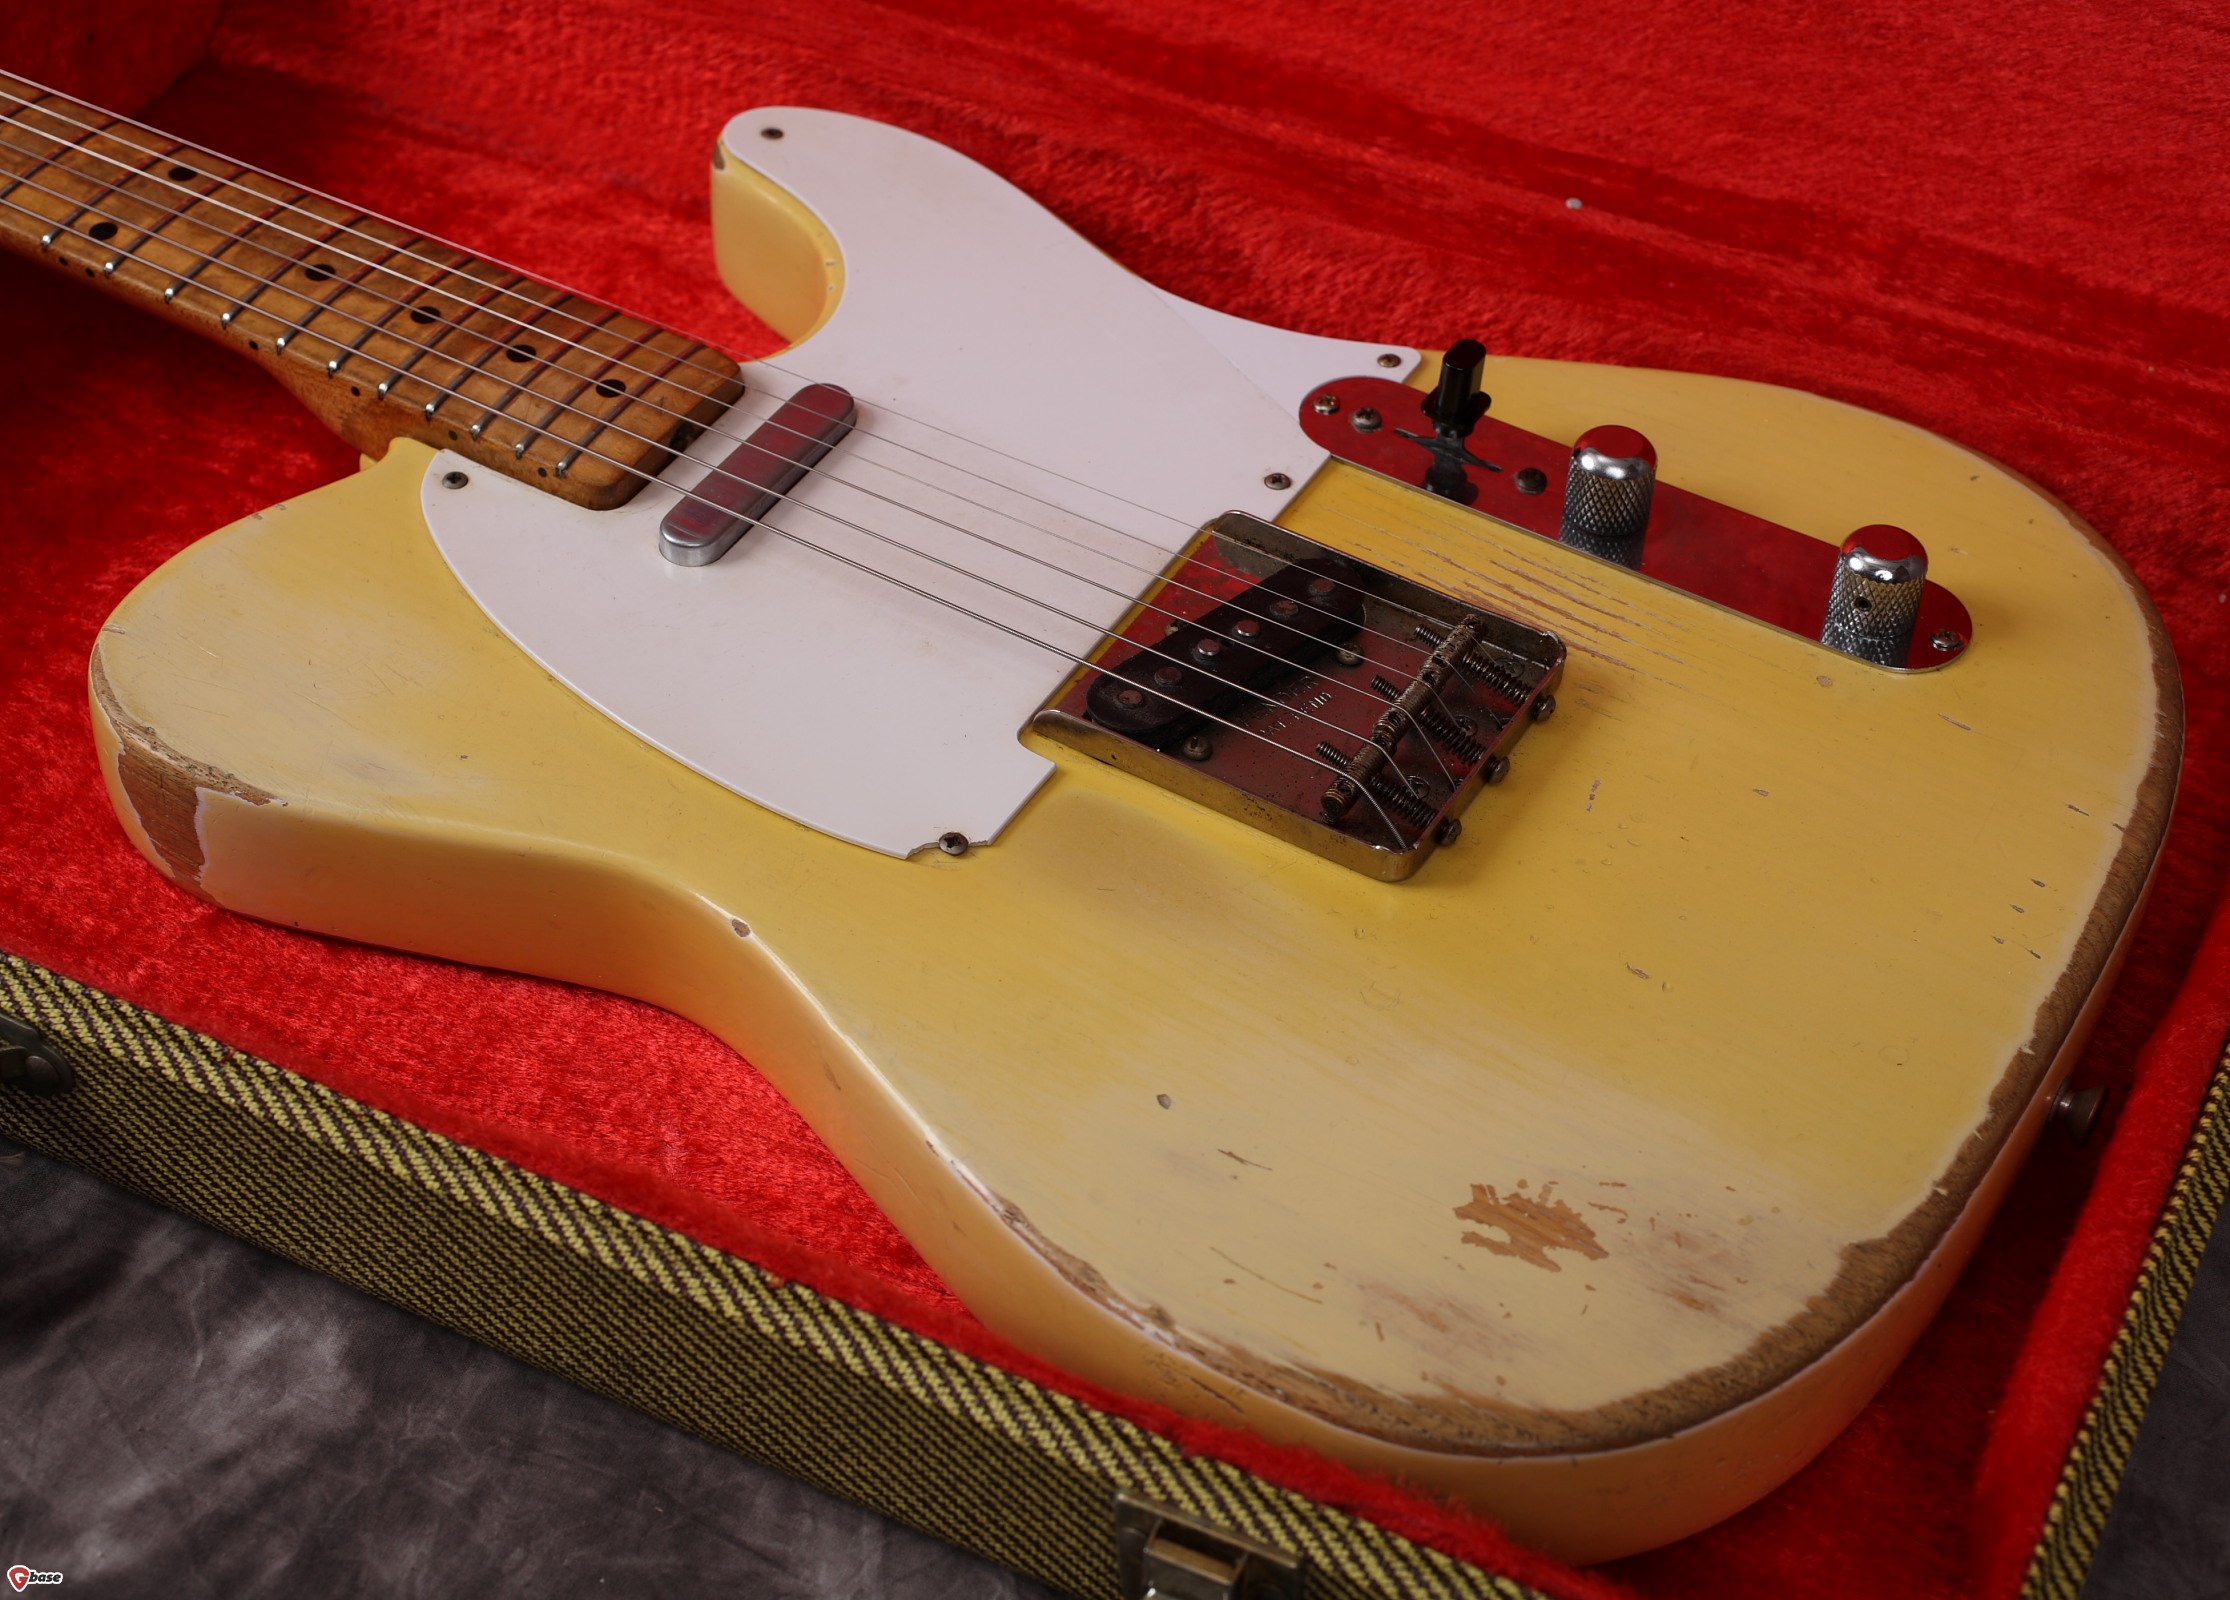
Leo Fender’s novel Esquire/Broadcaster/Telecaster-bridge featured a mounting plate for the bridge pickup, as well as individual action adjustment for each string, and octave compensation in string pairs.

Fender_Custom_Shop_52_Telecaster_Nocaster_Blonde_R10539_1

Fender’s Telecaster bridge assembly plays a huge part in this model’s distinctive, twangy tone, laying the foundation for the model’s classic status.

close-up Fender bridge

brucke-und-ta

Over the course of the 1950s and 60s, Fender experimented with different saddles – smooth brass, smooth steel, threaded steel, and steel saddles with a single notch per string – but the basic, three-saddle formula stayed firmly in place. You got fantastic tone, but not perfectly spot-on intonation.

****

70s Fender six-saddle

Twenty years after the original launch of Fender’s first solidbody electric, things had evolved.

In 1952 the original three-saddle bridge was less of a compromise, because the regular string sets of that time (012s or 013s) had a wound g-string. With a wound g-string the biggest step in intonation adjustment was between the b- and the g-string, and, as they were catered for by different saddles, a good, working compromise could be found.

By the late Sixties, ”slinky” string sets with plain g-strings had become the norm. This shifted the intonation step between the highest wound string and the lowest plain string onto a single, rigid bridge saddle (for the D- and g-string).

Fender retained the traditional three-saddle bridge on its standard Telecaster, but introduced six-saddle bridges on many of its new models in the Seventies. Pictured above is the six-saddle bridge from a (second version) Custom Telecaster (introduced in 1972).

Although this bridge finally offered perfect intonation, some players criticised this type of bridge for ”sounding” thinner (or brighter) than the original version. This might also have been due to changes in the precise specifications of the bridge pickup at that time, though.

Hipshot 6-saddle

Modern Fender 6-saddle

More recent six-saddle designs by makers like Hipshot, Gotoh or Fender are based on a thicker bridge plate. These are perfectly serviceable, modern designs, which offer precise intonation. Many Tele-anoraks still steer clear of these bridge types, however, because the more rigid bridge plate tends to tame the bridge pickup’s twang noticeably.

****

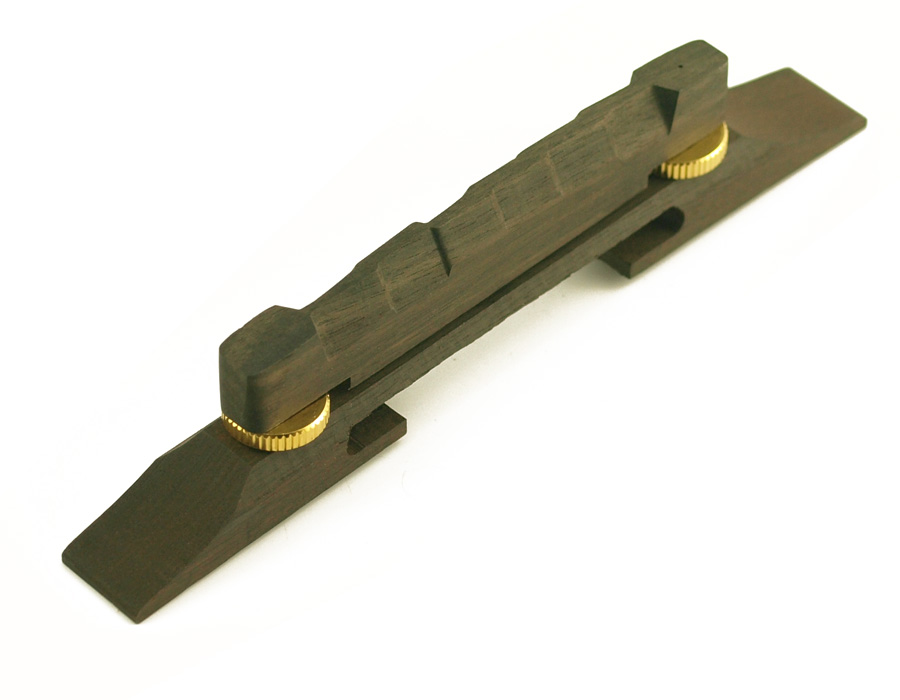
Another approach to better intonation on a Telecaster is to keep the twang-enhancing three-saddle ashtray bridge in place, but modify the saddles.

Joe Barden angled

Pickup specialist Joe Barden came up with angled brass saddles in his design for the late Tele-master Danny Gatton.

Wilkinson

Graph Tech

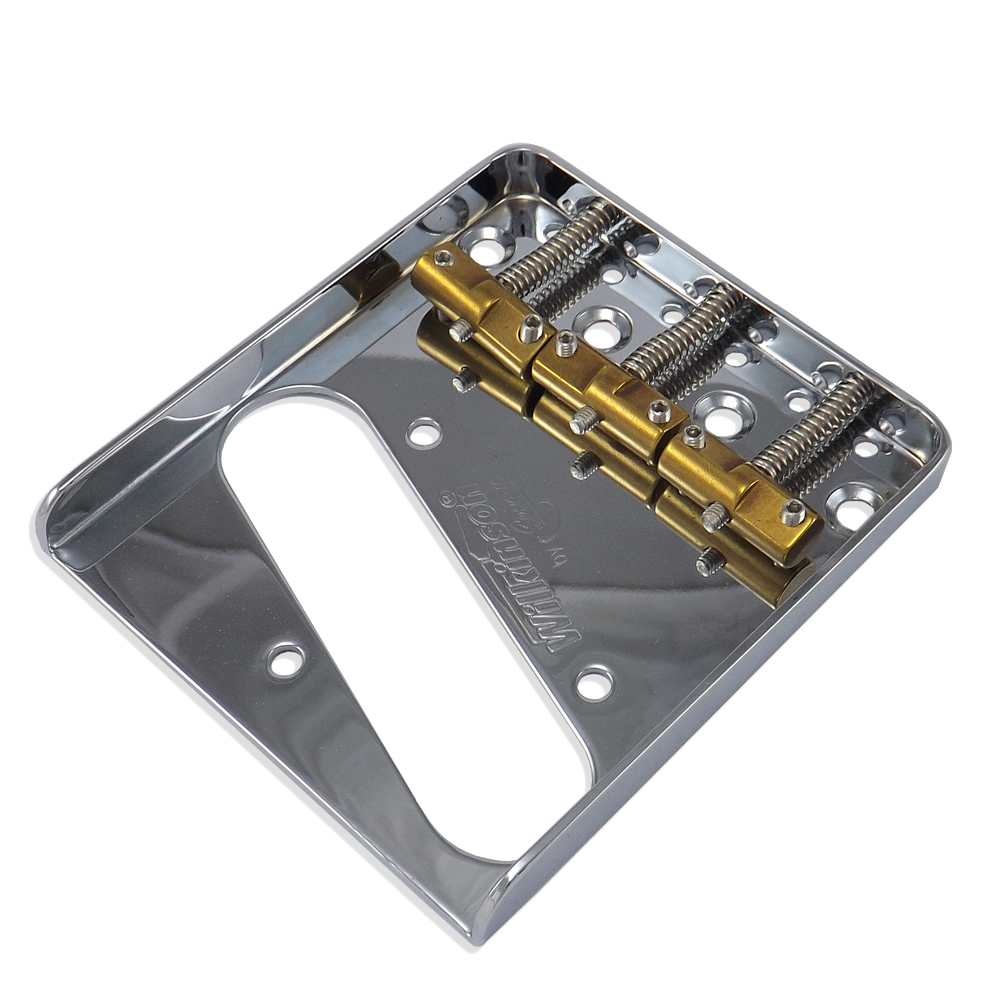
Wilkinson’s and Graph Tech’s designs have two different, preset jump-off points per saddle – one for each string.

These three approaches (Barden, Wilkinson, and Graph Tech) work very well in providing good intonation, while keeping the Telecaster-tone intact, as long as you use string sets with a plain g-string.

pivoting brass saddles

Mastery stainless steel

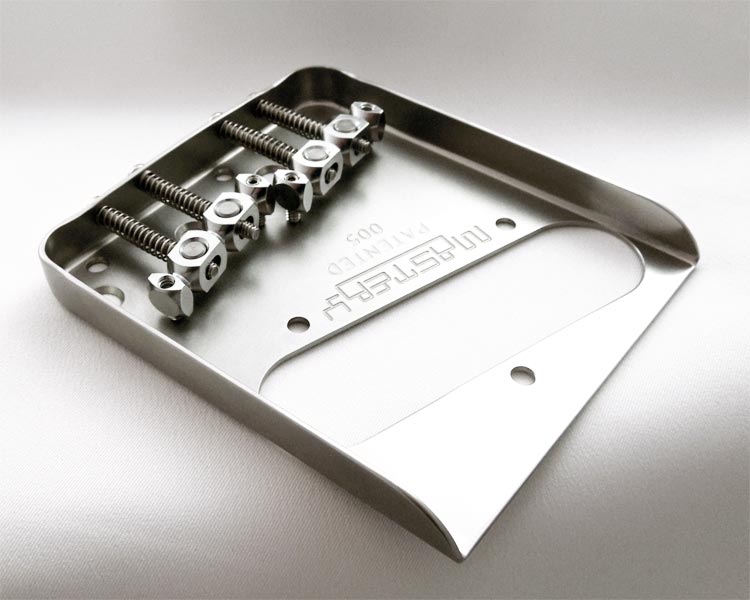
If you want to retain your three-saddle twang, but want to have more freedom in choosing your string gauges, the best way to go are saddles with an angle adjustment. Good examples are Wilkinson’s replacement brass saddles (above), or this stainless steel Tele-bridge by Mastery.

****

p1_u2nu2p1fg_so

How come that the vintage-type Fender Telecaster, with all its intonation flaws, is still in production and still very successful? The answer is that people have always been creative in working out solutions to design shortcomings.

In the Telecaster’s case this means finding a way to ”sweeten” the guitar’s slightly flawed intonation.

Here are three (of a myriad of) possible approaches:

1.) The fifty percent approach

After you’ve put on a set of new strings, use your digital tuner to set the (12th fret) intonation correctly for both E-strings, as well as the g-string (I call them the most critical strings). Then tune your guitar by tuning the open E-strings and the g-string to pitch. The remaining three strings (A, D, and b) are then tuned, so that the pitch at the seventh fret is correct (giving you E, a, and f#).

The A-, D-, and b-strings will be a little off in their intonation going up (or down) from the seventh fret, but overall the pitch will be much sweeter, than if you had tuned these strings to their correct open string pitches. You can then fine-adjust your sweetening by ear, using first position chords as a reference.

2.) Tuner sweetening

After you’ve put on a set of new strings, use your digital tuner to set the (12th fret) intonation, so that each string pair is slightly off in an approximately even way. With the E- and A-pair this would mean that the E-string’s intonation comes out slightly sharp, while the A-string’s intonation is a tiny bit flat. The next pair would see the D-string a bit flat, while the (plain) g-string is a tad sharp. The last pair would have the b-string a bit sharpish, with the e-string a little flat. Then tune the guitar by tuning all strings, so the pitch is correct at the seventh fret.

Now all strings will be a little off in their intonation going up (or down) from the seventh fret, but overall the pitch will be much sweeter, than if you had tuned them to their correct open string pitches. You can then fine-adjust your sweetening by ear, using first position chords as a reference.

3.) Sweetening to the A

After you’ve put on a set of new strings, use your digital tuner to set the (12th fret) intonation, so that each string pair is slightly off in an approximately even way. With the E- and A-pair this would mean that the E-string’s intonation comes out slightly sharp, while the A-string’s intonation is a tiny bit flat. The next pair would see the D-string a bit flat, while the (plain) g-string is a tad sharp. The last pair would have the b-string a bit sharpish, with the e-string a little flat. Then tune your guitar by first tuning the open A-string to pitch. Next, tune all the other strings by ear, using the A-string as your reference:

• E-string at the fifth fret against open A

• D-string at the seventh fret against open A (or A-string 12th fret harmonic)

• g-string at the second fret against open A (or A-string 12th fret harmonic)

• b-string at the tenth fret against open A (or A-string 12th fret harmonic)

• e-string at the fifth fret against open A (or A-string 12th fret harmonic)

You can then fine-adjust your sweetening by ear, using first position chords as a reference.

****

Remember, none of the above tuning tips is set in granite. Tuning and intonating a three-saddle Telecaster is a dark art, and most players have developed their own way of sweetening their guitar’s intonation. Let your ears be your guide!

Fender-American-Special-Telecaster-Olympic-White-Maple004

Kielten vaihtaminen – Les Paul -tyyliset kitarat

Kuvat: Miloš Berka

****

Kielten vaihtamiseen tarvitaan Les Paul -tyylisessä kitarassa kielisatsin lisäksi terävän leikkurin, viritysmittarin ja kitarajohdon. Halpa muovikamppi nopeuttaa virityskoneiston kääntämistä.

Metalliviivoittimella taas mitataan ennen kuin aloittaa kielten korkeus 12:n nauhan kohdalla. Mittaamisen ansiosta kitaran säätäminen soittokuntoon helpoittuu huomattavasti, esimerkiksi jos on jouduttu poistamaan talla.

****

Pidän minun 80-luvun Les Paul Juniorissa kielet pujotettuna kieltenpitimeen edestä vintage-tyylisesti. Seurauksena on hieman pehmeämpi tatsi.

Tällä tavalla Les Paul -tyyliset kitarat nykyään kielitään, mikä näyttää siistimmältä. Molemmat tavat ovat ”sallittuja” – valitse omasi.

****

Teippaan sekä tallan että kieltenpitimen kiinni kitaran kanteen, koska ilman kielten vetoa ne lähtevät helposti irti, mikä voi kieltenvaihdon yhteydessä vahingoittaa kitaran runkoa. Älä missään nimessä käytä sellaista teippiä, joka jättää ikävät (ja usein ikuisetkin) jäljet kitaran lakkaukseen (esim. ilmastointi teippi). Samasta syystä on myös viisasta irrottaa teipit heti kuin kielet on vaihdettu.

Jos kitarasi on uudempi Epiphone tai se on varustettu Tone Pros -metalliosilla teippaamisen ei tarvitse, koska sekä talla että kieltenpidin ovat kiinni tolpissaan.

****

Mielestäni on helpointa ottaa ensin kaikki kielet pois.

****

Kun poistaa ensin virittimen aiheuttama kierre, kielen voi vetää kieltenpitimen läpi ilman turhaa kitkaa.

****

Työnnän kielen kieltenpitimen läpi.

****

Alun perin Juniorini oli varustettu Grover minivirittimillä, mutta vaihdoin vanhat Schaller M6-Vintage -virittimiin muutama vuosi sitten.

****

Suljetut virittimet ovat käytännössä huoltovapaita. Niiden tuntuma voi säätää nupin keskellä olevalla ruuvilla.

****

Minä suosittelen että aloitat uusien kielten laittamisen ”alhaalta” (lähellä satulaa) ja etenet pareissa (E-e, A-h, D-g).

Uusi kieli pujotetaan kokonaan kieltenpitimen läpi. Vasta kuin ball-end-rengas on turvallisesti paikoillaan kieli vedetään tallan yli kohti viritinlapa.

****

Kieli työnnetään virittimen läpi…

…vedetään viritintapin ympäri…

…ja lukitaan paikoilleen vetämällä sitä kohti kitaran logoa.

****

Yksi käsi painaa kielen alas, kun toinen kiertää sen kireäksi. Kielen pitää kiertää tapin ympäri ylhäältä yhä alemmas.

****

Suosittelen ylijäävän palan poistamista katkaisemalla sitä lähellä viritintappia. Sen jälkeen taivutan varovaisesti kielitynkän hieman kohti lapaa. Ole varovainen, katkaistu kieli on hyvin terävä!

****

Jos kaikki meni suunnitelman mukaan, näyttää uusi ala-E tältä.

****

Kielet pitävät virettä nopeammin, jos niitä venytetään ensimmäisten viritysten yhteydessä: ensin viritetään, sitten venytetään…neljän-viiden kerran jälkeen viritys pitäisi alkaa asettua.

Otekäsi pitää kielen alhaalla venymisen yhteydessä, jottei satulaan kohdistaisi liikkaa rasitusta.

Kun kitara on viritetty voidaan mitata uusien kielten korkeus 12:n nauhan yllä. Tarvittaessa säädetään kielten korkeutta nostamalla tallaa (tai laskemalla sitä).

****

Viimeinen vaihe on intonaation tarkistus ja (jos on tarve) säätäminen. Intonaatiota tarkistetaan kitara sylissä soittamalla ensin avoimen kielen (tai kielen huiluääntä 12:n nauhan kohdalla) ja sen jälkeen kieli painettua alas 12:n nauhalla.

Jos alaspainetun kielen sävel on matalampi kuin tavoitettu sävel, tallapalan täyttyy säättää lähemmäksi tallamikrofonia. Tämän jälkeen viritetään uudestaan ja tarkistetaan intonaatiota uudestaan.

Jos alaspainetun kielen sävel on korkeampi kuin tavoitettu sävel, tallapalan täyttyy säättää tallamikrofonista poispäin. Tämän jälkeen viritetään uudestaan ja tarkistetaan intonaatiota uudestaan.

PS: Vanhoissa kitaroissa tune-o-matic-talla voi istua hieman löysästi tolppien päällä. Itse joudun kieltenvaihdon jälkeen aina työntämään tallan bassopuoli varovaisesti kieltenpitimeen suuntaan. Vaikka kyse on vain todella pienestä virheasennosta, seikka vaikuttaa tuntuvasti kitaran intonaatioon!

***

Changing strings – Les Paul -type guitars

Photos: Miloš Berka

****

Here’s what you need:

A pack of strings, a wire cutter, a tuner and a guitar lead. A cheap plastic crank speeds up the whole process of string winding.

A metal ruler comes in handy for measuring the action at the 12th fret before you start. If you take down these measurements it will be easy to readjust your guitar’s action, if you’ve taken off the guitar’s hardware, for example.

****

I keep my 1980s Les Paul Junior strung in the old-school way, with the strings going over the stopbar. This approach gives you a slightly looser feel.

This is how Les Paul -type guitars are usually strung these days, which looks cleaner and neater. Both approaches are valid – take your choice.

****

I use sticky tape to secure the tune-o-matic bridge and stopbar to the body to prevent them from falling off and damaging the guitar. Don’t use adhesives that could mark your guitar, like duct tape, and don’t keep the tape on the guitar for longer than it takes to change strings, if you don’t want to leave (possibly permanent) marks on your finish.

If you own a recent Epiphone guitar, or your guitar is equipped with Tone Pros hardware, the tape is not needed. In these cases the hardware is already fixed to their posts.

****

It’s easiest, in my opinion, to take off all strings once.

****

The old strings are much easier to pull out of the stopbar, once you’ve snipped off the coiled end that was formed by the tuner post.

****

Here I’m pushing the old string through the stopbar.

****

My Junior was equipped originally with Grover Minis, which I replaced with Schaller M6-Vintage tuners a few years ago.

****

Sealed tuners are practically maintenance-free. You can adjust their feel with the small screw at the tip of the tuner buttons.

****

I’d recommend you work your way up from the wrist of the headstock and work in pairs: first E-e, then A-b, and lastly D-g.

Pull the new string all the way through the stopbar, and only pull it over the bridge, once the string’s ball-end is in place inside the stopbar.

****

Insert the string…

…pull it around the post…

…and lock the string in by pulling it up away from the body.

****

Keep the string pressed downwards, while you’re turning the crank. Each new winding should pass under the one before it.

****

I’d recommend cutting off the surplus string in close proximity to the tuning post. Then I bend the stub down towards the headstock face. Be careful, a cut off string is very sharp!

****

If everything went according to plan this is how the new low E-string should look in the tuner.

****

Getting new strings to stay in tune is a much faster process, if you stretch each string carefully. It works like this: First you tune to pitch, then you stretch each string, and retune again. Once you’ve repeated this process four to five times, you should be ready to go.

Your fretting hand should hold down the string you’re stretching at the first or second fret to avoid damage to the top nut.

Once the guitar is in tune you should check the string action at the 12th fret and compare it with the values measured with the old string set. Raise (or lower) the bridge as needed.

****

The last stage should be checking and resetting the guitar’s intonation. Always check your intonation with the guitar in playing position, by comparing the correctly tuned open string (or its 12th fret harmonic) to the fretted pitch at the 12th fret.

If the fretted note is flat (its pitch too low), you need to adjust the bridge saddle closer to the bridge pickup. Give the screw a few turns, then retune and check again. Repeat if necessary.

If the fretted note is sharp (its pitch too high), you need to adjust the bridge saddle further away from the bridge pickup. Give the screw a few turns, then retune and check again. Repeat if necessary.

PS: On older guitars the tune-o-matic-bridge’s bridge post holes may be worn. After a string change, I always have to give the bridge’s bass side a little push towards the stopbar to get it back into its correct position on my Junior. The actual difference in terms of millimeters is only incremental, but it does make a discernible difference to the guitar’s intonation!

***

Changing strings – vintage-style Stratocaster

Photos: Miloš Berka

****

Here’s what you need:

A pack of strings, a wire cutter, a tuner and a guitar lead. A cheap plastic crank speeds up the whole process of string winding.

A metal ruler comes in handy for measuring the vibrato’s tip-up (the distance between the back of the baseplate and the face of the guitar), as well as the action at the 12th fret before you start. If you take down these measurements it will be easy to readjust your guitar’s vibrato and action, should the need arise, due to the new string set differing in gauge compared to the old set.

****

It’s easiest, in my opinion, to take off all of a Strat’s strings once.

****

The old strings are much easier to pull out of the vibrato block, once you’ve snipped off the coiled end that was formed by the tuner post.

****

And out the string comes…

****

On vintage-style Stratocasters the tuners are copies of old Kluson-machines, which feature a well inside the tuner post for the string to go in.

****

It’s a good idea to check the tuners for loose fixing screws, and tighten them carefully, if necessary. Slightly stiff tuners benefit from a drop of oil, applied via the small hole in the tuner’s back cover.

****

I recommend starting with the low E-string, working your way up. This way offers you slightly more manoeuvering space on the headstock than doing it the other way around.

The new string is fed into the vibrato block and through the vibrato’s base plate. Pull the string up first in a straight line away from the body, until you feel the ball-end hitting the top of the vibrato block, before pulling the string towards its tuner.

If you pull the string carelessly through the vibrato block, pulling it towards the tuner before the ball-end has travelled fully through the block, you can easily end up with a kink in the brand-new string, which may well cause breakage, possibly already during the first tune-up.

****

Because of the handy hole in the tuner post, you won’t need the full length of string. Shorten it, by cutting it off at about the second next tuner post (in this case at the D-string’s tuner). Be careful, cutting through a string may cause it to jump at you. The cut-off point is very sharp, so mind your eyes!

****

Feed the start of the new string all the way into the tuner post…

…then bend it towards the headstock, once it’s in.

****

Keep the string pressed downwards, while you’re turning the crank. Each new winding should pass under the one before it.

****

Note that the bridge saddles on a vintage-type Strat feature no groove for string alignment. You can check the correct alignment by looking at the middle pickup. Each string should pass over its magnet approximately through the middle.

Realigning a string is much easier, if you remember to tune down a few turns before pushing the string over the saddle’s surface.

****

Getting new strings to stay in tune is a much faster process, if you stretch each string carefully. It works like this: First you tune to pitch, then you stretch each string, and retune again. Once you’ve repeated this process four to five times, you should be ready to go (a floating vibrato may need a few tugs and retunings more).

Your fretting hand should hold down the string you’re stretching at the first or second fret to avoid damage to the top nut.

Once the guitar is in tune you should check the tip-up of the bridge and the string action at the 12th fret and compare it with the values measured with the old string set. Adjust the tip-up first by changing the position of the spring claw inside the back compartment, before adjusting the action via the bridge saddles’ adjustment screws.

****

The last stage should be checking and resetting the guitar’s intonation. Always check your intonation with the guitar in playing position, by comparing the correctly tuned open string (or its 12th fret harmonic) to the fretted pitch at the 12th fret.

If the fretted note is flat (its pitch too low), you need to adjust the bridge saddle closer to the bridge pickup. Give the screw a few turns, then retune and check again. Repeat if necessary.

If the fretted note is sharp (its pitch too high), you need to adjust the bridge saddle further away from the bridge pickup. Give the screw a few turns, then retune and check again. Repeat if necessary.

***

Kielten vaihtaminen – vintage-tyylinen Stratocaster

Kuvat: Miloš Berka

****

Kielten vaihtamiseen tarvitaan vintage-tyylisessä Stratocasterissa kielisatsin lisäksi terävän leikkurin, viritysmittarin ja kitarajohdon. Halpa muovikamppi nopeuttaa virityskoneiston kääntämistä.

Metalliviivoittimella taas mitataan ennen kuin aloittaa vibraton aluslevyn takareunan etäisyyttä runkoon sekä kielten korkeus 12:n nauhan kohdalla. Mittaamisen ansiosta kitaran säätäminen soittokuntoon helpoittuu huomattavasti, silloin kun on vaihdettu kielten paksuutta.

****

Mielestäni Stratossa on helpointa ottaa ensin kaikki kielet pois.

****

Kun poistaa ensin virittimen aiheuttama kierre, kielen voi vetää vibrablokin läpi ilman turhaa kitkaa.

****

Vanha kieli vedetään rungon takaosasta ulos.

****

Vintage-tyylisissä Stratoissa käytetään vanhojen Kluson-virittimien kopiot, joissa on tapin keskellä kanava terävälle kielipäälle.

****

Nyt on hyvä hetki kiristää varovaisesti virittimien kiinnitysruuveja. Jos virittimet ovat hieman jäykistineet voi kotelon reiän läpi lisätä tilkkua öljyä koneistoon.

****

Aloitan aina ala-E-kielestä ja jatkan sitten ylöspäin.

Uusi kieli pujotetaan vibrablokin läpi ja vedetään ensin suoraan poispäin rungon etupuolesta. Vasta kun ball-end-niminen metallirengas on saavuttanut kanavan loppupään, vedetään kieli viritinlavalle.

Jos ball-end-rengas ei ole vielä oikeassa kohdassa uusi kieli taipuu ensin väärästä kohdasta, mikä voi aiheuttaa sen katkeamista viritettäessä.

****

Uusi kieli lyhennetään sopivasti – noin kaksi virittimiä oikean tapin ohi. Varo silmiäsi, kieli voi tulla yllättävästi vastaan! Kielipää on aika terävä!

****

Kielipää upotetaan huolellisesti tapin kanavaan…

…ja kieli taivutetaan lapaa kohti.

****

Yksi käsi painaa kielen alas, kun toinen kiertää sen kireäksi. Kielen pitää kiertää tapin ympäri ylhäältä yhä alemmas.

****

Vintage Straton tallapaloissa ei ole kieltä kohdistava ura. Kun kaikki kielet ovat paikoillaan tasaisen etäisyyden voi tarkistaa keskimikistä. Jokaisen kielen pitäisi mennä kutakuinkin keskimikrofonin magneetin keskikohtaa läpi.

Kun virittää kielen ensin hieman alas, on helpompi työntää sen oikeaan paikkaan.

****

Kielet pitävät virettä nopeammin, jos niitä venytetään ensimmäisten viritysten yhteydessä: ensin viritetään, sitten venytetään…neljän-viiden kerran jälkeen viritys pitäisi alkaa asettua (jos vibra on säädetty kelluvaksi, se voi kestää kauemminkin).

Otekäsi pitää kielen alhaalla venymisen yhteydessä, jottei satulaan kohdistaisi liikkaa rasitusta.

Kun kitara on viritetty voidaan mitata uusien kielten korkeus 12:n nauhan yllä sekä tarkistaa onko tallan asento sama kuin vanhoilla kielillä. Tarvittaessa säädetään ensin vibran aluslevyn korkeutta (kiristimällä tai löystämällä jouset rungon takapuolella). Tämän jälkeen viritetään uudestaan ja säädetään tarvittaessa kielten korkeus uudestaan tallapalojen ruuveilla.

****

Viimeinen vaihe on intonaation tarkistus ja (jos on tarve) säätäminen. Intonaatiota tarkistetaan kitara sylissä soittamalla ensin avoimen kielen (tai kielen huiluääntä 12:n nauhan kohdalla) ja sen jälkeen kieli painettua alas 12:n nauhalla.

Jos alaspainetun kielen sävel on matalampi kuin tavoitettu sävel, tallapalan täyttyy säättää lähemmäksi tallamikrofonia. Tämän jälkeen viritetään uudestaan ja tarkistetaan intonaatiota uudestaan.

Jos alaspainetun kielen sävel on korkeampi kuin tavoitettu sävel, tallapalan täyttyy säättää tallamikrofonista poispäin. Tämän jälkeen viritetään uudestaan ja tarkistetaan intonaatiota uudestaan.

***

Pidä blogia WordPress.comissa.

Ylös ↑