
Löydät oppaan TÄÄLTA.

Kitarablogi.com – Finland's premier Guitar and Bass blog
Juttuja kitaroista ja bassoista


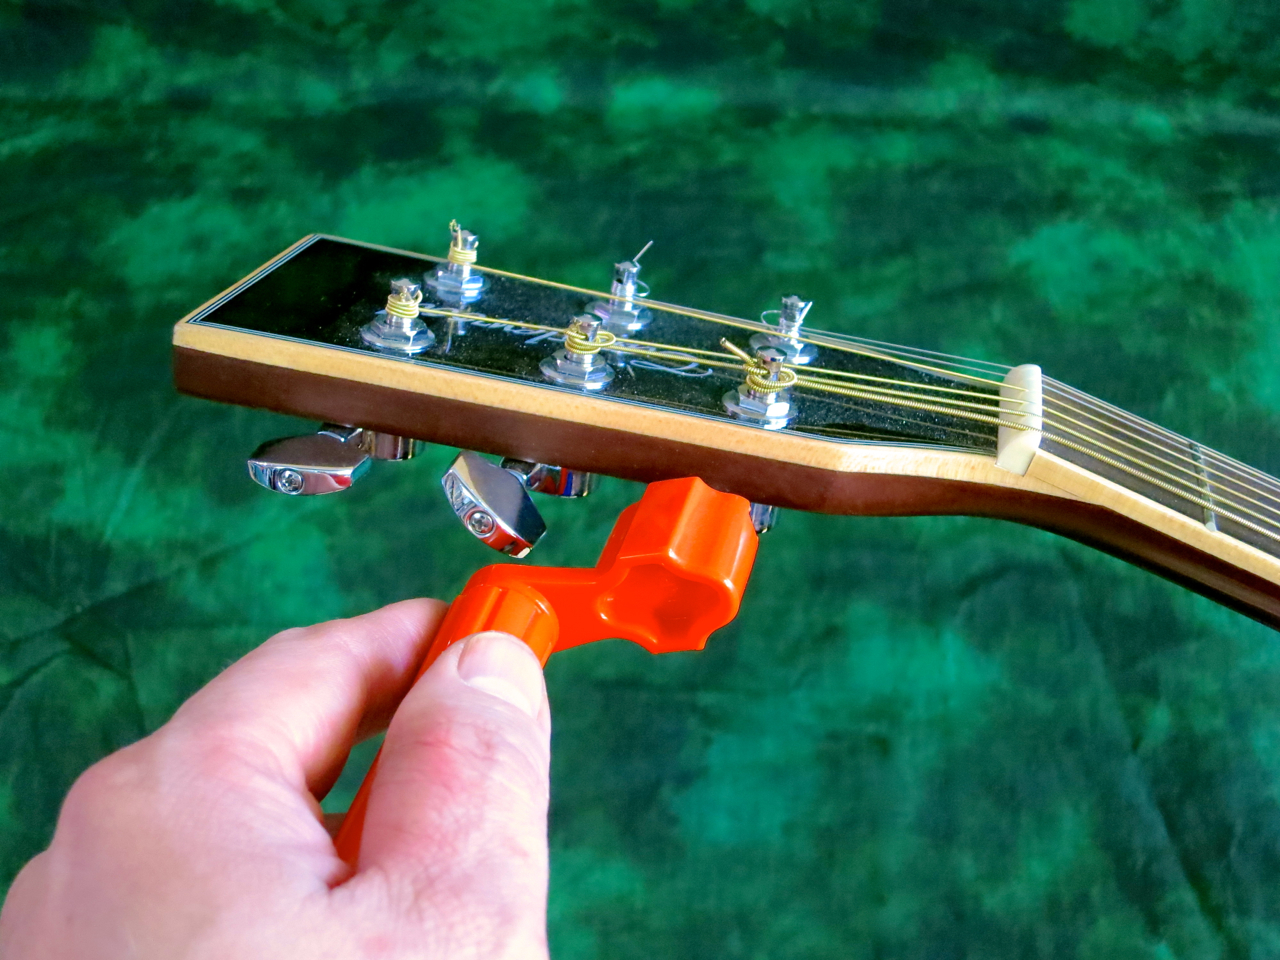
Kielten vaihtamiseen tarvitaan teräskielisessä kitarassa kielisatsin lisäksi terävän leikkurin, sekä viritysmittarin. Halpa muovikampi nopeuttaa virittimien kääntämistä.
Metalliviivoittimella taas mitataan ennen kuin aloitetaan kielten korkeus 12:n nauhan kohdalla. Mittaamisen ansiosta kaularaudan säätäminen helpottuu huomattavasti, jos uusi kielisatsi on ohuempi tai paksumpi kuin vanha. Parasta olisi kuitenkin aina vaihtaa samanpaksuiset kielet päälle – näin soittotuntuma pysyy muuttamattomana, eikä kaularautaa tarvitse silloin tavallisesti säätää.
Mielestäni on helpointa ottaa ensin kaikki kielet pois.
Jotkut väittävät, että akustisissa kitaroissa kaikkien kielten yhtäaikainen poistaminen olisi jotenkin soittimelle vahingollista, mutta itse olen aina (vuodesta 1977 lähtien) vaihtanut kielet näin, enkä ole tähän mennessä vielä rikkonut yhtäkään kitaraa. Myös Martin Guitarsin omassa videossa poistetaan heti koko kielisatsi.

Kun kielet ovat täysin löysiä, leikkaan ne keskeltä poikki.
Tämä ei ole välttämättömyys, mutta minusta lyhyet pätkät ovat helpompia käsitellä kuin täyspitkät kitaran kielet.

Teräskielisissä kitaroissa kielet on kiinnitetty tallaan ns. tallanastoilla (engl. bridge pin), jotka voivat olla muovista, luusta, puusta tai metallista.
Tallanastojen nostamiseen on lähes kaikissa viritinvivuissa pieni syvennys. Tavallisesti tallanasta ja kielen ball-end-rengas ovat näin jumissa, että vipua ei kannata käyttää nastan nostamiseksi, ainakaan heti.

Useimmissa tapauksissa kielen saa pois käsipelillä:
Työnnä ensin kielen hieman tallan läpi runkoon.
Tämä vapauttaa yleensä tallanastan ball-end-renkaan lukituksesta, ja nastan voi nostaa helposti ulos.
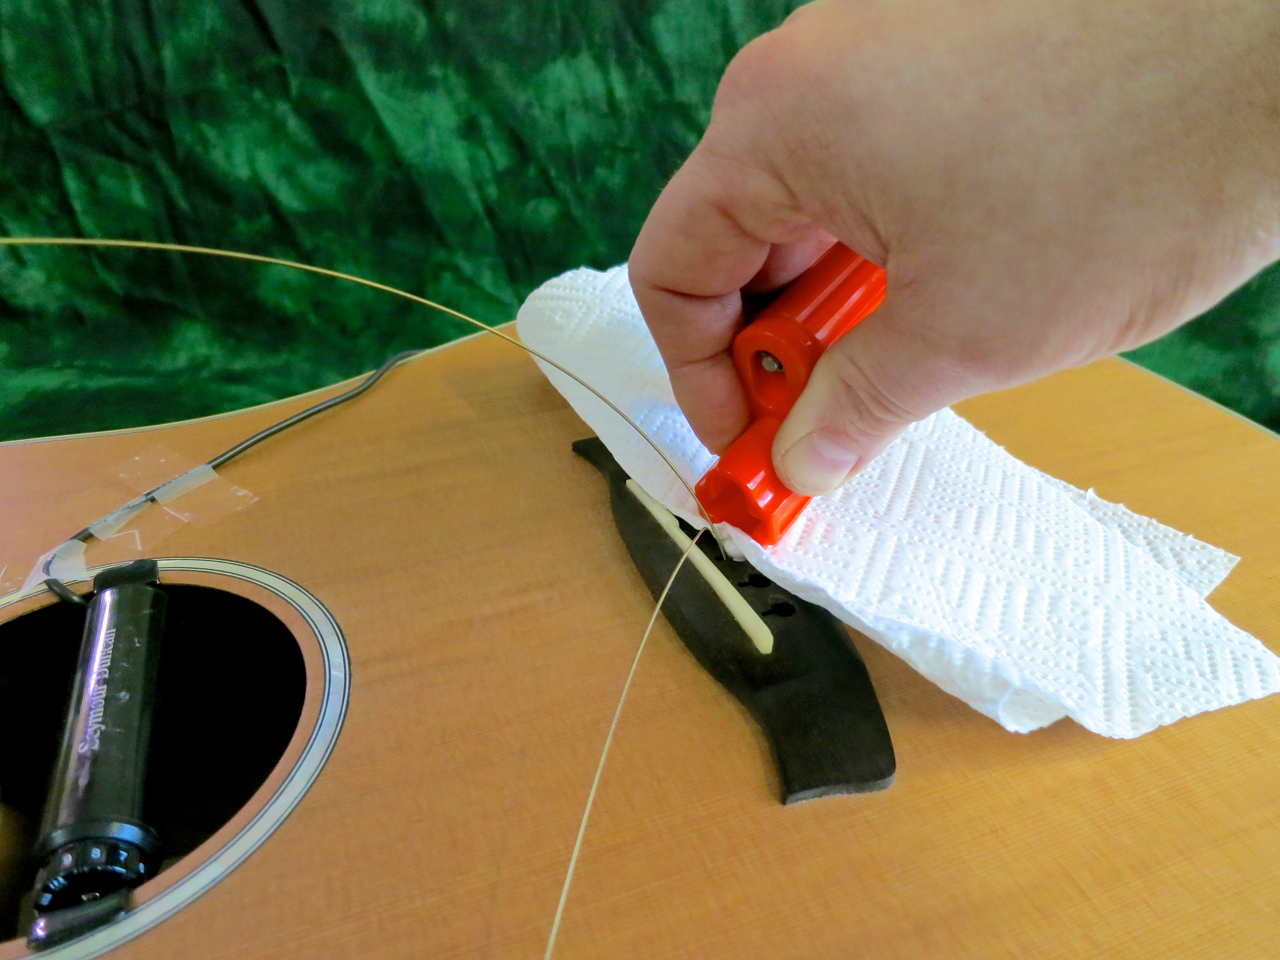
Jos tallanastaa ei saa – yrityksistä huolimatta – pois käsipelillä, suosittelisin talouspaperin (tai ohuen kangaspalan) käyttämistä tallan ja tallanastan suojaksi.

Joissakin kitaroissa – etenkin tietyissä Ovation- ja Takamine-malleissa – löytyy myös nastattomia tallaratkaisuja. Näissä talloissa kielet pujotetaan yksinkertaisesti tallan takaosan läpi.

Tämän jälkeen poistetaan vanhat kielet myös virittimien tapeista.
Kun kaikki vanhat kielet on poistettu, voi tarvittaessa öljytä otelaudan ja tallan sopivalla otelautaöljyllä.

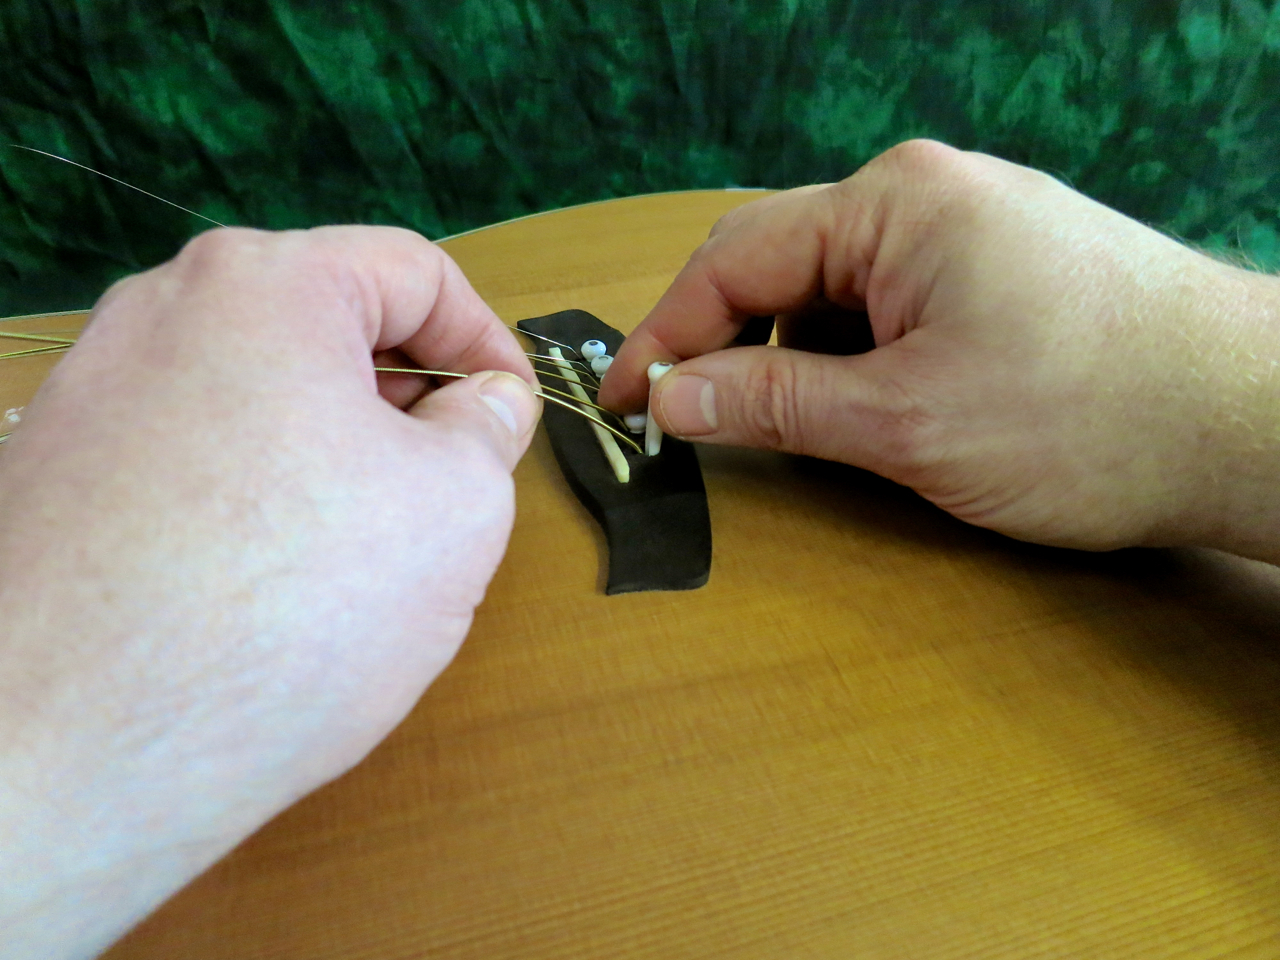
Uudet kielet kiinnitetään aina ensin soittimen tallaan, laittamalla ball-endin ja tallanastan paikoilleen.

Seuraavaksi kieli vedetään kevyesti ulospäin, samalla kun pidetään tallanastaa paikalla. Näin kiilataan se tallanasta ball-endin avulla kiinni tallaan.

Lavalla kieli työnnetään virittimen läpi…

…vedetään viritintapin ympäri…

…ja lukitaan paikoilleen vetämällä sitä rungosta poispäin.
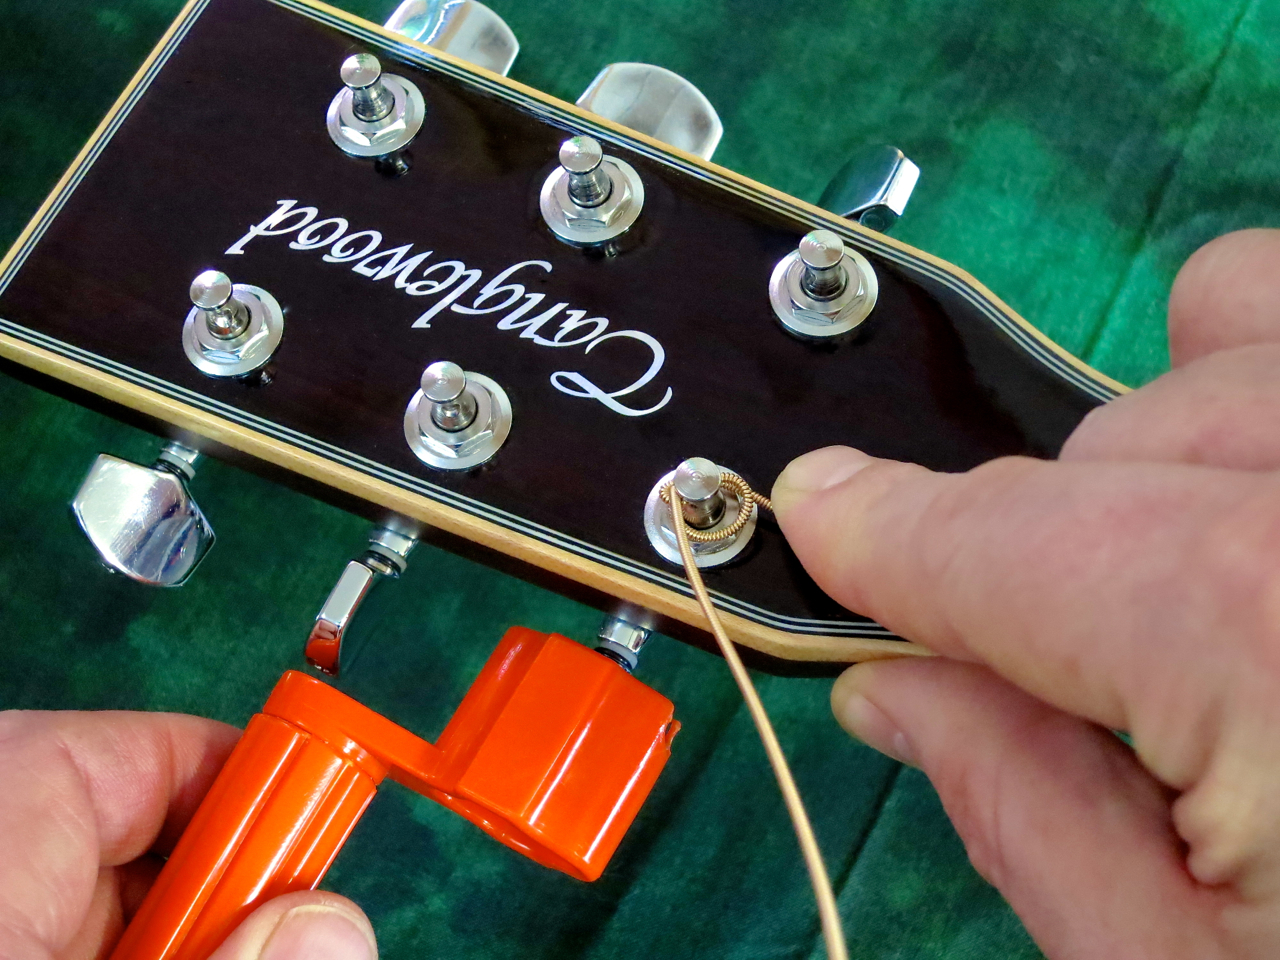
Yksi käsi painaa kielen alas, kun toinen kiertää sen kireäksi. Kielen pitää kiertää tapin ympäri ylhäältä yhä alemmas.

Kun viritin alkaa kiristää kieltä yhä enemmän, otan toisen käteni pois lavalta, jotta voin tarvittaessa estää tallanastan nousemista ulos tallasta.

Suosittelen ylijäävän palan poistamista – kun kieli on viritetty – katkaisemalla sen läheltä viritintappia. Sen jälkeen taivutan varovaisesti kielityngän hieman kohti lapaa. Ole varovainen, katkaistu kieli on hyvin terävä!
Laitan uudet kielet kitaralle tavallisesti pareittain – ensin E-e, sitten A-h ja viimeiseksi D-g.

Onnistunut lopputulos näyttää tällaiselta.
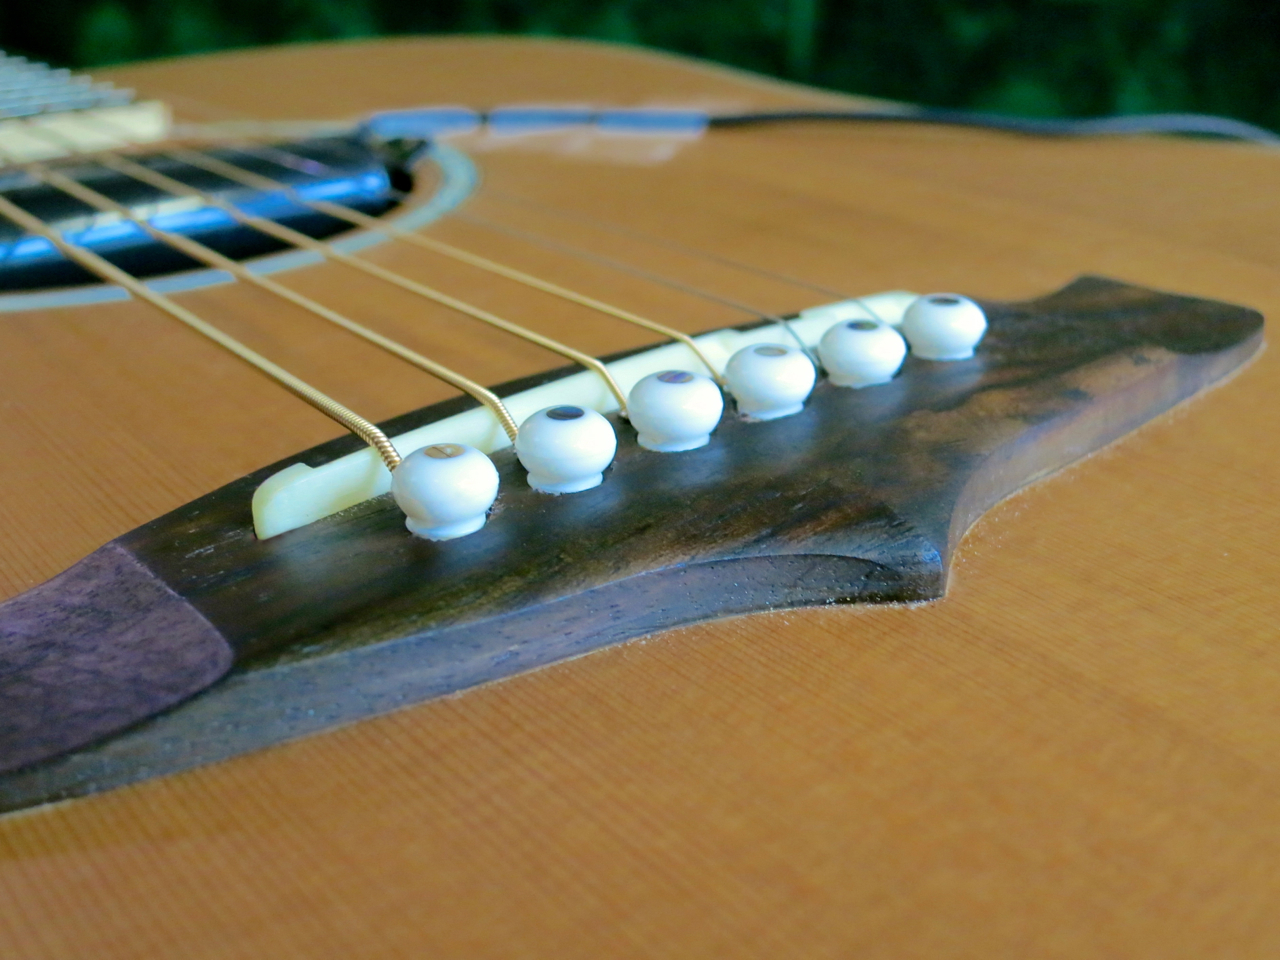
Tallanastat istuvat tasaisesti tallassa.
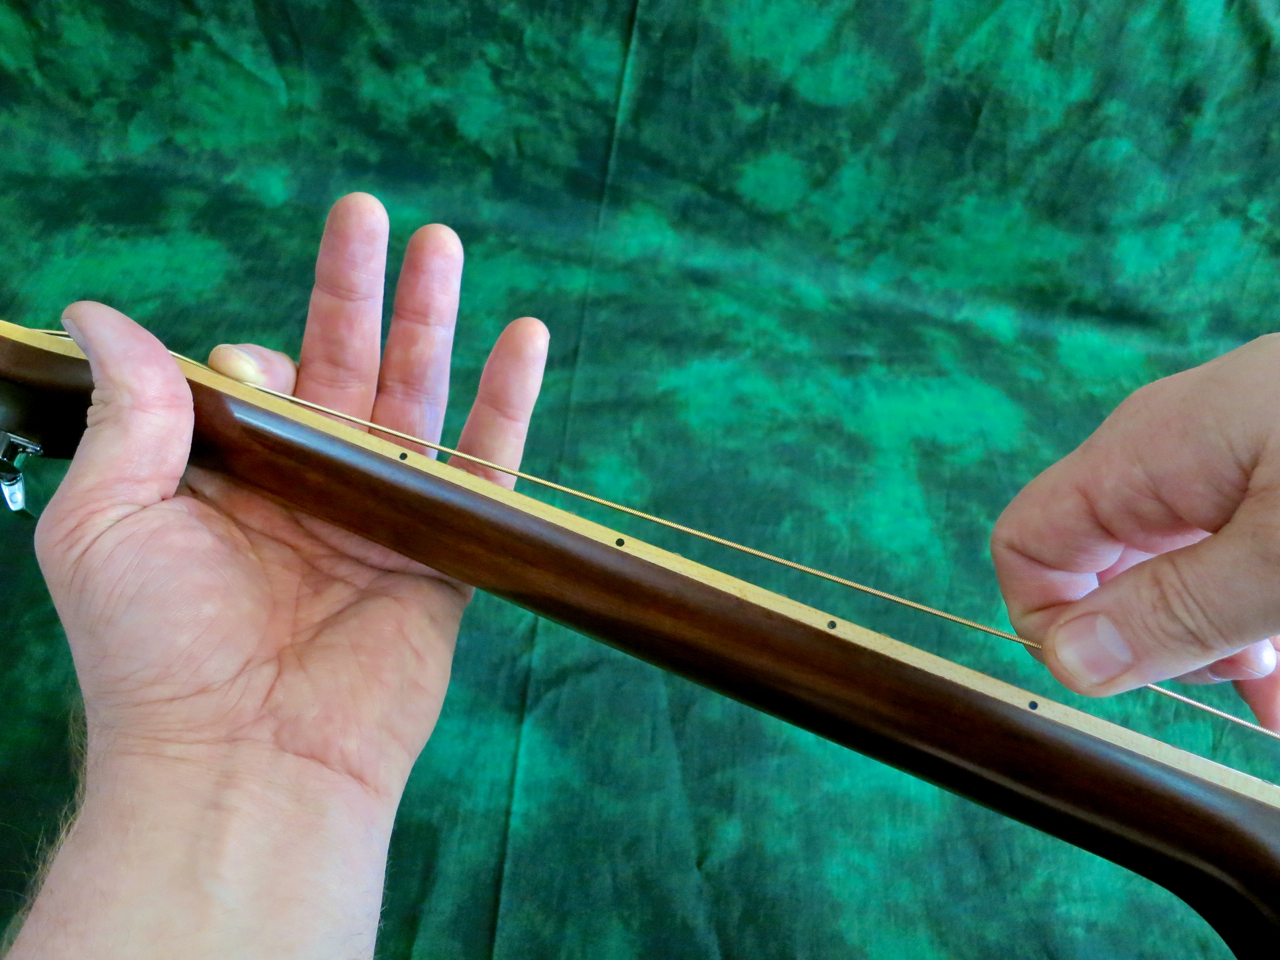
Kielet pitävät vireen nopeammin, jos niitä venytetään ensimmäisten viritysten yhteydessä: ensin viritetään, sitten venytetään… neljän-viiden kerran jälkeen virityksen pitäisi alkaa asettua.
Otekäsi pitää kielen alhaalla venymisen yhteydessä, jottei satulaan kohdistuisi liikkaa rasitusta.
****
Kun kitara on viritetty, voidaan tarkistaa vielä uusien kielten korkeus 12:n nauhan yllä.
Jos kielten korkeus on selvästi suurempi kuin ennen kielten vaihtamista, uusi kielisatsi oli luultavasti paksumpi kuin vanha. Silloin kannattaa kiristää kaularautaa (sopivalla avaimella) noin neljänneskierrosta (korkeintaan puolen kierroksen).
Jos kielten korkeus on selvästi pienempi kuin ennen kielten vaihtamista, uusi kielisatsi oli luultavasti ohuempi kuin vanha. Silloin kannattaa löysätä kaularautaa (sopivalla avaimella) noin neljänneskierrosta (korkeintaan puolen kierroksen).
Kaularaudan tarkoitus on säätää kaulan loivaa kaarevuutta (ns. neck relief). Vaikka kaulan reliefilla on suora vaikutus kielten korkeuteen, kaularauta ei ole varsinaisesti tarkoitettu säätämään kielten korkeutta. Kielten korkeuden oikeaoppinen muuttaminen on soitinrakentajan homma, ja sitä hoidetaan hiomalla (tai vaihtamalla) soittimen tallaluu.

Here’s what you need:
In addition to a fresh set of strings, you should have a wire cutter and a tuner at the ready. An inexpensive string winder makes the process much faster.
A steel rule will come in handy, should you want to double-check your ”before” and ”after” setups. Measure your string height at the 12th fret (top of fret to bottom of string) before taking the old strings off. That way you will be able to use the steel rule to ascertain that your setup has stayed unchanged. Alternatively, you could also measure the neck relief at the seventh fret directly, by using a capo at the first fret, while pressing down the low E-string at the 14th fret.
Ideally, though, you should stick to the exact same string gauge (and even string brand) to avoid inadvertently changing the playability of your acoustic guitar.
I find it most convenient to take off all strings at once.
There are some people who claim that taking all six strings off at the same time may cause damage to your instrument. Let me tell you, I have been changing strings on steel-string guitars since 1977, always removing the whole set at once, and have never had any problems at all. Even Martin Guitars suggest you do it this way in their own video, and they should know!
Once the strings are completely loose and flabby, I cut them in half.
This isn’t something you must do, but I find the shorter lengths easier to handle, than having to deal with the whole string.
For the largest part, steel-string acoustics come with pin bridges. The bridge pins – made out of plastic, bone, wood or even metal – keep the ball-ends locked into place.
Most string winders sport a small cut-out for lifting the bridge pins. I’d suggest, though, that you first try extracting the pins by hand, because, very often, the ball-ends have jammed the pins in place fairly tightly. Trying to pull them out directly might damage your string winder or the bridge pins, or, even worse, the bridge itself.
Most of the time you will be able to extract the bridge pins by hand:
Start by pushing the ball-end down (into the body) by a centimetre, or so.
Usually, this is all that’s needed to unjam the bridge pin.
If a pin really is stuck, and can’t be lifted out with your fingers, I’d strongly suggest using a piece of tissue paper (or a piece of cloth) as a cushion to protect the pin and the bridge’s surface.
Some acoustic guitars come equipped with a pinless bridge – most notable Ovation and some Takamines. With these bridges, all you have to do is pull the ball-ends out of the back of the bridge.
At the headstock end you have to untie the strings and take them off the tuner posts.
If your guitar’s fretboard and/or bridge feel (or look) a little dry, now would be the perfect time for applying a little fretboard oil.
You start putting on a new string by feeding the ball-end into the appropriate bridge hole, while inserting the bridge pin.
By pulling the string up a little, while holding the pin down, you will conveniently get the ball-end to jam the bridge pin in place.
Next you feed the string through the tuner’s post…
…pull the string away from the body, and around the post…
…and, finally, lock the string end in place.
Keep the string pressed downwards, while you’re turning the crank. Each new winding should pass under the one before it.
When the string starts getting taut, I move my hand from the headstock to the bridge, to make sure the bridge pin stays firmly in place.
I’d recommend cutting off the surplus string in close proximity to the tuning post. Then I bend the stub down towards the headstock face. Be careful, a cut-off string is very sharp!
I put on the fresh strings in pairs, working my way away from the nut – first the two e-strings, then the pair of A and b, and lastly the D- and g-strings.
This is what the result should look like at the headstock end.
The bridge pins should sit at a uniform height above the surface of the bridge.
Getting new strings to stay in tune is a much faster process, if you stretch each string carefully. It works like this: First you tune to pitch, then you stretch each string, and retune again. Once you’ve repeated this process four to five times, you should be ready to go.
Your fretting hand should hold down the string you’re stretching at the first or second fret to avoid damage to the top nut.
****
Once the guitar is in tune you could check the string action at the 12th fret and compare it with the values measured with the old string set.
If the action is noticeably higher, chances are you’ve put on a heavier gauge set of strings. You need to compensate for the stronger string pull by tightening the truss rod (with the correct tool) by a quarter of a turn (or half a turn, at the most).
If the action is noticeably lower, chances are you’ve put on a lighter gauge set of strings. You need to compensate for the weaker string pull by loosening the truss rod (with the correct tool) by a quarter of a turn (or half a turn, at the most).
The truss rod is meant solely for neck relief adjustment. Even though adjusting the neck relief does have an impact on the action, string height adjustment isn’t really what the truss rod is meant for. Adjusting the action on a steel-string acoustic is usually a job for a luthier, and is achieved by changing the height of the bridge saddle.
