


Maahantuoja: F-Musiikki
Kitarablogi.com – Finland's premier Guitar and Bass blog
Juttuja kitaroista ja bassoista


Kielten vaihtamiseen tarvitaan teräskielisessä kitarassa kielisatsin lisäksi terävän leikkurin, sekä viritysmittarin. Halpa muovikampi nopeuttaa virittimien kääntämistä.
Metalliviivoittimella taas mitataan ennen kuin aloitetaan kielten korkeus 12:n nauhan kohdalla. Mittaamisen ansiosta kaularaudan säätäminen helpottuu huomattavasti, jos uusi kielisatsi on ohuempi tai paksumpi kuin vanha. Parasta olisi kuitenkin aina vaihtaa samanpaksuiset kielet päälle – näin soittotuntuma pysyy muuttamattomana, eikä kaularautaa tarvitse silloin tavallisesti säätää.
Mielestäni on helpointa ottaa ensin kaikki kielet pois.
Jotkut väittävät, että akustisissa kitaroissa kaikkien kielten yhtäaikainen poistaminen olisi jotenkin soittimelle vahingollista, mutta itse olen aina (vuodesta 1977 lähtien) vaihtanut kielet näin, enkä ole tähän mennessä vielä rikkonut yhtäkään kitaraa. Myös Martin Guitarsin omassa videossa poistetaan heti koko kielisatsi.

Kun kielet ovat täysin löysiä, leikkaan ne keskeltä poikki.
Tämä ei ole välttämättömyys, mutta minusta lyhyet pätkät ovat helpompia käsitellä kuin täyspitkät kitaran kielet.

Teräskielisissä kitaroissa kielet on kiinnitetty tallaan ns. tallanastoilla (engl. bridge pin), jotka voivat olla muovista, luusta, puusta tai metallista.
Tallanastojen nostamiseen on lähes kaikissa viritinvivuissa pieni syvennys. Tavallisesti tallanasta ja kielen ball-end-rengas ovat näin jumissa, että vipua ei kannata käyttää nastan nostamiseksi, ainakaan heti.

Useimmissa tapauksissa kielen saa pois käsipelillä:
Työnnä ensin kielen hieman tallan läpi runkoon.
Tämä vapauttaa yleensä tallanastan ball-end-renkaan lukituksesta, ja nastan voi nostaa helposti ulos.
Jos tallanastaa ei saa – yrityksistä huolimatta – pois käsipelillä, suosittelisin talouspaperin (tai ohuen kangaspalan) käyttämistä tallan ja tallanastan suojaksi.

Joissakin kitaroissa – etenkin tietyissä Ovation- ja Takamine-malleissa – löytyy myös nastattomia tallaratkaisuja. Näissä talloissa kielet pujotetaan yksinkertaisesti tallan takaosan läpi.

Tämän jälkeen poistetaan vanhat kielet myös virittimien tapeista.
Kun kaikki vanhat kielet on poistettu, voi tarvittaessa öljytä otelaudan ja tallan sopivalla otelautaöljyllä.

Uudet kielet kiinnitetään aina ensin soittimen tallaan, laittamalla ball-endin ja tallanastan paikoilleen.

Seuraavaksi kieli vedetään kevyesti ulospäin, samalla kun pidetään tallanastaa paikalla. Näin kiilataan se tallanasta ball-endin avulla kiinni tallaan.

Lavalla kieli työnnetään virittimen läpi…

…vedetään viritintapin ympäri…

…ja lukitaan paikoilleen vetämällä sitä rungosta poispäin.
Yksi käsi painaa kielen alas, kun toinen kiertää sen kireäksi. Kielen pitää kiertää tapin ympäri ylhäältä yhä alemmas.

Kun viritin alkaa kiristää kieltä yhä enemmän, otan toisen käteni pois lavalta, jotta voin tarvittaessa estää tallanastan nousemista ulos tallasta.

Suosittelen ylijäävän palan poistamista – kun kieli on viritetty – katkaisemalla sen läheltä viritintappia. Sen jälkeen taivutan varovaisesti kielityngän hieman kohti lapaa. Ole varovainen, katkaistu kieli on hyvin terävä!
Laitan uudet kielet kitaralle tavallisesti pareittain – ensin E-e, sitten A-h ja viimeiseksi D-g.

Onnistunut lopputulos näyttää tällaiselta.
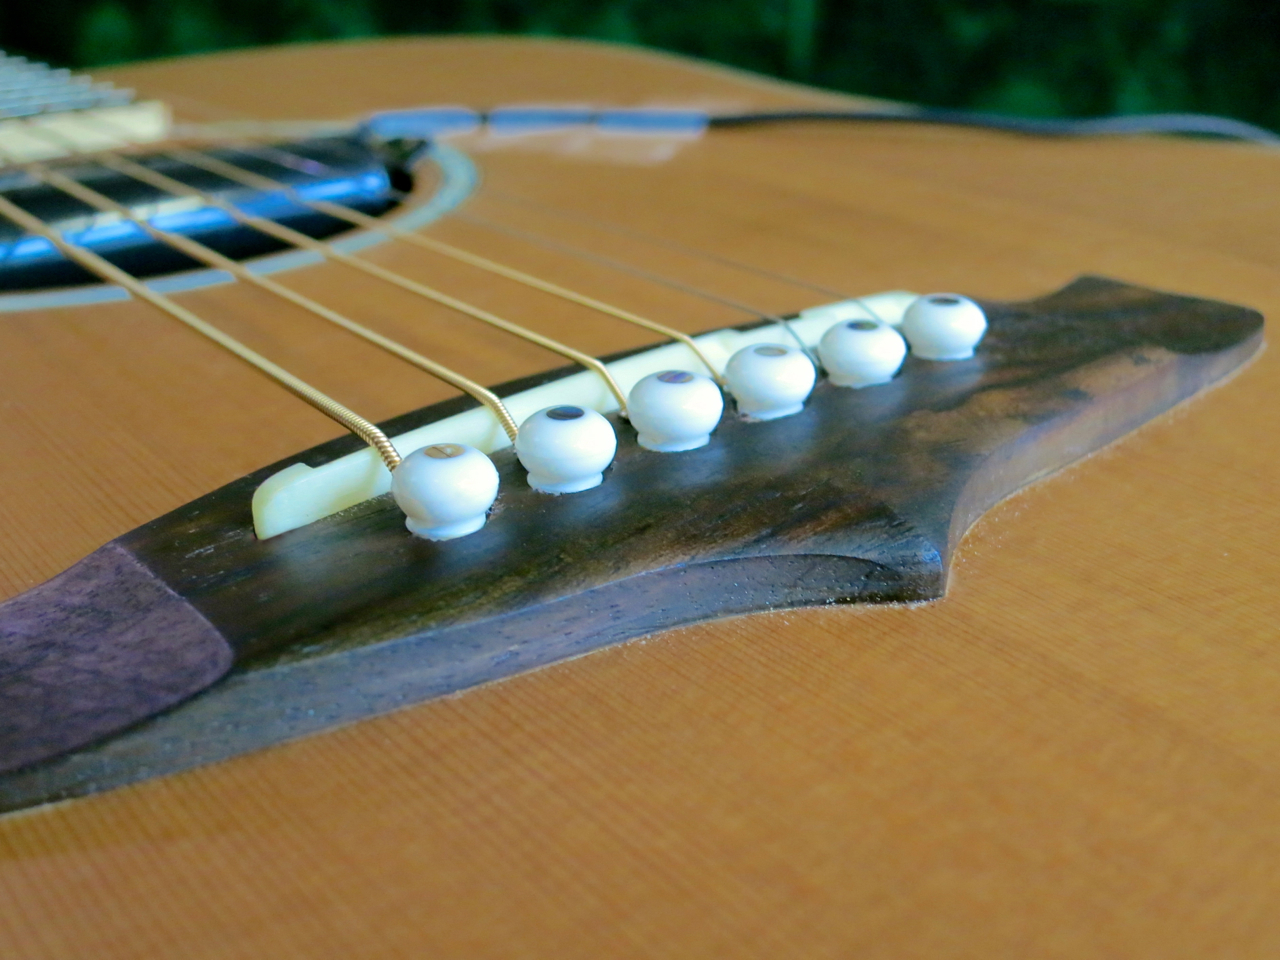
Tallanastat istuvat tasaisesti tallassa.
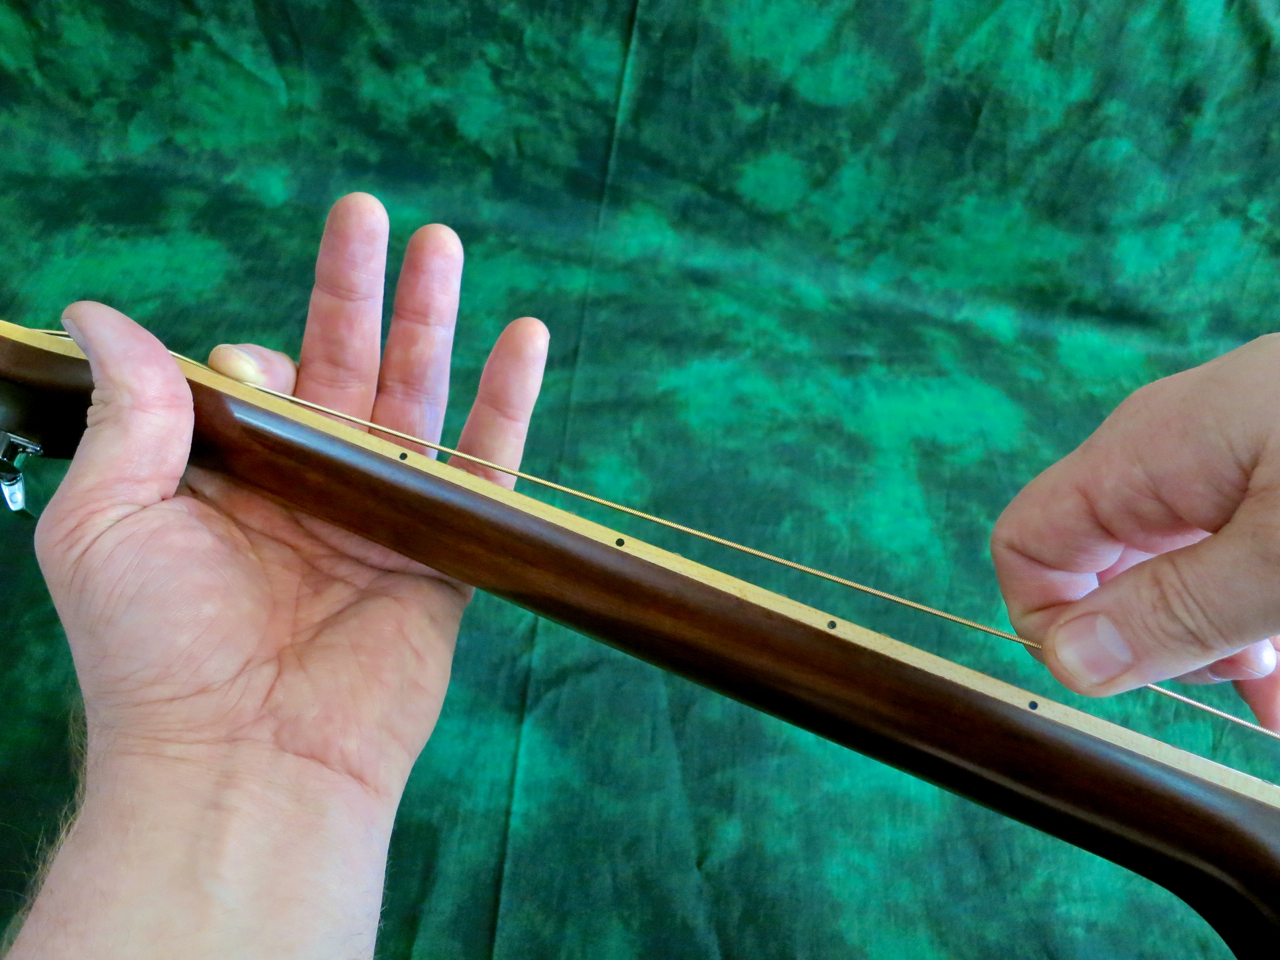
Kielet pitävät vireen nopeammin, jos niitä venytetään ensimmäisten viritysten yhteydessä: ensin viritetään, sitten venytetään… neljän-viiden kerran jälkeen virityksen pitäisi alkaa asettua.
Otekäsi pitää kielen alhaalla venymisen yhteydessä, jottei satulaan kohdistuisi liikkaa rasitusta.
****
Kun kitara on viritetty, voidaan tarkistaa vielä uusien kielten korkeus 12:n nauhan yllä.
Jos kielten korkeus on selvästi suurempi kuin ennen kielten vaihtamista, uusi kielisatsi oli luultavasti paksumpi kuin vanha. Silloin kannattaa kiristää kaularautaa (sopivalla avaimella) noin neljänneskierrosta (korkeintaan puolen kierroksen).
Jos kielten korkeus on selvästi pienempi kuin ennen kielten vaihtamista, uusi kielisatsi oli luultavasti ohuempi kuin vanha. Silloin kannattaa löysätä kaularautaa (sopivalla avaimella) noin neljänneskierrosta (korkeintaan puolen kierroksen).
Kaularaudan tarkoitus on säätää kaulan loivaa kaarevuutta (ns. neck relief). Vaikka kaulan reliefilla on suora vaikutus kielten korkeuteen, kaularauta ei ole varsinaisesti tarkoitettu säätämään kielten korkeutta. Kielten korkeuden oikeaoppinen muuttaminen on soitinrakentajan homma, ja sitä hoidetaan hiomalla (tai vaihtamalla) soittimen tallaluu.

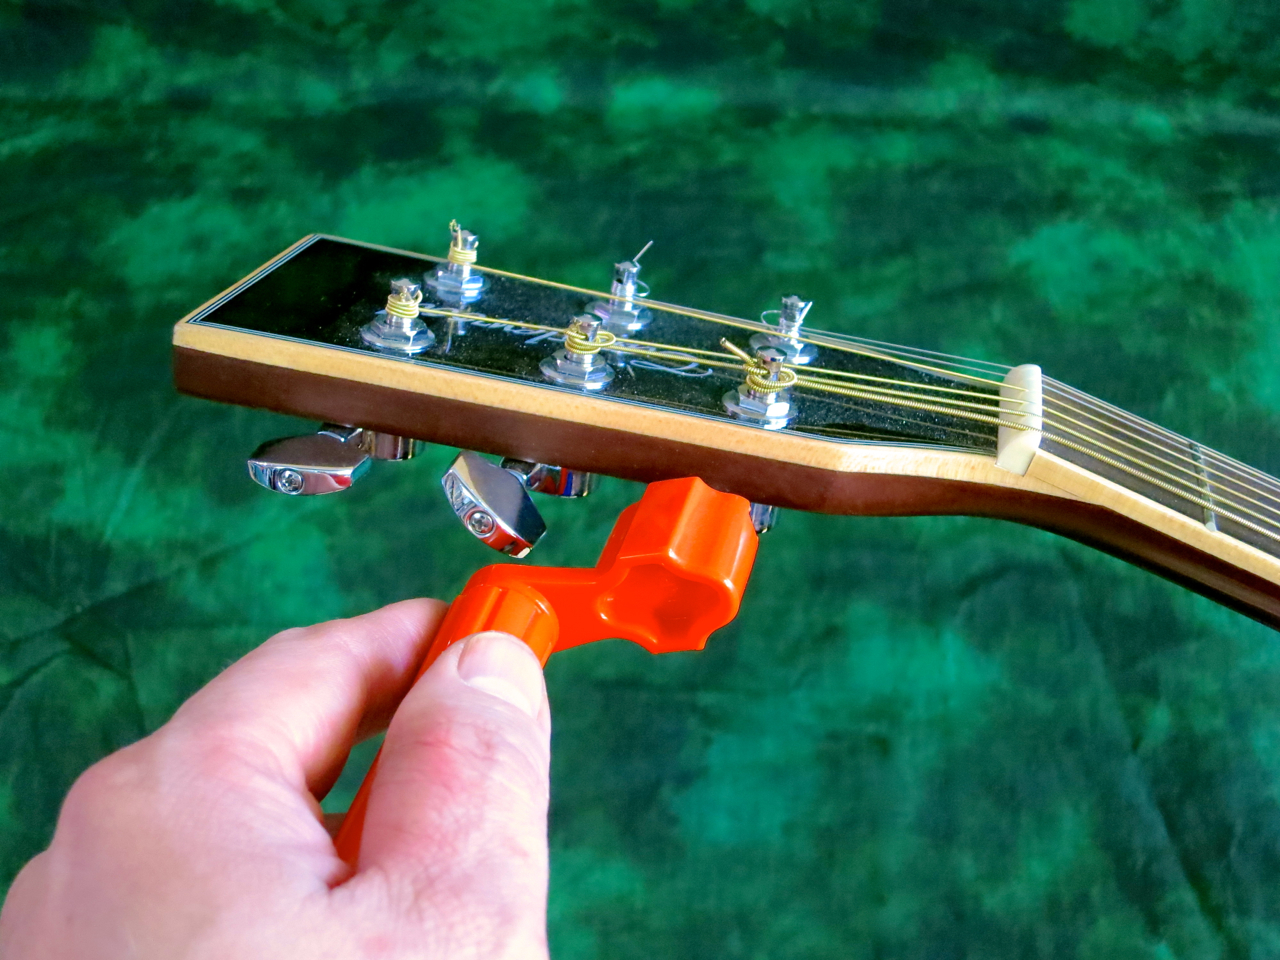
Here’s what you need:
In addition to a fresh set of strings, you should have a wire cutter and a tuner at the ready. An inexpensive string winder makes the process much faster.
A steel rule will come in handy, should you want to double-check your ”before” and ”after” setups. Measure your string height at the 12th fret (top of fret to bottom of string) before taking the old strings off. That way you will be able to use the steel rule to ascertain that your setup has stayed unchanged. Alternatively, you could also measure the neck relief at the seventh fret directly, by using a capo at the first fret, while pressing down the low E-string at the 14th fret.
Ideally, though, you should stick to the exact same string gauge (and even string brand) to avoid inadvertently changing the playability of your acoustic guitar.
I find it most convenient to take off all strings at once.
There are some people who claim that taking all six strings off at the same time may cause damage to your instrument. Let me tell you, I have been changing strings on steel-string guitars since 1977, always removing the whole set at once, and have never had any problems at all. Even Martin Guitars suggest you do it this way in their own video, and they should know!
Once the strings are completely loose and flabby, I cut them in half.
This isn’t something you must do, but I find the shorter lengths easier to handle, than having to deal with the whole string.
For the largest part, steel-string acoustics come with pin bridges. The bridge pins – made out of plastic, bone, wood or even metal – keep the ball-ends locked into place.
Most string winders sport a small cut-out for lifting the bridge pins. I’d suggest, though, that you first try extracting the pins by hand, because, very often, the ball-ends have jammed the pins in place fairly tightly. Trying to pull them out directly might damage your string winder or the bridge pins, or, even worse, the bridge itself.
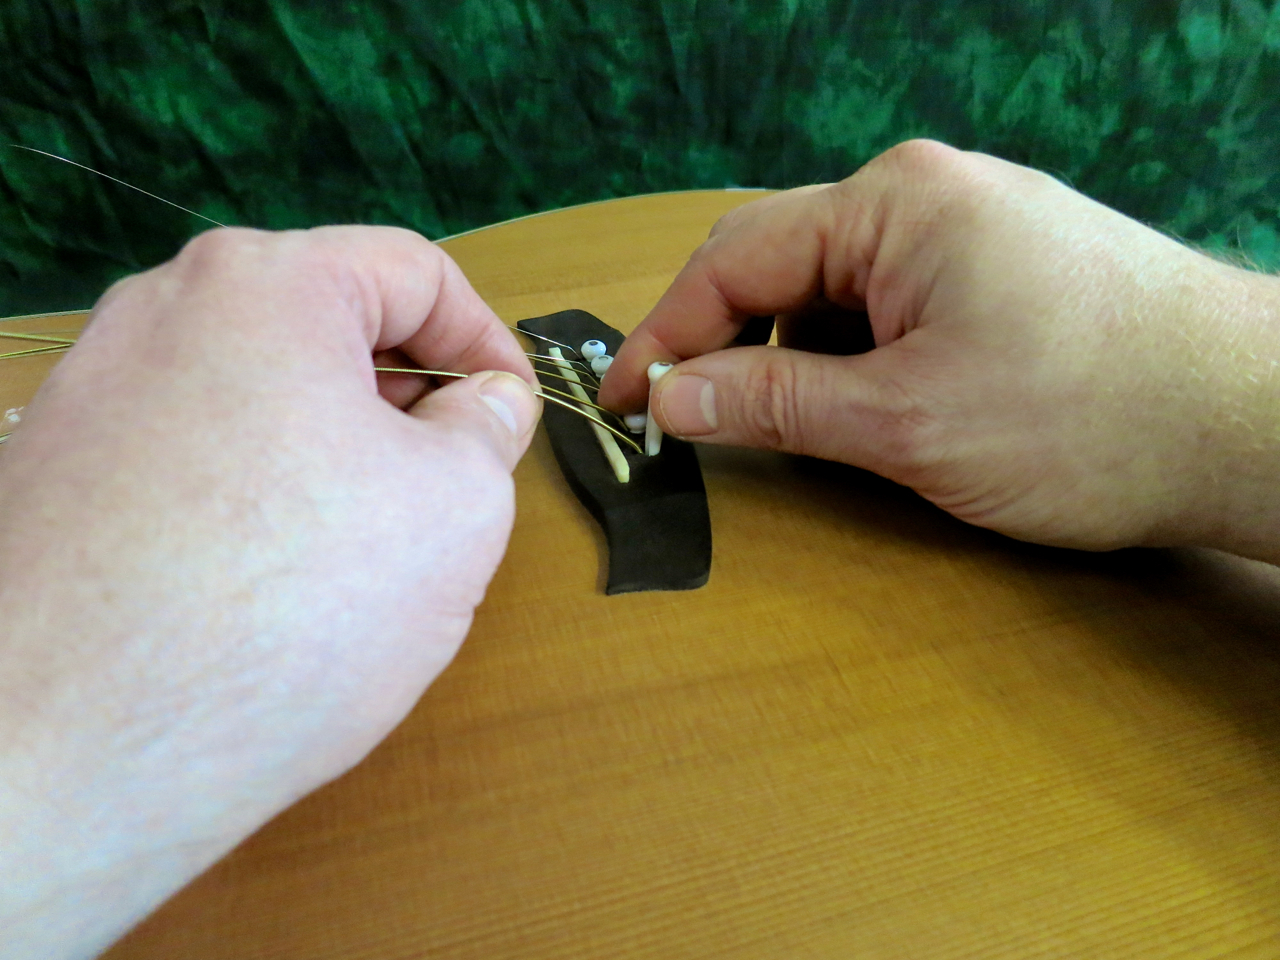
Most of the time you will be able to extract the bridge pins by hand:
Start by pushing the ball-end down (into the body) by a centimetre, or so.
Usually, this is all that’s needed to unjam the bridge pin.
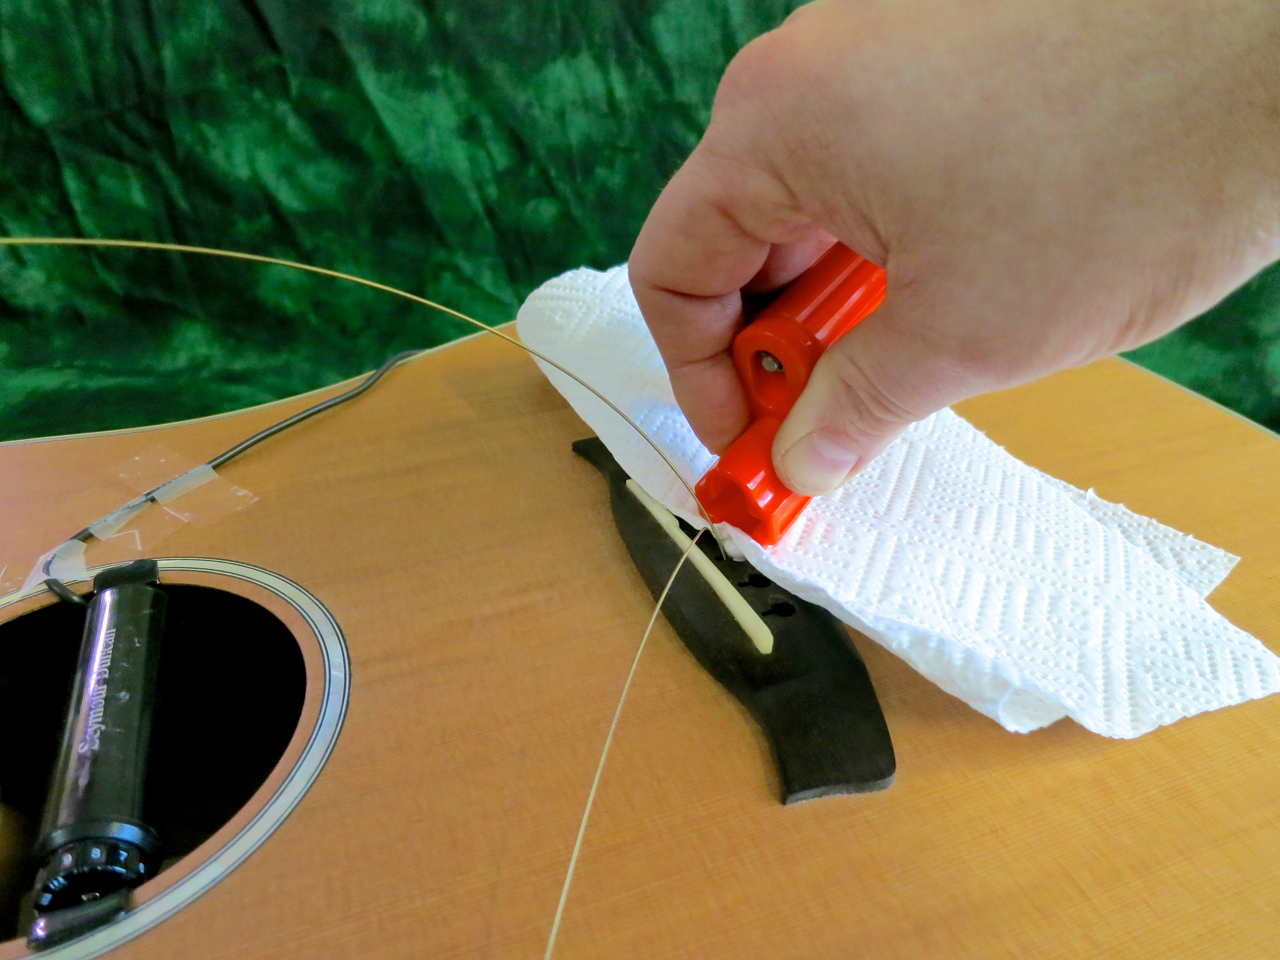
If a pin really is stuck, and can’t be lifted out with your fingers, I’d strongly suggest using a piece of tissue paper (or a piece of cloth) as a cushion to protect the pin and the bridge’s surface.
Some acoustic guitars come equipped with a pinless bridge – most notable Ovation and some Takamines. With these bridges, all you have to do is pull the ball-ends out of the back of the bridge.
At the headstock end you have to untie the strings and take them off the tuner posts.
If your guitar’s fretboard and/or bridge feel (or look) a little dry, now would be the perfect time for applying a little fretboard oil.
You start putting on a new string by feeding the ball-end into the appropriate bridge hole, while inserting the bridge pin.
By pulling the string up a little, while holding the pin down, you will conveniently get the ball-end to jam the bridge pin in place.
Next you feed the string through the tuner’s post…
…pull the string away from the body, and around the post…
…and, finally, lock the string end in place.
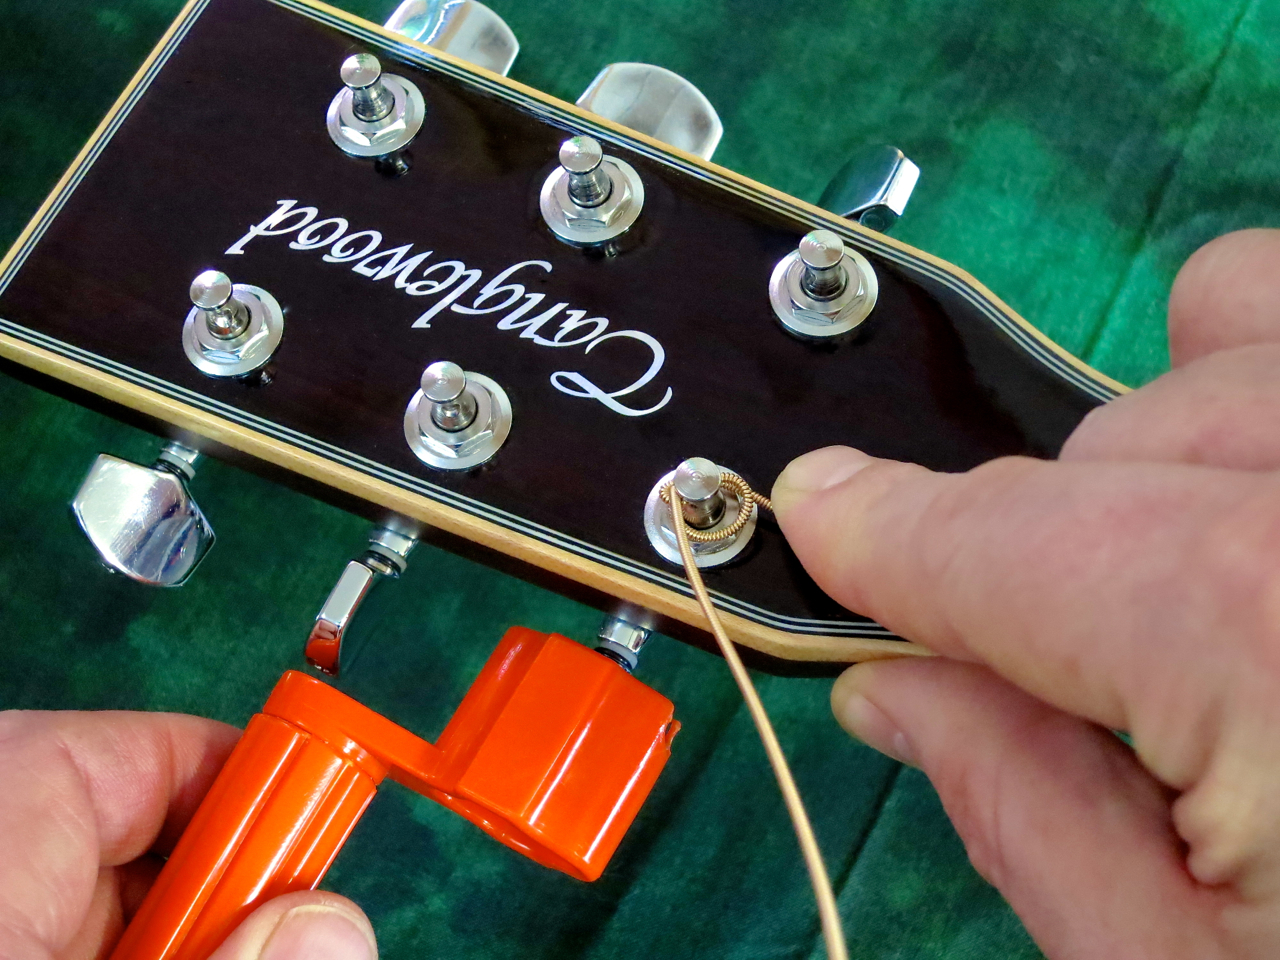
Keep the string pressed downwards, while you’re turning the crank. Each new winding should pass under the one before it.
When the string starts getting taut, I move my hand from the headstock to the bridge, to make sure the bridge pin stays firmly in place.
I’d recommend cutting off the surplus string in close proximity to the tuning post. Then I bend the stub down towards the headstock face. Be careful, a cut-off string is very sharp!
I put on the fresh strings in pairs, working my way away from the nut – first the two e-strings, then the pair of A and b, and lastly the D- and g-strings.
This is what the result should look like at the headstock end.
The bridge pins should sit at a uniform height above the surface of the bridge.
Getting new strings to stay in tune is a much faster process, if you stretch each string carefully. It works like this: First you tune to pitch, then you stretch each string, and retune again. Once you’ve repeated this process four to five times, you should be ready to go.
Your fretting hand should hold down the string you’re stretching at the first or second fret to avoid damage to the top nut.
****
Once the guitar is in tune you could check the string action at the 12th fret and compare it with the values measured with the old string set.
If the action is noticeably higher, chances are you’ve put on a heavier gauge set of strings. You need to compensate for the stronger string pull by tightening the truss rod (with the correct tool) by a quarter of a turn (or half a turn, at the most).
If the action is noticeably lower, chances are you’ve put on a lighter gauge set of strings. You need to compensate for the weaker string pull by loosening the truss rod (with the correct tool) by a quarter of a turn (or half a turn, at the most).
The truss rod is meant solely for neck relief adjustment. Even though adjusting the neck relief does have an impact on the action, string height adjustment isn’t really what the truss rod is meant for. Adjusting the action on a steel-string acoustic is usually a job for a luthier, and is achieved by changing the height of the bridge saddle.
Maahantuoja: F-Musiikki
Maahantuoja: F-Musiikki


(picture courtesy of AJL-Guitars)
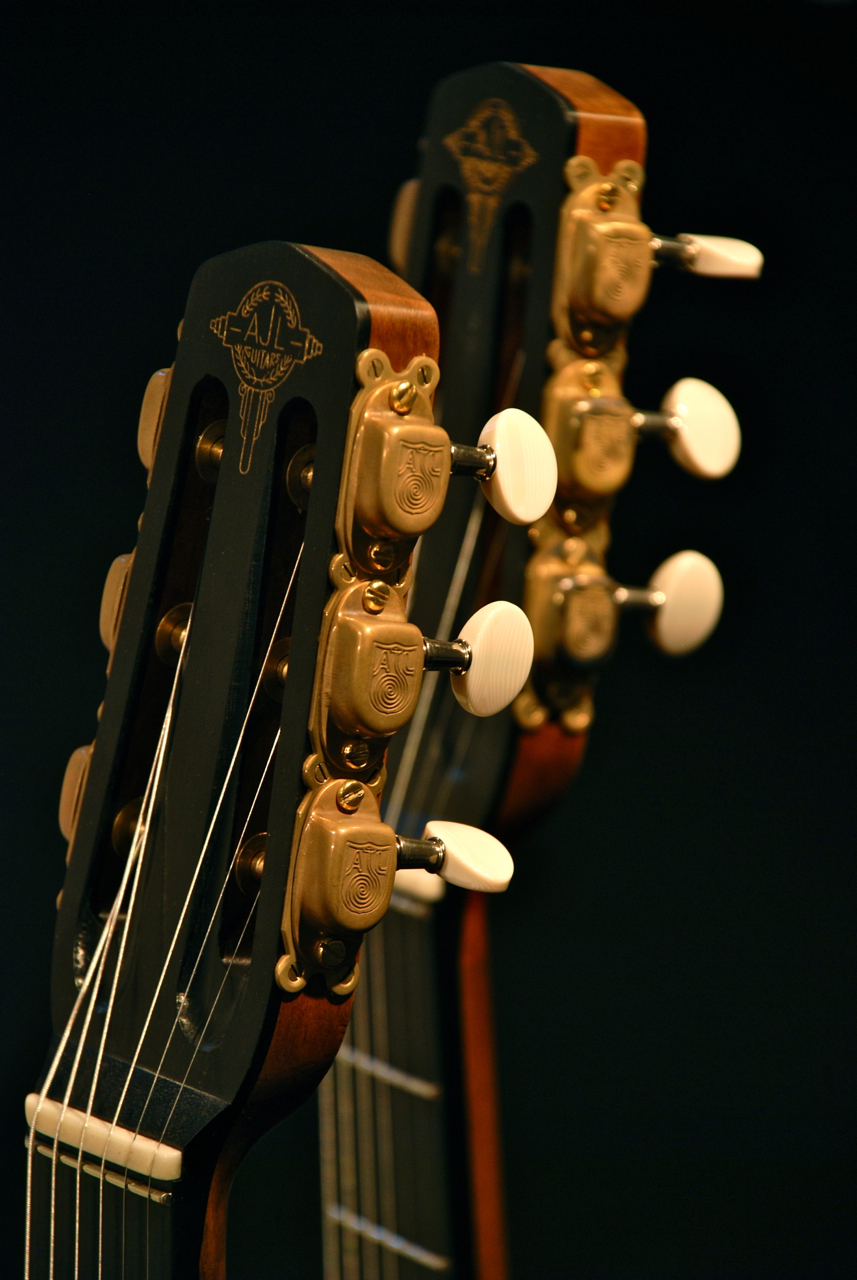
(picture courtesy of AJL-Guitars)

(picture courtesy of AJL-Guitars)
****
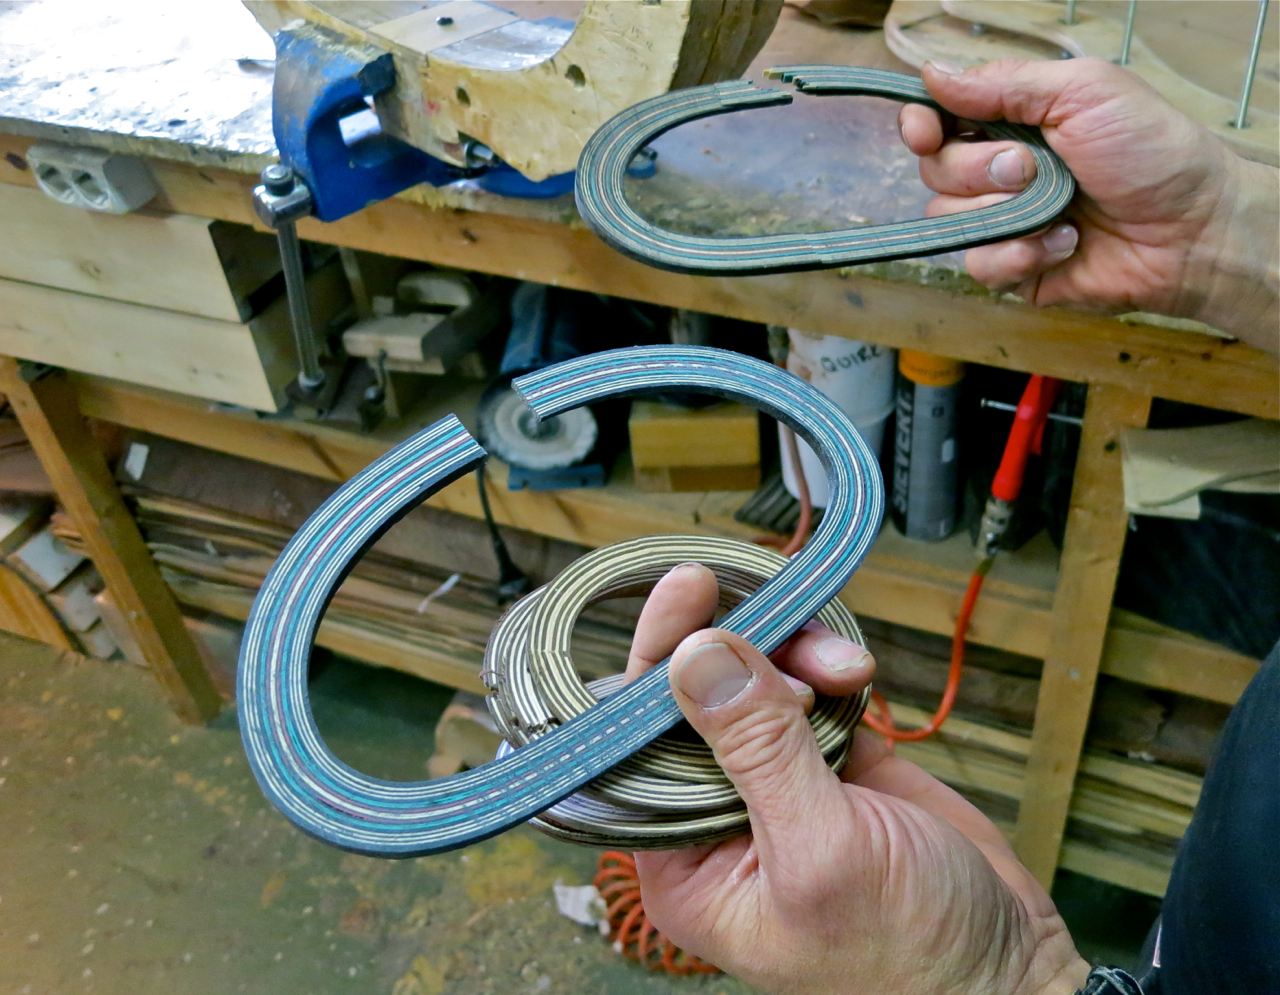
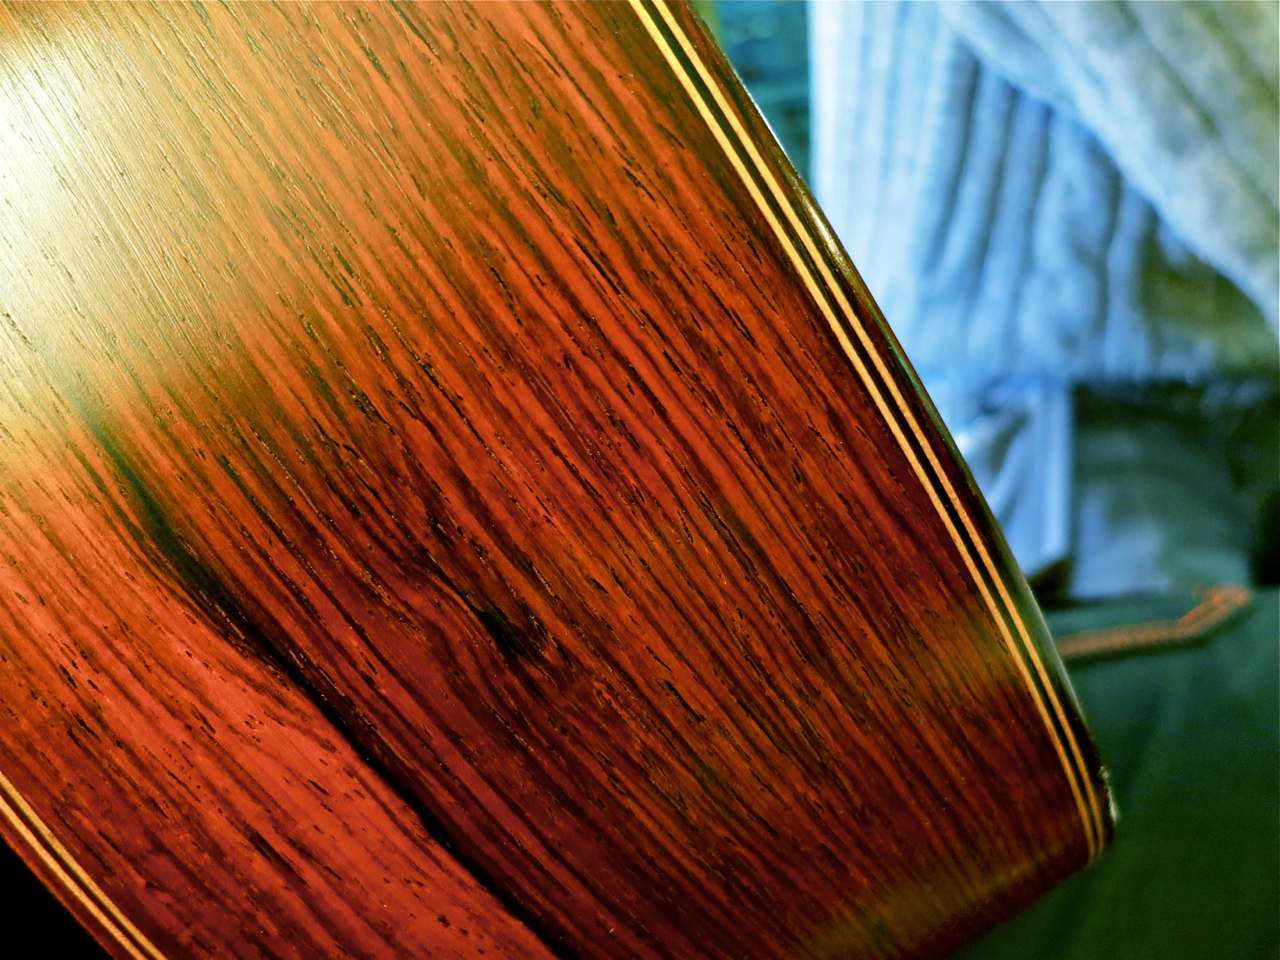
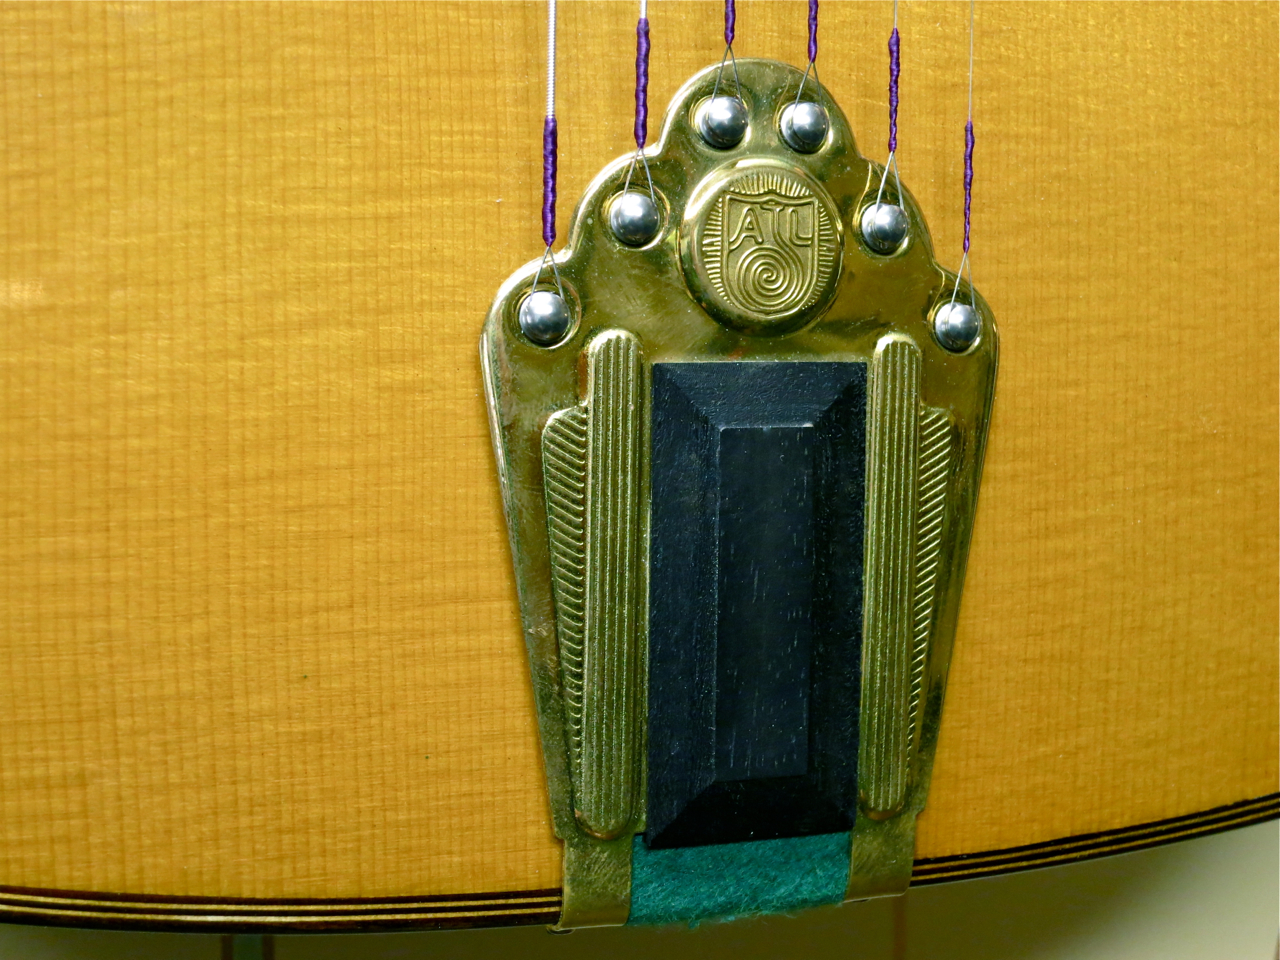
In the autumn of 2013 Kitarablogi had the pleasure of visiting Ari-Jukka Luomaranta’s AJL-Guitars workshop in Kokkola.
Here are some of the pictures I took on that occasion:

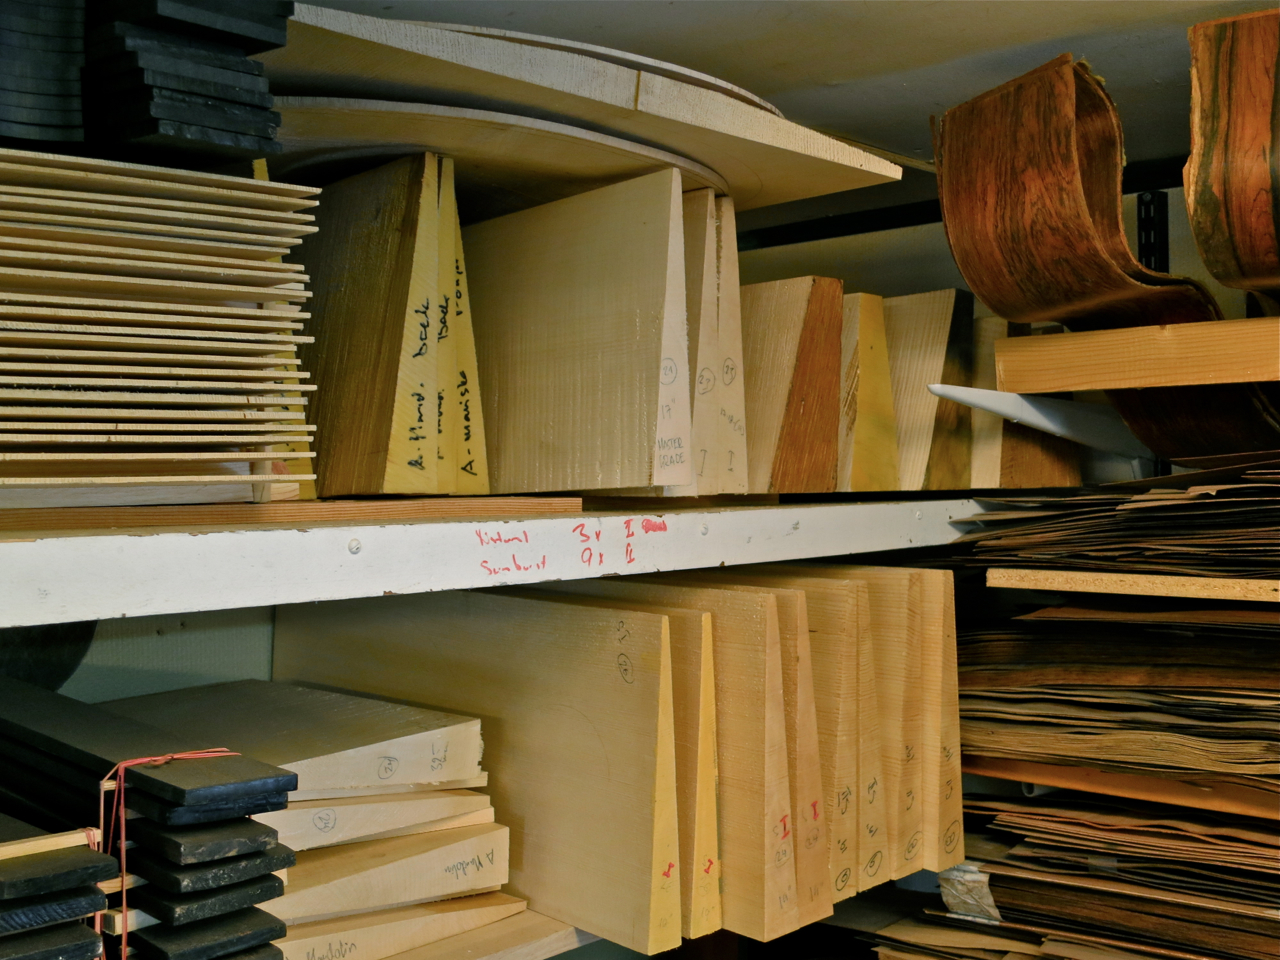


(picture courtesy of AJL-Guitars)


(picture courtesy of AJL-Guitars)


Find out more about AJL-Guitars on their WEBSITE or on FACEBOOK.
AJL-Guitars will also be at The Holy Grail Guitar Show in Berlin, Germany, in November!
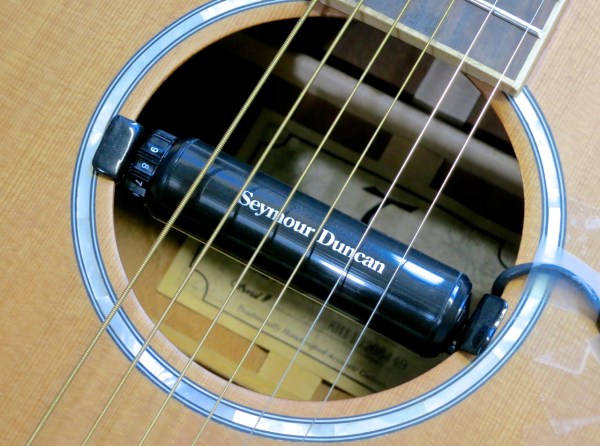
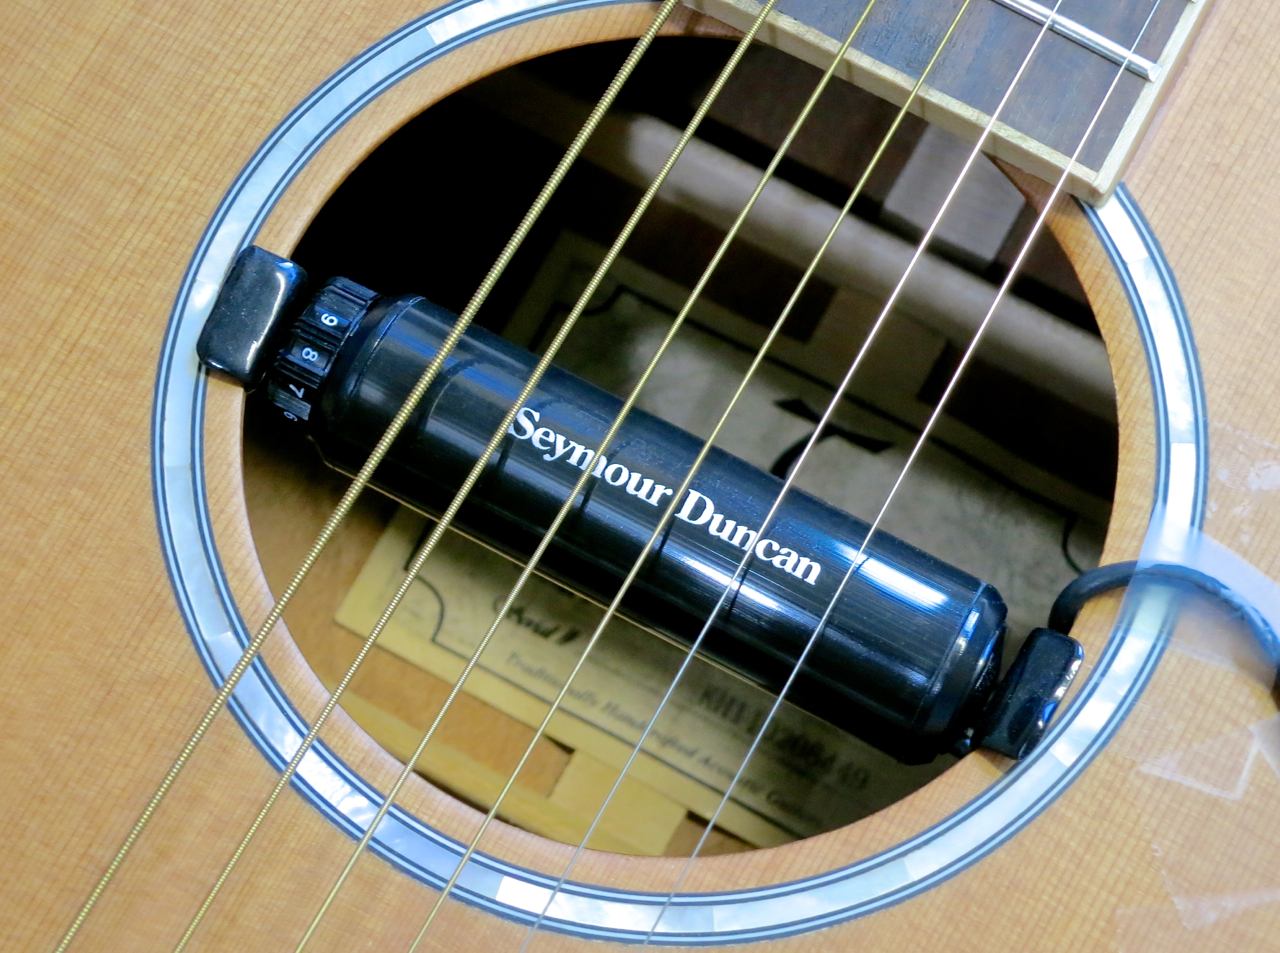
Ostin itselleni hiljattain Seymour Duncanin SA-1 Acoustic Tube -mikrofonin, koska etsin helppoa mikkiratkaisua akustisia keikkoja varten. Huomasin, että netistä löytyy melko vähän tietoa tästä magneettisesta mikrofonista, siksi tämä tietoisku:
SA-1 on humbuckermikki kahdella päällekkäisillä keloilla (ns. stack-rakenne), jolla on sisäänrakennettu volume-säädin.
Pidän siitä, että Acoustic Tube -mikrofonilla on vain lyhyt johto, joka loppuu laadukkaan jakkiin. Jakkia voi kiinnittää esimerkiksi kitarahihnaan, ja sitten voi käyttää tavallista kitarajohtoa SA-1:stä DI-boksiin, mikseriin tai akustiseen vahvistimeen.
Parasta tässä mikrofonissa on kuitenkin sen soundi, joka on yllättävän luonnollinen, kun ottaa huomioon, että kyseessä on suhteellisen edullinen, pelkästään magneettisesti toimiva mikki.
Lisätietoja saa Musamaailmalta.
****
****
I recently went out and bought myself a Seymour Duncan SA-1 Acoustic Tube pickup, because I needed an easy-to-use pickup solution for acoustic live gigs. Strangely, there’s not that much information on this pickup available on the Internet, which is why I decided to give you a short decription of the SA-1:
The SA-1 is a stacked humbucker pickup featuring a built-in volume control.
I like the fact that Duncan’s Acoustic Tube comes with only a short pickup lead that ends in a high-quality phone jack. You can tape the jack to your guitar strap and then run a normal guitar cable from the SA-1 to your DI Box, mixing console or acoustic amplifier.
The best thing about this soundhole pickup is its sound, though, which is very natural and offers plenty of sparkle – especially considering that the SA-1 is a relatively affordable, purely magnetic pickup.
Seymour Duncan products are distributed in Finland by Musamaailma.


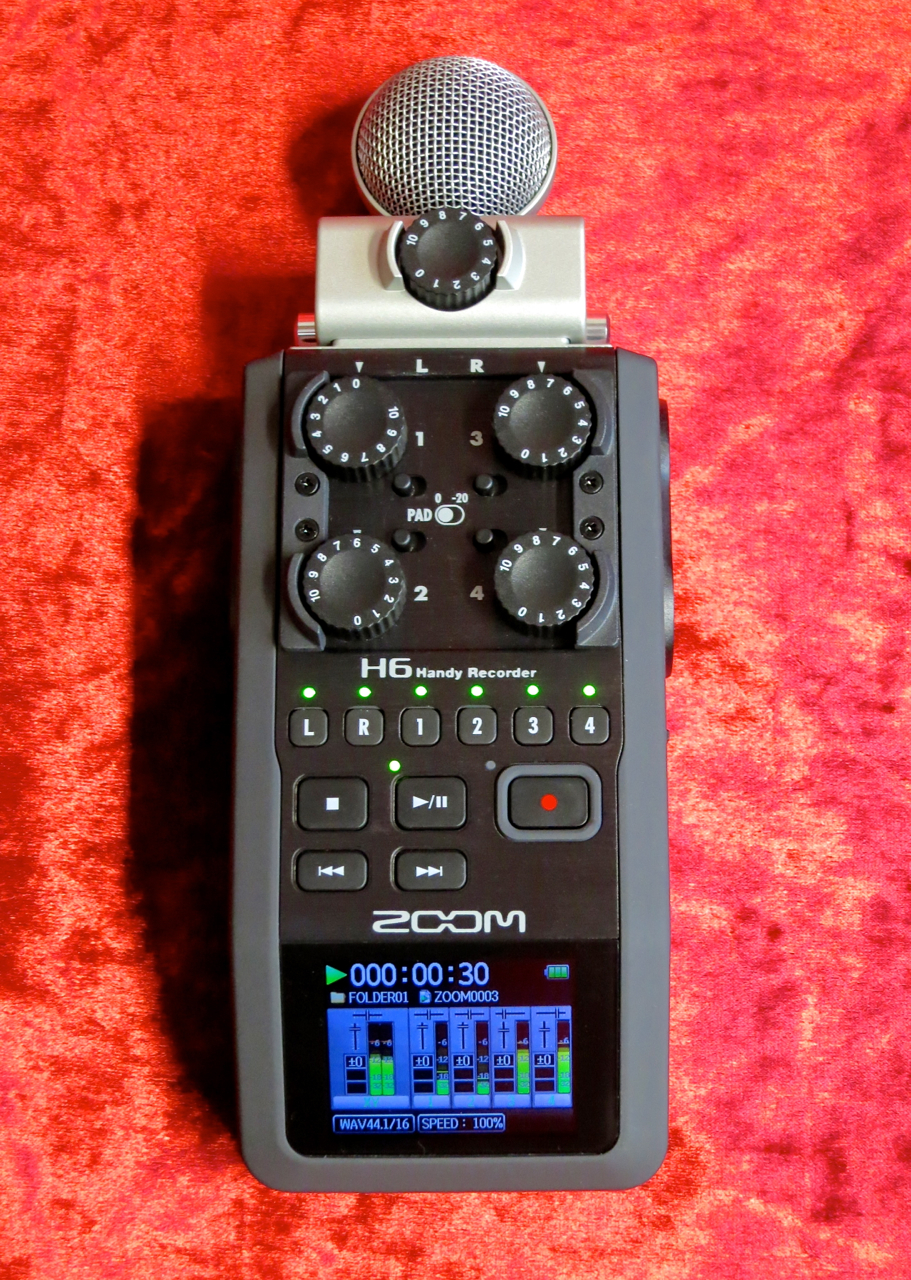
Zoom have released their new handy recorder flagship:
The Zoom H6 is a six-track mobile recorder with exchangeable microphone modules.
****

Zoom’s H6 (rrp in Finland: 398 €) comes in its own carrying case.

The package includes the H6 itself, two mic modules – the XYH-6 offering XY-stereo and the MSH-6 with an MS-stereo capsule – a foam windscreen, a USB-cable, four AA-size batteries and a 2 GB SD-card.
Also included is Steinberg’s Cubase LE audio-sequencer software.
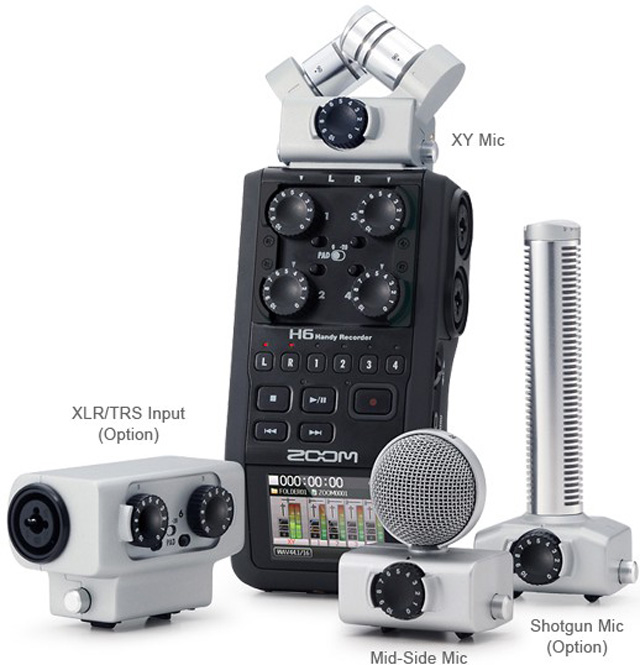
At the moment the H6 is the only field recorder offering you different exchangeable mic and preamp modules.
In addition to the supplied XY- and MS-modules you can also buy Zoom’s shotgun module (SGH-6) or a module with an additional pair of XLR-/TRS-inputs (EXH-6).

For this review we were also supplied with Zoom’s accessory pack for the H6 (APH-6), which contains a furry windshield for outdoor recording, as well a USB-power supply and a remote control.
****

Except for its control panel the Zoom H6 is entirely covered in a non-slip rubbery coating, which also cuts down on handling noise during recording.

A typical Zoom-feature has been carried over into the recorder’s XY-module:
You can switch the stereo width of the XY-setup by turning the capsules. The options are the slightly narrower 90 degrees angle…

…and the wider pickup pattern of 120 degrees.

The combined XLR/TRS-connectors have been placed on both sides of the H6. The Zoom offers switchable phantom power for condenser mics.
On the left side you’ll find the access to the SD-card, as well as the headphones output and the volume control.

In addition to the recorder’s mini-USB-port the right side is home to the Menu-button and the device’s nifty navigation toggle.
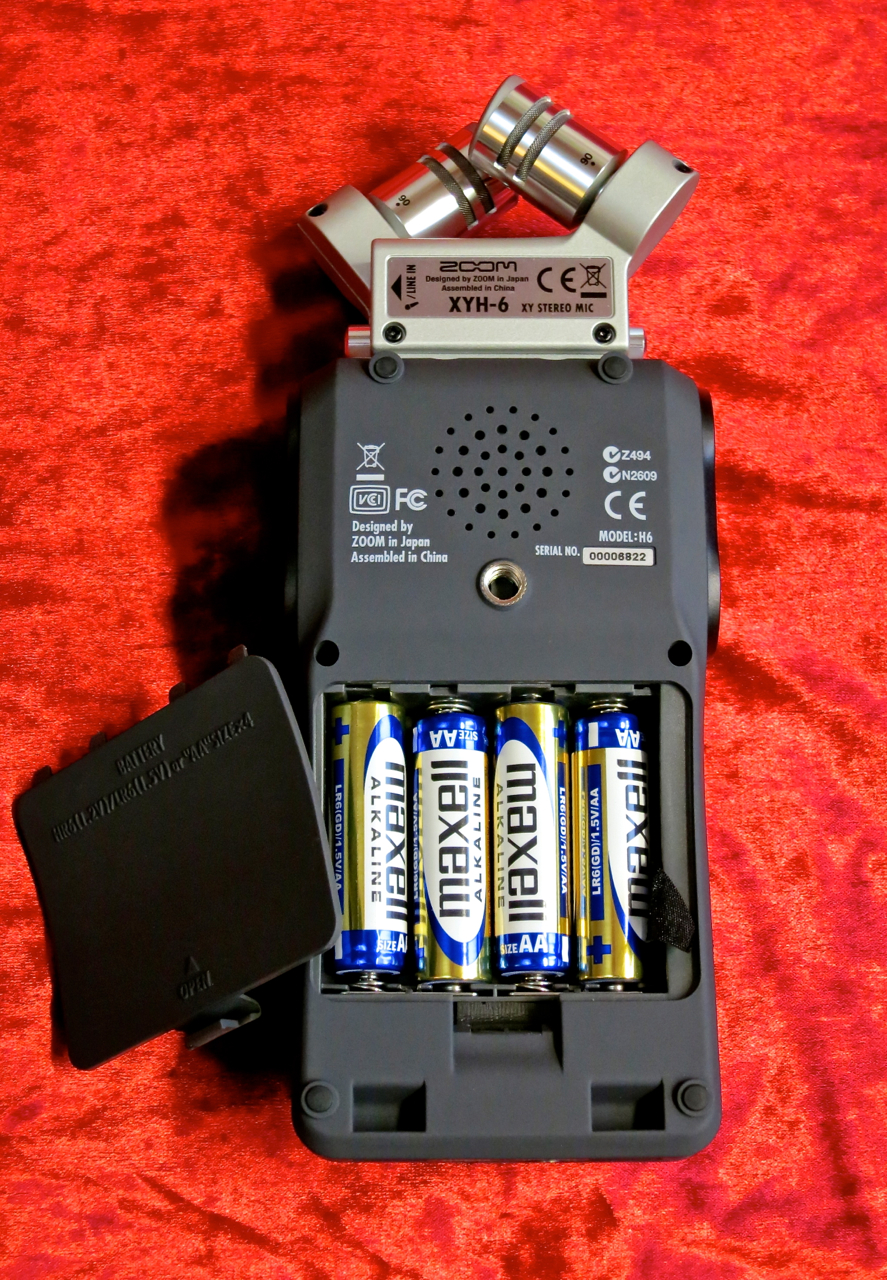
This recorder runs on four AA-size batteries, and will run for approximately 20 hours on a fresh set of alkalines.
You can place the Zoom on most camera tripods, thanks to its standardised thread. There’s also the HS-1 hot shoe adapter available, which makes it possible to mount the recorder straight onto a camera.
The small monitor speaker isn’t particularly Hi-Fi, but it’s good to have it for quick checks.

The unit’s line level output, as well as the connector for the optional remote control, has been placed on the bottom rim of the Zoom.
****
The Zoom H6 can handle two audio formats:
Linear WAV-files offer you sample rates of 44.1, 48 or 96 kHz with 16 or 24 bits of resolution. When you choose WAV as your recording format the H6 works as a multitrack recorder, which makes it possible to do overdubs, and which allows you to mix the recorded tracks afterwards. You can do your mixdown internally, using the Zoom’s own Project Mixer, or by exporting the separate tracks to an audio-sequencer.
Another function that only works when you’ve chosen WAV as your recording format is called Backup Record. This nifty function records the input signal from the exchangeable module twice – one set of tracks uses your input gain settings and is routed to the L/R-track, as usual, while the second set is recorded with 12 dB of attenuation as the so-called Backup-track. The Backup-track is your safety in case your own settings were too hot.
The big advantage of using the H6 in MP3-mode is, of course, this mode’s greatly extended recording time, made possible by data reduction. The recorder lets you choose from many different recording quality settings between 48 and 320 kbps. When in MP3-mode you use the Zoom’s Monitor Mixer to mix all of the six inputs into one stereo file, which is the recorded. This means that, when recording using the MP3-format, the end result is always a single stereo file, instead of the separate tracks you get when running in WAV-mode.
When you’re using the MS-module you can adjust the side-mic level, either before recording (WAV and MP3) or afterwards if you’ve recorded the module’s input signal using the Zoom’s MS-Raw-mode (WAV only).
More information on MS-stereo can be found HERE.
****

The Zoom H6 is very easy to use, because the signal routing is fixed:
The module’s output always goes to the L/R-track (stereo), while inputs one to four are routed to their corresponding mono tracks (1-4).

Beneath the Gain-controls there’s a row of track status buttons, as well as the recorder’s ”transport” buttons.

The Zoom’s Monitor Mixer is where you adjust the signal levels and pan positions of all the signals for monitoring.
The Monitor Mixer window also shows you the status of each channel’s bass cut, compressor/limiter and phantom power.

This is what the Menu-view looks like.

To mix down recorded tracks you use a different internal mixer, called the Project Mixer.
The Project Mixer allows you to adjust each track’s volume and pan position, as well as the playback pitch for each track (without changing the playback speed).
****

In my opinion Zoom’s H6 hits the bull’s eye:
The exchangeable mic modules give you an enormous amount of flexibility to tailor the recorder quickly to the recording situation you find yourself in. The H6 is easy to use, and the recorder’s sound quality is very, very good. Thanks to the built-in metronome and chromatic tuner it’s easy to make sure you play in time and in tune. I’ve also enjoyed the Zoom’s nice compressors and limiters, which work very musically.
To demonstrate the H6’s performance and sound I recorded a short song using the recorder’s overdub function. I used the X/Y-module (at 90 deg) to record the steel-string acoustic, and recorded two mandolin tracks and two vocals with my trusty Shure SM57.
First, I mixed the song using the Zoom’s internal mixer, after which I exported the stereo file to Garageband, where I cut off the count-in and added a little bit of reverb:
I also tried taking the other route by exporting all the separate files from the H6 into Garageband, where I remixed the song using the original tracks:
****
I used a series of sine-wave sweeps to give you an idea of the effect the side-mic level has on the stereo-width of the recorded material. The lower the side-mic level is, the narrower your stereo image gets.
Side-mic +6dB:
Side-mic -2 dB:
Side-mic -9 dB:
Side-mic -22 dB:
Side-mic off:
****

I think Zoom’s H6 is a great field recorder and portable multi-track studio. The H6 works great to capture your song ideas or to for quality recordings of your band rehearsals or live gigs. The Zoom makes pro-quality recording on the road possible.
****
Zoom H6
Finnish distributor: Studiotec
Zoom H6 – 398 €
APH-6 – 48 €
EXH-6 – 58 €
SGH-6 – 118 €
****
Pros:
+ exchangeable L/R-modules
+ rugged build
+ colour display
+ Overdub-, Pre Record- ja Backup Record -functions
+ quality compressor/limiter-section
****
Zoomilla on uusi pikkutallentimien lippulaiva:
Zoom H6 on kuusiraitainen kannettava tallennin, joka tarjoaa vaihtomoduulien kautta erilaisia mikrofoniratkaisuja.
****
Zoom H6 (suositushinta 398 €) myydään omassa kätevässä laukussa.
Laukun sisältä löytyy H6:n runko, kaksi mikrofonimoduulia – XY-stereota tarjoava XYH-6 ja MS-stereomikrofoni MSH-6 – vaahtomuovinen tuulisuoja, USB-johto, neljä AA-paristoa, sekä 2 GB:n SD-kortti.
Tämän lisäksi pakettiin kuuluu myös Cubase LE -softasekvensseri.
H6 on tällä hetkellä ainoa kämmenkokoinen tallennin, joka tarjoaa mahdollisuuden vaihtaa tallentimen mikrofonivarustusta erilaisilla moduuleilla.
Lisävarusteena voi ostaa itselleen XY- ja MS-moduulien lisäksi Zoomiin sopiva haulikkomikki (SGH-6) tai sitten kaksi XLR/TRS-lisätuloja tarjoavaa vaihtoehtoa (EXH-6).
Testiin saatiin myös Zoomin kätevä lisävarustepaketti (APH-6), josta löytyy karvainen tuulisuoja ulkotyöskentelyä varten, sekä H6:lle sopiva USB-virtalähde ja langallinen kauko-ohjain.
****
Zoom H6:n metallista etupaneelia lukuun ottamatta laitteen runkoa on päällystetty käsittelyääniä vaimentavalla kumimaisella kuorella.
Yksi Zoom-tallentimille tyypillisistä ominaisuuksista löytyy myös XY-moduulista:
Mikrofonikapseleiden kulmaa voi säätää kääntämällä. Vaihtoehtoina tarjotaan hieman kapeampaa 90:n asteen kulmaa…
…sekä leveämpi 120:n asteen asentoa.
H6:n XLR/TRS-kombiliitimet on sijoitettu kätevästi laitteen molempiin kylkiin. Tuloista voi lähettää tarvittaessa phantom-virtaa kondensaattorimikrofoneja varten.
Vasen kylki tarjoaa tulojen lisäksi muistikorttipaikan, kuulokelähdön, sekä volumesäätimen.
Oikeasta kyljestä taas löytyy minikokoisen USB-portin lisäksi vielä Zoomin Menu-nappi ja H6:n sulavasti toimiva navigointivipu.
Laitteen pohjaan on upotettu sen paristolokero neljälle AA-kokoisille paristoille. Alkaliparistoilla H6 toimii noin 20 tuntia.
Standardisoidun kierteensä ansiosta Zoomin voi kiinnittää suoraan tavalliseen kamerajalustaan, tai HS-1-kamera-adapterilla myös suoraan kameran salamakiinnikkeeseen.
Zoom H6:lla on myös pieni sisäinen monitorikaiutin.
Zoomin linjalähtö, sekä H6:n liitin kauko-ohjaimelle on sijoitettu tallentimen etureunaan.
****
Zoom H6 käyttää kahta audioformaattia:
Lineaariset WAV-tiedostot tarjoavat 44,1:n, 48:n tai 96:n kilohertsin näytetaajuudet 16- tai 24-bittisinä. Kun WAV on valittu äänitysformaatiksi, tallennin toimii moniraiturina, jolloin jälkiäänittäminen (engl. overdubbing) ja raitojen miksaaminen äänityksen jälkeen – joko H6:n omalla mikserillä (Project Mixer) tai audiosekvensserillä – on mahdollinen.
Myös Zoomin mainiota Backup Record -toimintoa varten formaatiksi täytyy valita WAV-vaihtoehto. Backup Record äänittää vaihtomoduulin signaalin samanaikaisesti sekä normaalina tallennuksena L/R-stereoraidalle että varmuuden vuoksi 12 desibeliä hiljaisempana ns. BU-raidalle. Jos on esimerkiksi live-tilanteessa tullut laitettua mikkimoduulin gain-asetuksia vahingossa liian isoksi, on Backupin ansiosta kuitenkin hyvin todennäköistä, että L/R-raidasta löytyy myös särötön versio.
MP3-tilan suuri etu on luonnollisesti, että datakompressoitu tiedostomuoto antaa roimasti enemmän tallennusaikaa. Zoomissa voi valita mp3-laadun 48:n ja 320:n kbps välillä. Kun mp3-on valittu äänitysformaatiksi H6:n kaikki tulosignaalit miksataan kuuntelumikserillä (engl. monitor mixer) yhdeksi valmiiksi stereotiedostoksi. MP3-tilan äänityksessä syntyy siis aina vain yksi valmis stereotiedosto, eikä WAV-tilan tavoin erillisiä raitoja.
Tallentimen MS-moduulilla äänittäessä voi säätää stereokuvan laajuutta säätämällä sivumikrofonin (side-mic) signaalitasoa, joko ennen äänitystä (WAV ja mp3) tai ns. MS-Raw-moodissa (vain WAV) vasta miksausvaiheessa.
Lisää tietoa MS-stereosta saa TÄSTÄ.
****
Zoomin H6 on helppoa käyttää, sillä tallentimen signaalireititys on kiinteä:
Moduulin signaali menee L/R-stereoraidalle, kun taas muiden tulojen (1-4) signaalit äänitetään niille kuuluville monoraidoille (1-4).
Gain-säätimien alapuolella sijaitsevat raitojen tilanapit, sekä tallentimen isokokoiset näppäimet ”nauhakuljetusta” varten.
Äänitysvaiheessa käytössä on Zoomin Monitor Mixer, jossa säädetään kuuntelutasoa ja -panorointia.
Kuuntelumikserissä voi myös nähdä, ovatko tulojen bassoleikkurit, kompressorit ja phantom-syötöt päällä vai pois.
Tällainen on H6:n selkeä Menu-näkymä.
Valmiin materiaalin miksausta varten tallentimella on oma mikseri nimellä Project Mixer.
Tarjolla on raitojen tason säätö ja panorointi, ja sen lisäksi jokaisen raidan reaaliaikainen transponointi (toistonopeus pysyy muuttumattomana).
****
Mielestäni Zoom H6 on täysosuma:
Vaihtomoduulien käyttö on nerokas tapa laajentaa tallentimen käyttökohteita. H6 on helppo käyttää, ja sen tarjoama äänenlaatu on hyvin kiitettävällä tasolla. Sisäisen metronomin ja viritysmittarin ansiosta äänitys pysyy myös taimissa ja vireessä. Erityiskiitos kuuluu Zoom H6:n monipuolisille ja laadukkaille kompressori- ja limitteri-efekteille, jotka toimivat erittäin musikaalisella tavalla.
Äänitin kokeiluksi yhden akustisen demobiisin päällesoittoja käyttäen. Teräskielistä akustista kitaraa poimin talteen Zoomin XY-moduulilla (90 asteen kulma), minkä jälkeen äänitin kaksi lauluosuutta ja kaksi mandoliiniraitaa dynaamisella Shure SM57 -mikrofonilla.
Miksasin biisin ensin H6:n omalla mikserillä, minkä jälkeen vein stereomiksauksen Garagebandiin, jossa poistin sisäänlaskun ja lisäsin hieman yleiskaikua:
Tämän jälkeen vein biisin yksittäiset raidat Garagebandiin, ja miksasin biisiä uudelleen sekvensserillä:
****
Käytin sarjan siniaalto-sweepejä MS-moduulin sivumikrofonin asetuksien havainnollistamiseen. Mitä pienempi sivumikin taso on, sitä kapeammaksi stereokuva muuttuu.
Side-mic +6dB:
Side-mic -2 dB:
Side-mic -9 dB:
Side-mic -22 dB:
Side-mic off:
****
Zoom H6 on mielestäni loistava taskustudio, joka toimii yhtä hyvin biisintekovälineenä kuin myös mainiona keikka- tai harjoitustallentimena. Se on erittäin onnistunut paketti paljon liikkuvalle muusikoille, jolla voi syntyä helposti jopa julkaisukelpoista materiaalia.
****
Zoom H6
Maahantuoja: Studiotec
Zoom H6 – 398 €
APH-6 – 48 €
EXH-6 – 58 €
SGH-6 – 118 €
****
Plussat:
+ vaihdettavat moduulit
+ vankkaa tekoa
+ värinäyttö
+ Overdub-, Pre Record- ja Backup Record -toiminnot
+ laadukkat kompressorit/limitterit
****
![]()
Mannedesign is the more affordable, Far Eastern-produced brand of Italian company Manne Guitars.
Apart from Mannedesign’s wide array of electric guitars and basses the brand’s model range also includes several steel-string acoustics, two of which are featured in this review:
The Parlour-sized Mannedesign PFM and Roberto Dalla Vecchia’s signature-Dreadnought, the RDV.
****

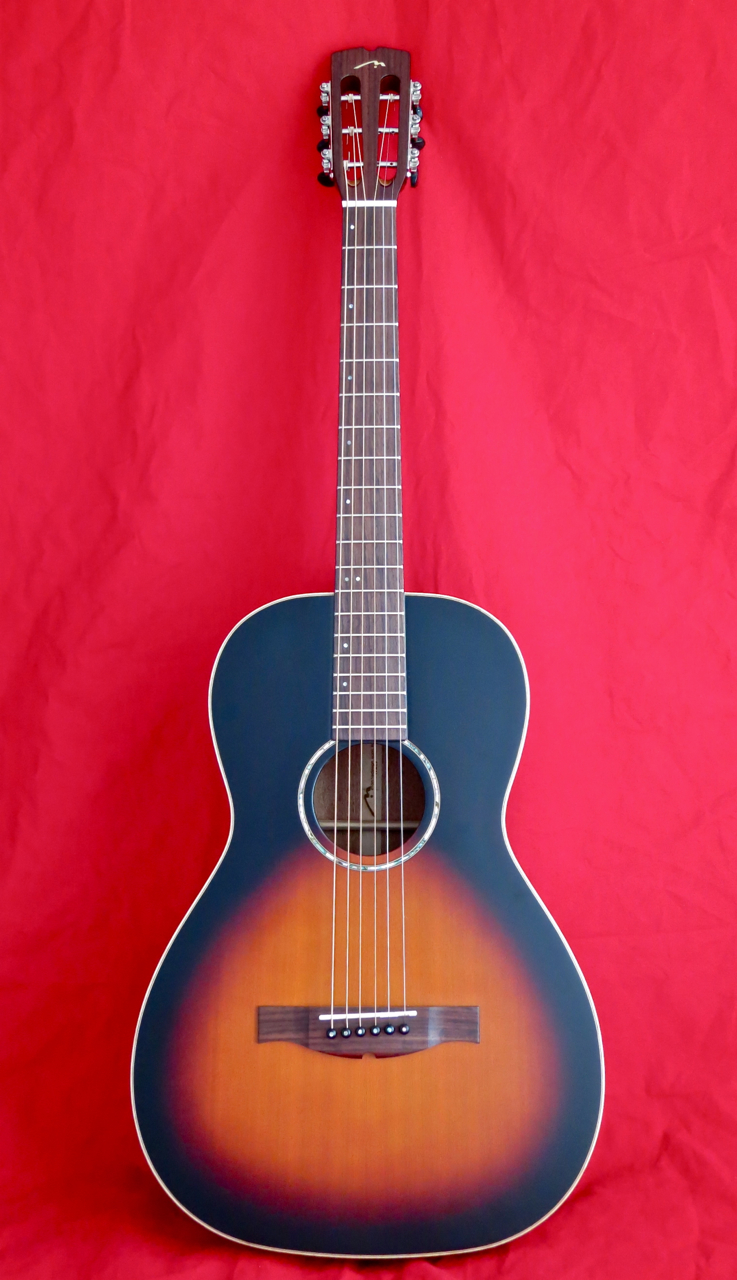
The Mannedesign PFM (660 €) is an all-solid, small-bodied instrument for the Blues-, Folk- and Roots-guitarist, who is looking for a vintage-toned guitar.
The deep and rich matte finish on the PFM’s cedar top embues the instrument with a good dose of street credibility.

The mahogany neck is one-piece, save for the upper half of the headstock, and a another piece used to get the neck heel up to its full length. The neck joint is a the 12th fret, just like it was on many guitars in the 1930s.
The back and rims of the soundbox have been crafted from beautiful solid mahogany.
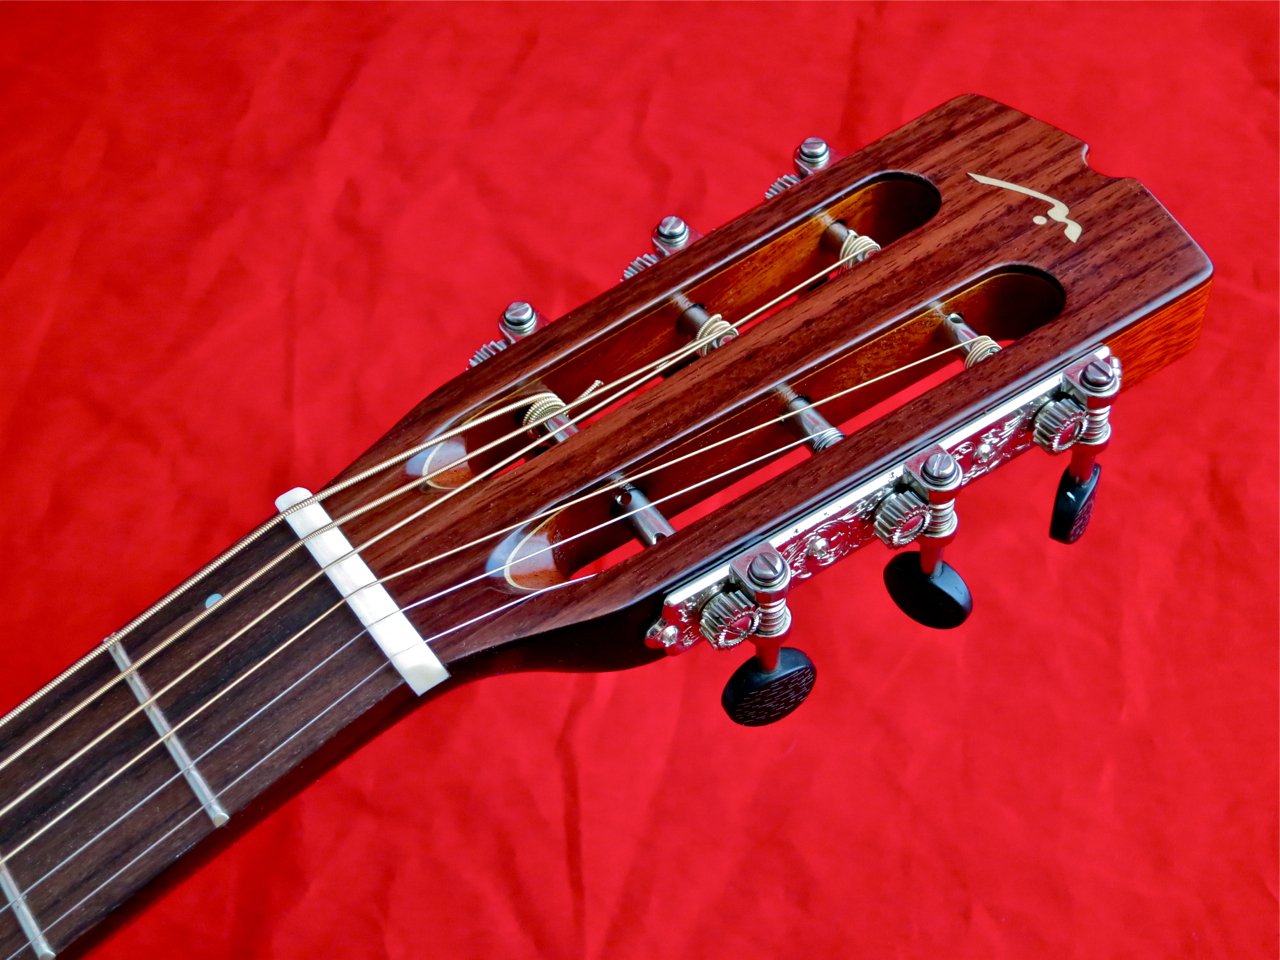
The headstock sports a rosewood veneer, which has been beautifully inlaid with a maple Mannedesign-logo.
TRhe top nut has been carved from genuine bone.

Gotoh supplies this model’s quality open tuning machines, which are a well-designed update on vintage tuners.

The Mannedesign’s rosewood fingerboard holds 19 well-seated, medium-sized frets.

The PFM’s body has been adorned with stylish flame maple binding, while the guitar’s beautiful rosette sports abalone inlays.
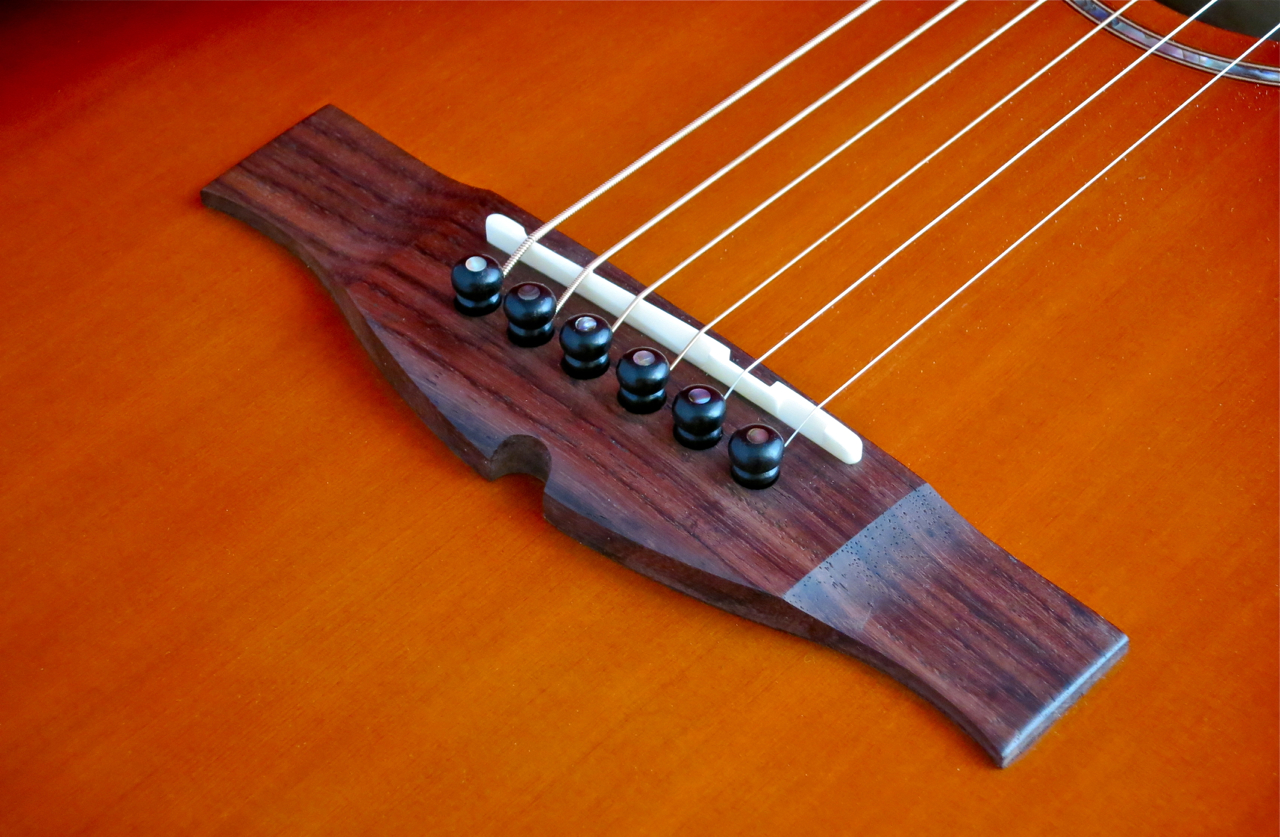
The characteristic dip of the Mannedesign’s headstock is mirrored in the rosewood bridge’s design.
The compensated bridge saddle has been made – just like the top nut – from bovine bone, which is still one of the best materials for this purpose.

****

Roberto Della Vecchia is an Italian Fingerstyle-wizard – I can only recommend hopping over to his website to check the man out!
Della Vecchia’s Mannedesign RDV -signature model (950 €) is a gorgeous Dreadnought guitar carefully crafted from traditional materials. AA-quality sitka spruce is used for the guitar’s solid top.

The RDV’s mahogany neck is one-piece, save for a separate bit used to make up the neck heel.
The solid Indian rosewood used for the back and the rims is stunningly beautiful.
The body of the guitar comes with a gloss finish, while the neck has been finished with a matte lacquer.

The headstock facing is black ebony, inlaid with a mother-of-pearl Mannedesign-logo.
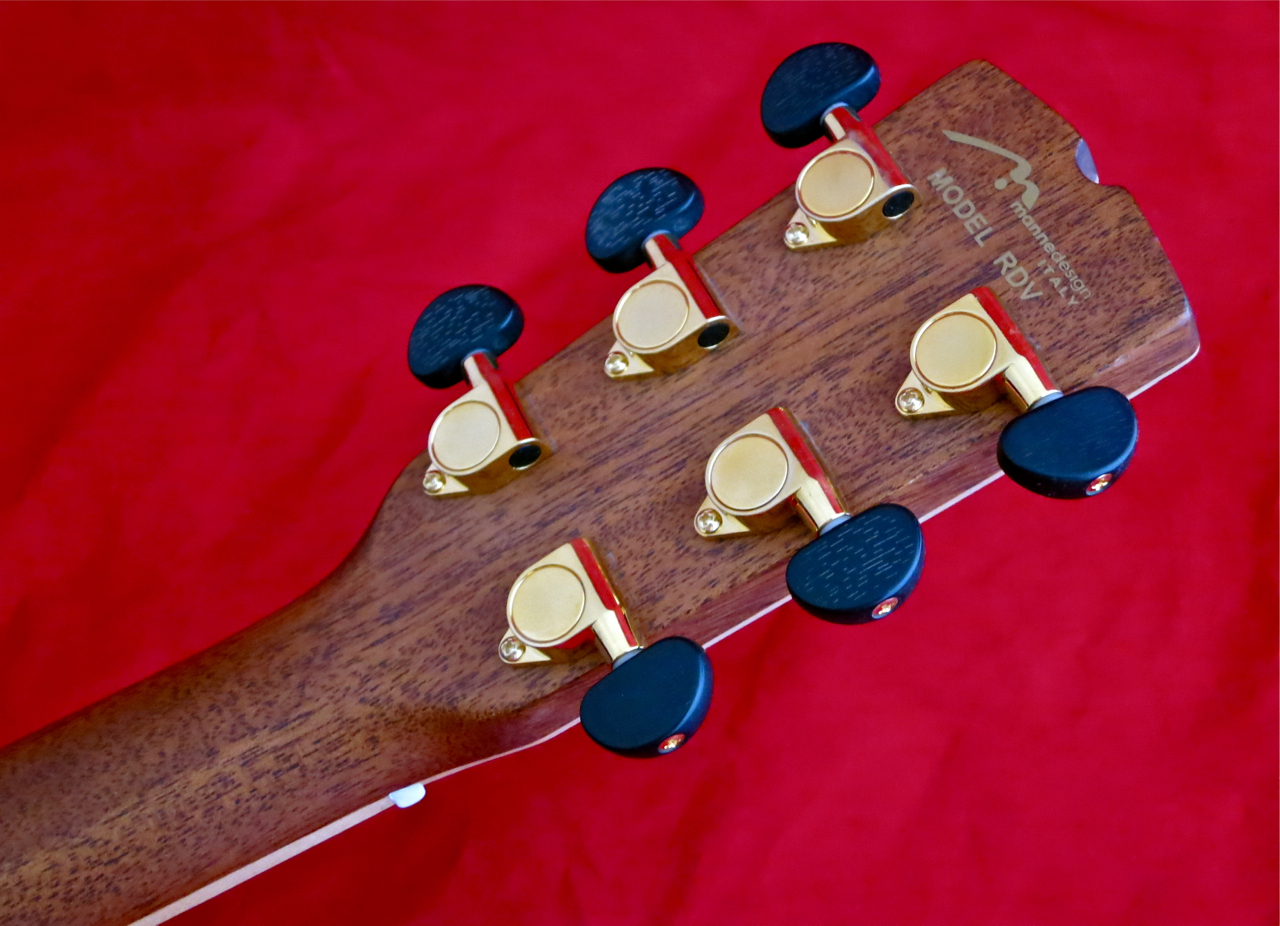
The RDV comes equipped with gold-coloured Gotoh tuners with ebony-styled plastic tuning buttons.

Maple binding frames the ebony fingerboard. The RDV is equipped with 20 medium-sized frets.

The back’s centre line has been inlaid with a very beautiful black-and-white motif.
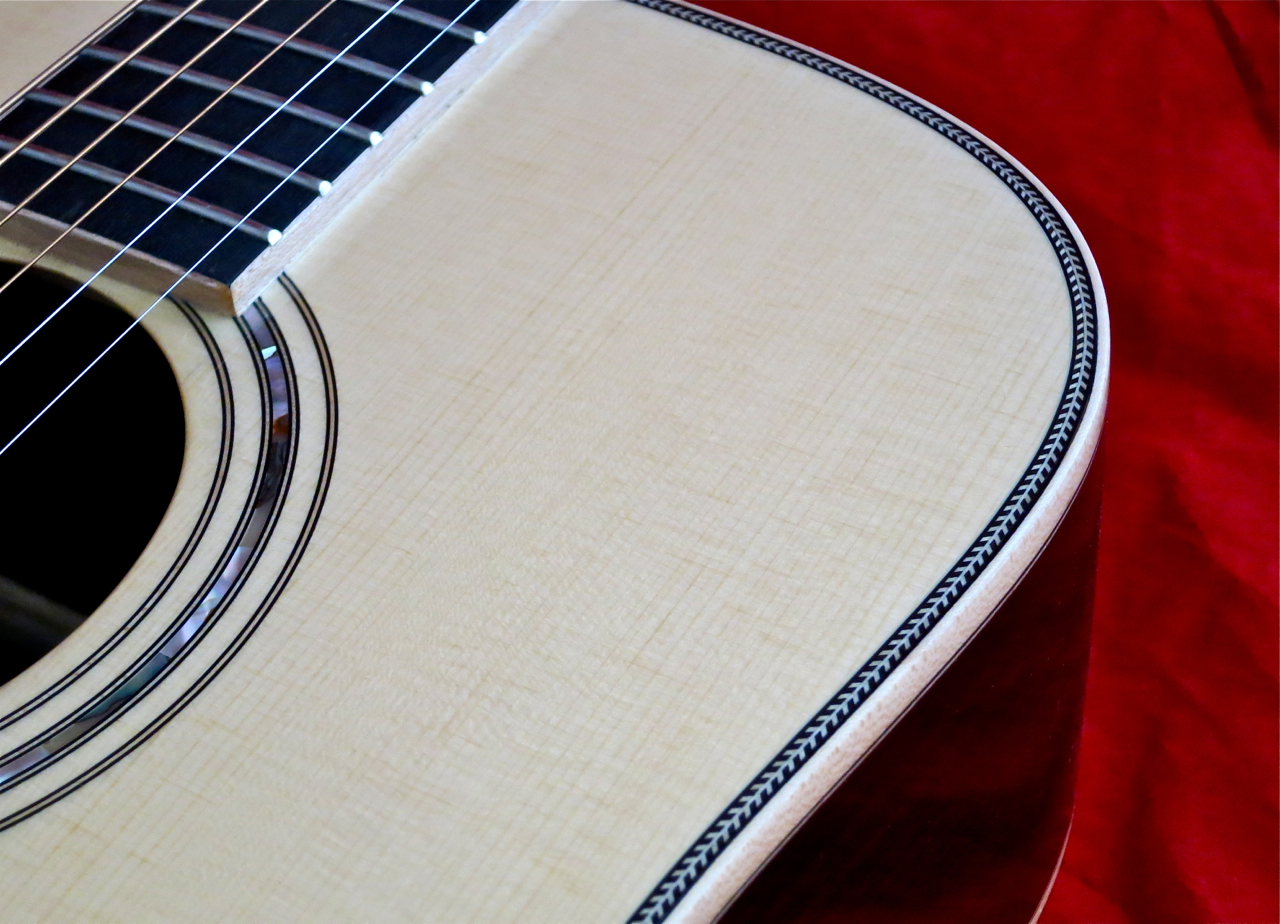
In addition to the maple edge binding the top also sports very crisp-looking herringbone purfling.
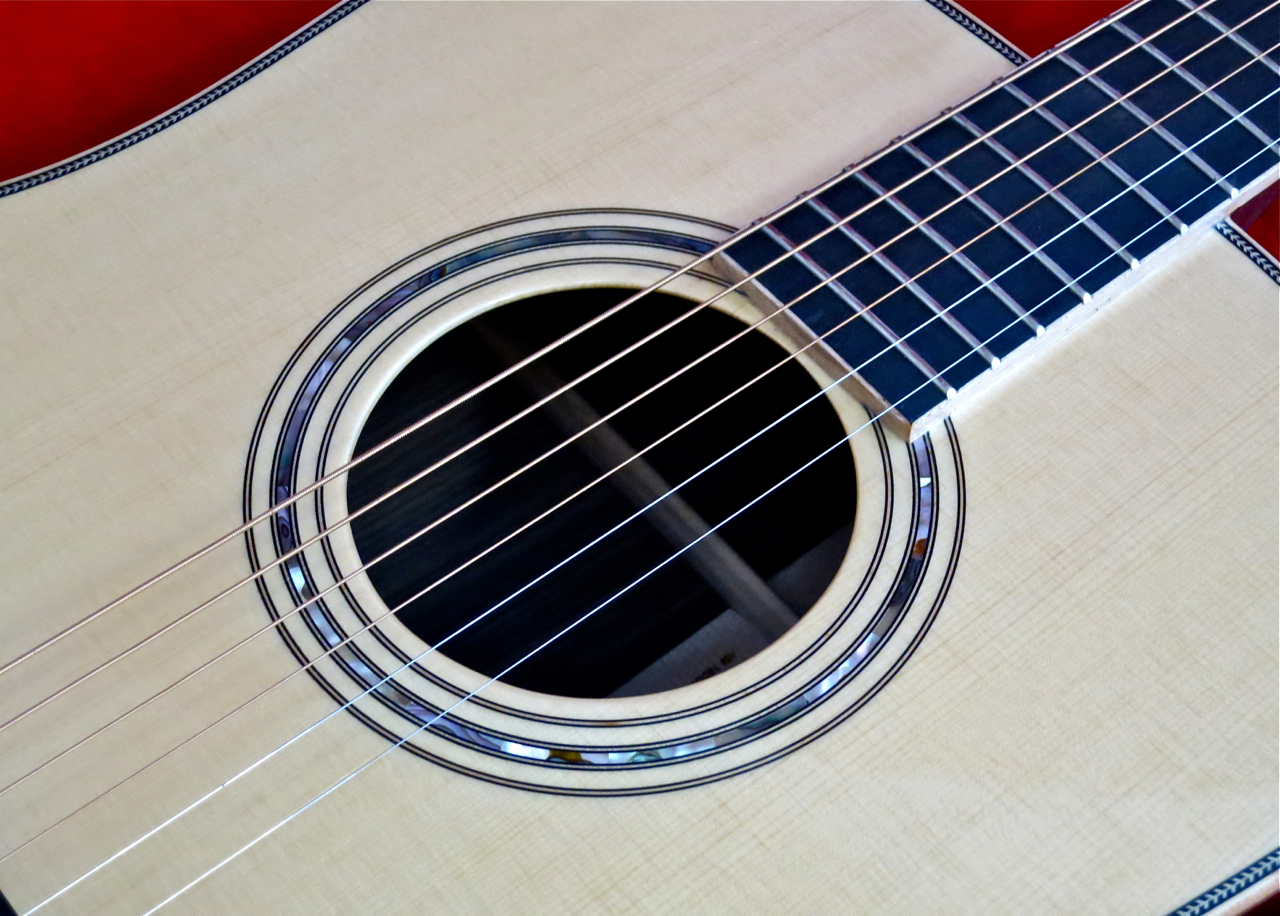
The rosette’s central ring is made up of genuine mother-of-pearl.

The RDV’s bridge is the same design we’ve already seen on the PFM, but this time crafted from deep black ebony.

****
As most do Parlour-sized guitars, the Mannedesign PFM has a medium-length scale of 63 cm, which makes bending the 012-gauge strings relatively easy to bend. Instead of a ”vintage-correct” – and often loathed – V-profile neck, Mannedesign have opted for a more sensible and nice-feeling middle-of-the-road D-profile. The guitar’s nut width measures 4,4 cm, while the string spacing (E to e) at the bridge stands at 5,4 cm – good for both plectrum player, as well as fingerstylists. The test sample was set up with a very friendly action (E: 1,9 mm/e: 1,5 mm).
The Mannedesign PFM is a typical Parlour-guitar in the best possible sense. The guitar’s sound is quite dry and has a barking attack, with a strong and slightly nasal overall mid-range focus. Fingerstyle-guitarists will love the relatively light bass register, which keeps things transparent. When using a plack, you will be positively surprised by how well the PFM is able to cut through and project – great for Ragtime and early Blues. The Mannedesign PFM also records really well, because it doesn’t clutter the low-mid and bass registers.

****

The Mannedesign RDV has the long scale (63 cm) typical of a Dreadnought. Roberto Della Vecchia requested a slightly wider-than-usual string spread at the bridge (5,9 cm) to accommodate the needs of fingerstyle players. The neck profile is a very nice, oval C. The Della Vecchia model’s set-up was superb, with a nice and comfortable action (E: 2,0 mm/e: 1,5).
Rosewood-bodied Dreads often turn out to be great ”shouters”, which also holds true for the RDV’s healthy volume levels. There’s plenty of lush bass on tap, with a warm mid-range and shimmering top-end to boot. The Mannedesign RDV is a prime exponent of the famous Dreanought-sound, offering you volume, character and dynamics in spades.


****
Mannedesign-instruments still have a rather low profile here in Finland. Still, based on this review I can only recommed a closer look at the brand’s acoustic offerings.
****
Mannedesign PFM + RDV
PFM – 660 €
RDV – 950 €
Finnish distributor: Nordsound
****
Pros (both models):
+ value-for-money
+ workmanship
+ playability
+ sound
****
![]()
