The Making of a Bluetone Amp – Part 4

Bluetone part 4 – 2

So here’s the finished guitar amplifier:

The new Bluetone Crossroad 2+2 amp head is fitted inside its cabinet, and Bluetone’s game-changing wifi-software is up and running smoothly.

Bluetone part 4 – 3

Bluetone’s wifi-protocol makes it easy to check and readjust the tube bias on your amplifier’s power tubes. No engineering degree or special tools needed – you only have to have a mobile device or computer to hand.

Bluetone part 4 – 4

The amp head is accessed as a web-address. The correct bias values for the power amp valves fitting your amp are listed in the owner’s manual. All you have to do is to type the new bias values into the correct fields, and save them by pressing the ”Change Bias” buttons.

Bluetone part 4 – 1

This is what the finished half-stack looks like. It has already been taken home by its lucky owner.

Contact: Bluetone

The Making of a Bluetone Amp – Part 3

Bluetone Pt3 – 1

The time-consuming process of hand-wiring, assembling and soldering the innards of the new Bluetone Crossroad amp head was practically finished by the start of last week. The only thing still missing was the software to run the wifi power valve biasing (the traditional, hardwired bias adjustment already worked, of course).

Bluetone Pt3 – 2

Bluetone Pt3 – 3

Bluetone Pt3 – 4

This is the way a custom-made guitar amplifier should look on the inside – exemplary workmanship and top grade components.

Bluetone Pt3 – 5

Bluetone Pt3 – 6

Bluetone Pt3 – 7

There was still a tiny bit of adjustment work to be done on the metal chassis to make it fit properly into its cabinet.

Bluetone Pt3 –8

When all is finished the control panel should be flush with the cloth grille.

From a tonal perspective the Crossroad-head was all dialled-in, thoroughly checked and rearing to go. Matti and Harry gave me a run-through of the sounds offered by this amp’s three channels, and I must say it sounded fantastic!

Only a few hours after my visit to Bluetone’s HQ, I got a message from Harry that the wifi-application had arrived for inclusion in the head.

Näin syntyy Bluetone-vahvistin – osa 4

Bluetone part 4 – 2

Valmista tuli!

Uusi Bluetone Crossroad 2+2 -vahvistin on sovitettu koteloonsa, ja firman mullistava wlan-softa pyörii ongelmitta vahvistimessa.

Bluetone part 4 – 3

Wifi-ominaisuus mahdollistaa pääteputkien biasointia kätevästi ilman insinööritaitoa tai erikoistyökaluja suoraan mobiililaitteen tai tietokoneen nettiselaimelta.

Bluetone part 4 – 4

Putkityypille sopivat biasointiarvot löytyy vahvistimen käyttöohjeesta, ja niitä voi muuttaa tallentamalla uudet arvot kummallekin pääteputkiparille nettiselaimen kautta.

Bluetone part 4 – 1

Nyt Bluetone Crossroad -puolistäkki on valmis luovutettavaksi asiakkaalle.

Lisätiedot: Bluetone

Näin syntyy Bluetone-vahvistin – osa 3

Bluetone Pt3 – 1

Aikaavievän ja tarkkuutta vaativan kokoamisvaiheen jälken uusi Bluetone Crossroad -nuppi on viitä vaille valmis. Ainoastaan wifi-biasoinnin softa puuttuu vielä (perinteinen biasointi johdoilla toimii toki tästä huolimatta).

Bluetone Pt3 – 2

Bluetone Pt3 – 3

Bluetone Pt3 – 4

Tällaisia custom-vahvistimien sisälmykset voivat näyttää parhaimmillaan – erittäin siistiä työtä ja laadukkaita komponentteja.

Bluetone Pt3 – 5

Bluetone Pt3 – 6

Bluetone Pt3 – 7

Nupin kotelo kaipaa vielä pientä hienosäätöä, koska se oli koesovituksessa hiuksen verran liian tiukka, eikä etupaneeli mahtunut sulavasti kokonaan aukosta läpi.

Bluetone Pt3 –8

Tarkoitus on, että valmiissa vahvistimessa etupaneeli on samassa linjassa nupin etukankaan kanssa.

Uuden Crossroad-nupin elektroniikka on jo hienosäädetty, ja myös sen koesoitto on viety onnistuneesti läpi. Matti ja Harry esittivät minulle puolistäkin soundeja, ja erittäin hyvältä se kuulosti!

Sain juuri Bluetonelta viestin, että wlan-softa toimii nyt ja on valmis asennettavaksi – Crossroad-projekti lähestyy siis maaliviivaa.

The Making of a Bluetone Amp – Part 2

Bluetone Crossroad – logic board

Bluetone Crossroad – layout sketch

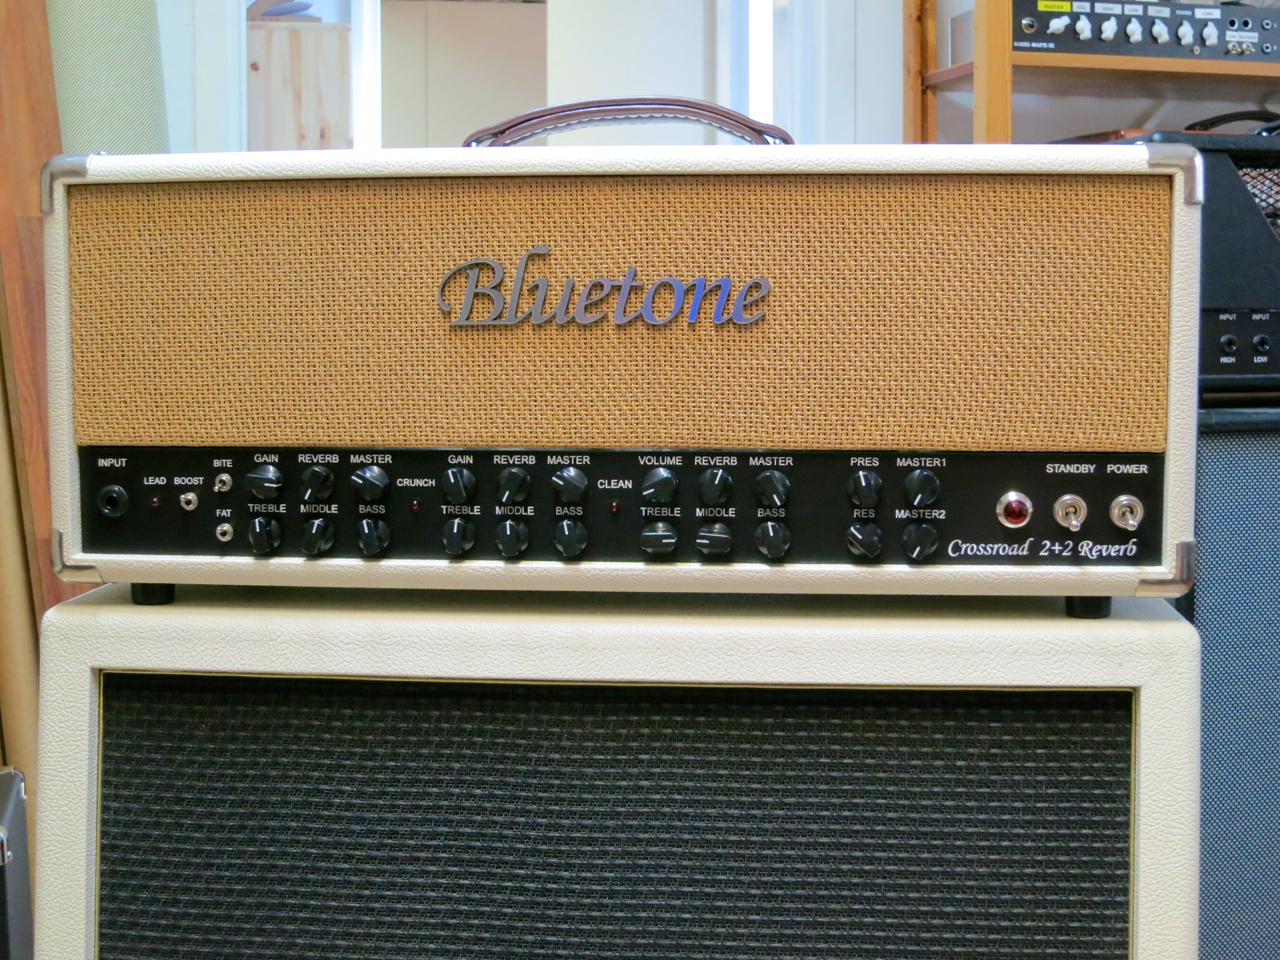
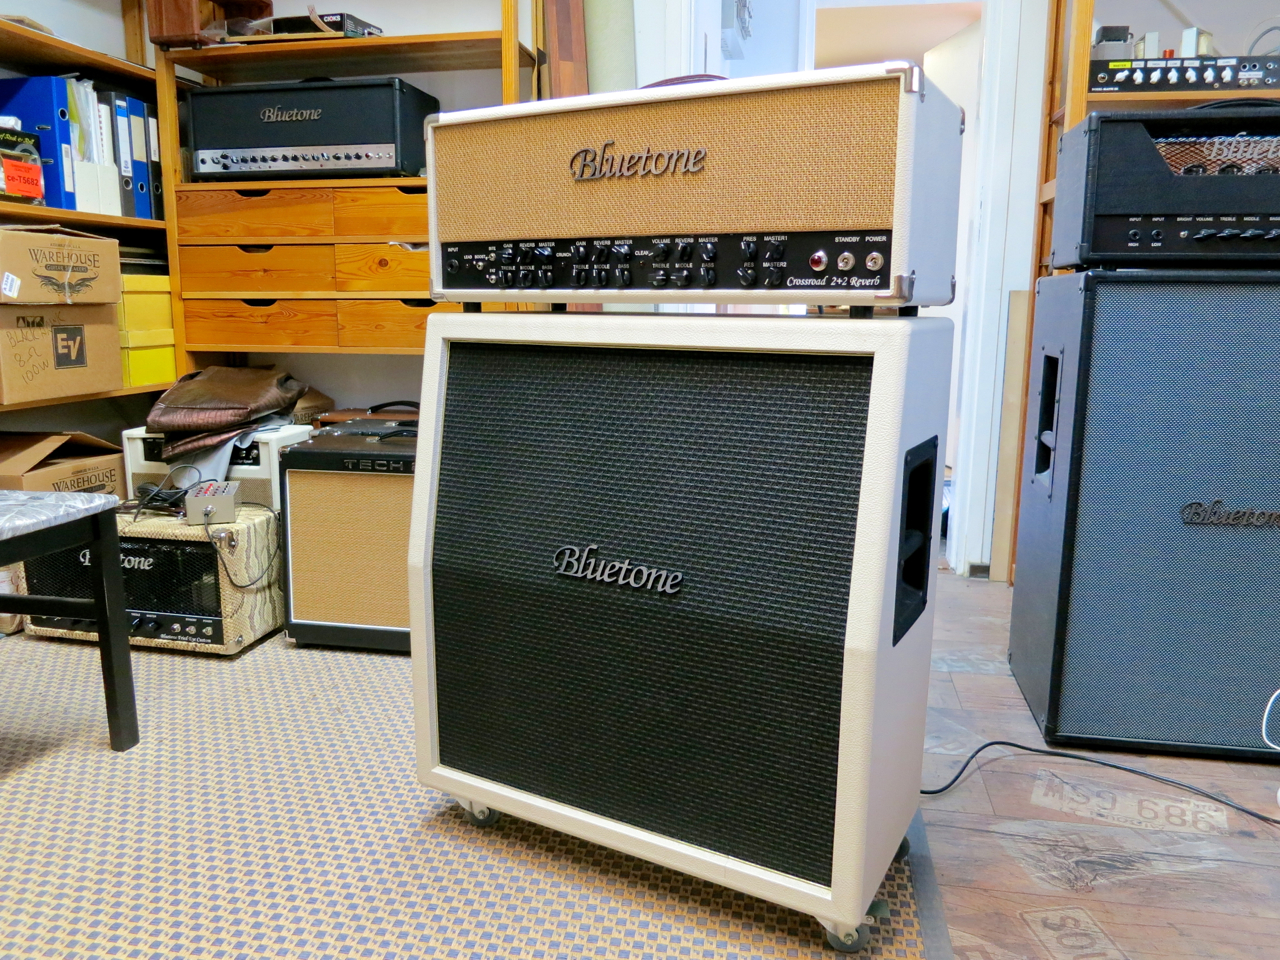
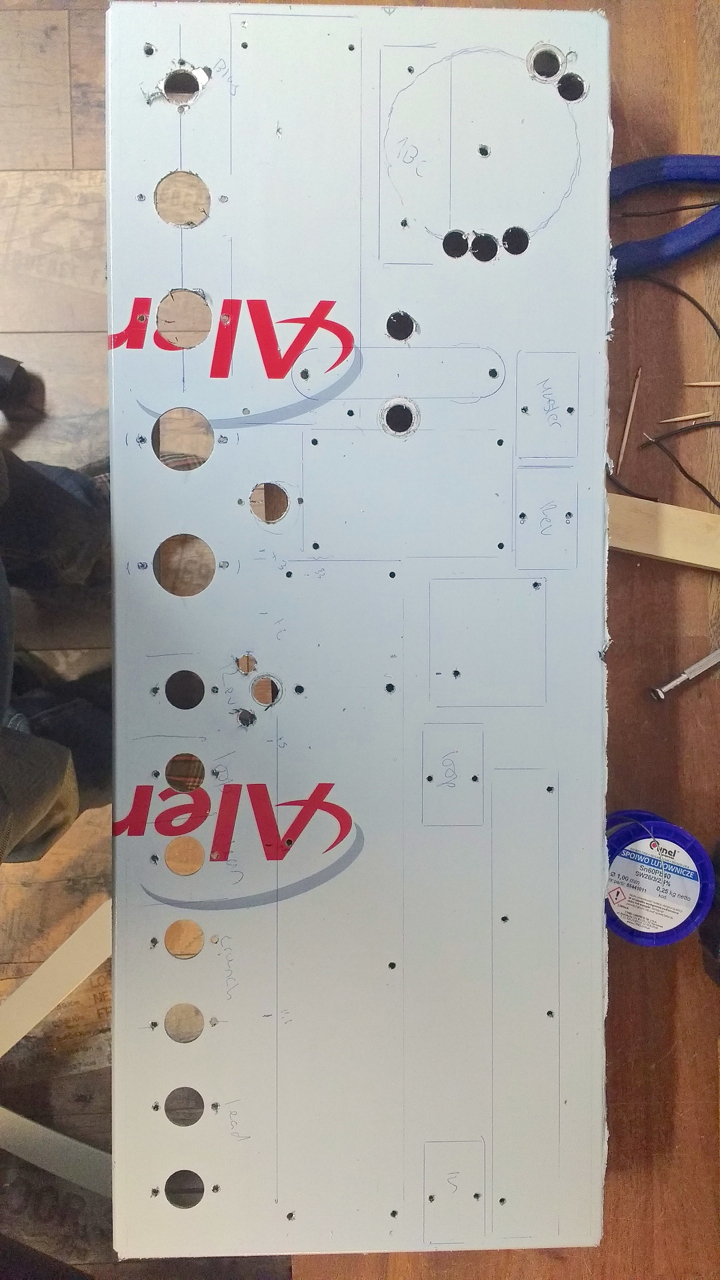
A versatile tube amp, such as Bluetone’s Crossroad, is quite an involved design containing many different components. The exact component layout requires a good deal of planning.

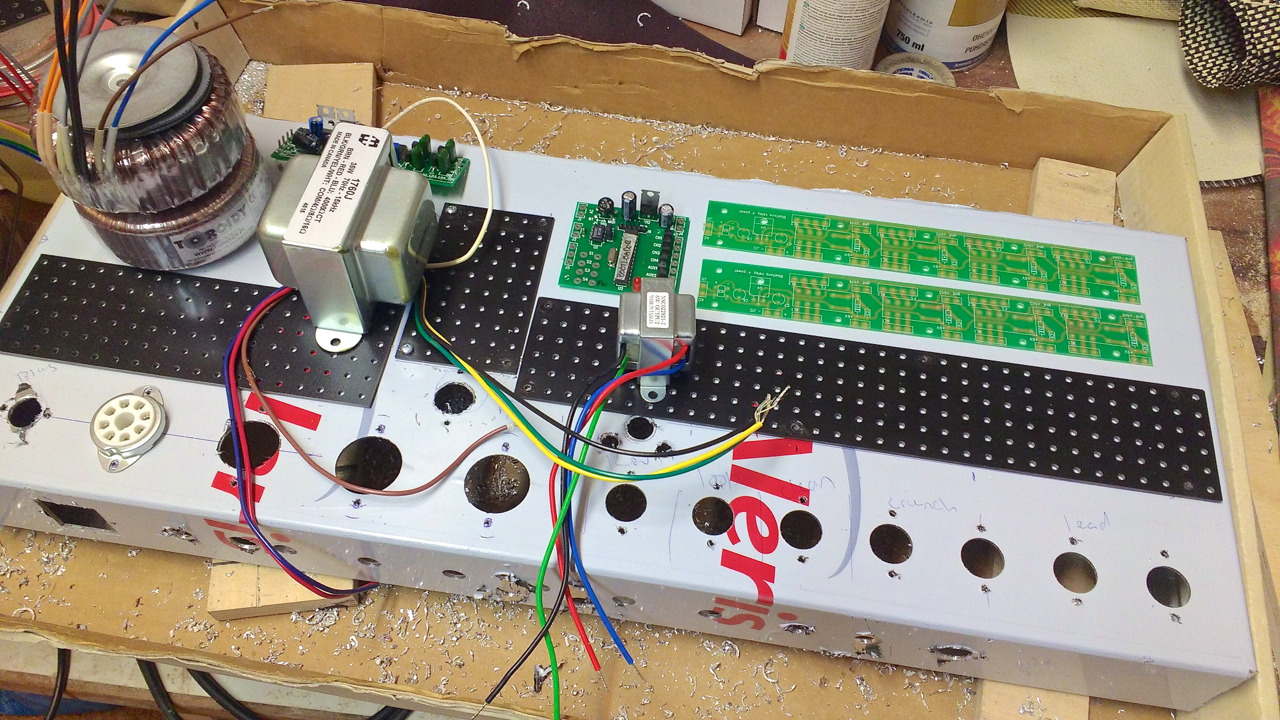
As you can see in the picture above, Matti Vauhkonen has sketched the outlines of all the necessary parts going into the Crossroad onto the chassis’ protective foil. Next he has drilled the holes needed to mount the valve sockets, the circuit boards, the transformers, and the leads going through the chassis.

Bluetone Crossroad – layout test

Designing a tube amp is all about balancing the different requirements of the different parts working inside the amp – you can’t simply throw the components together haphazardly.

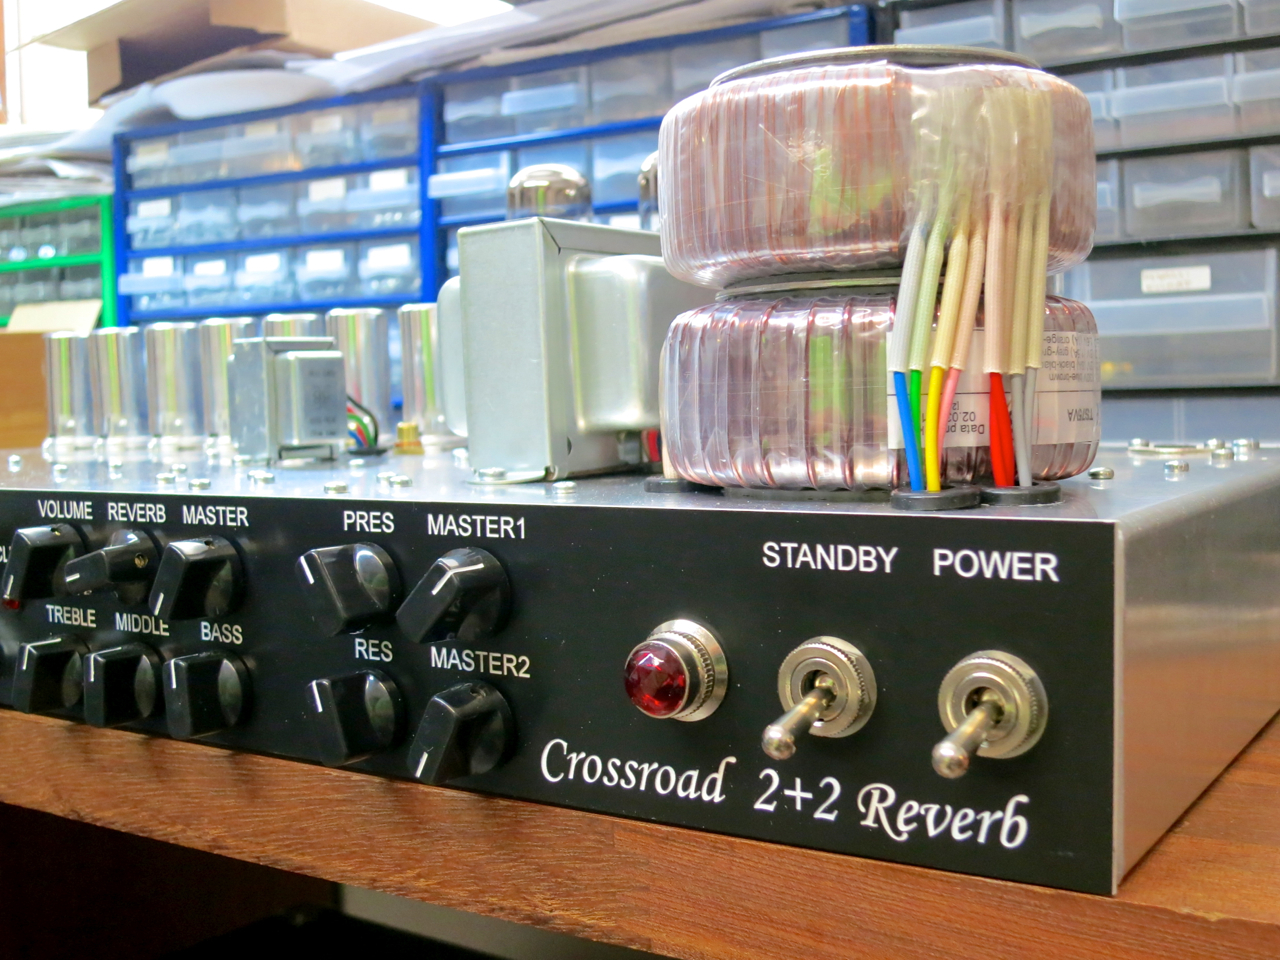
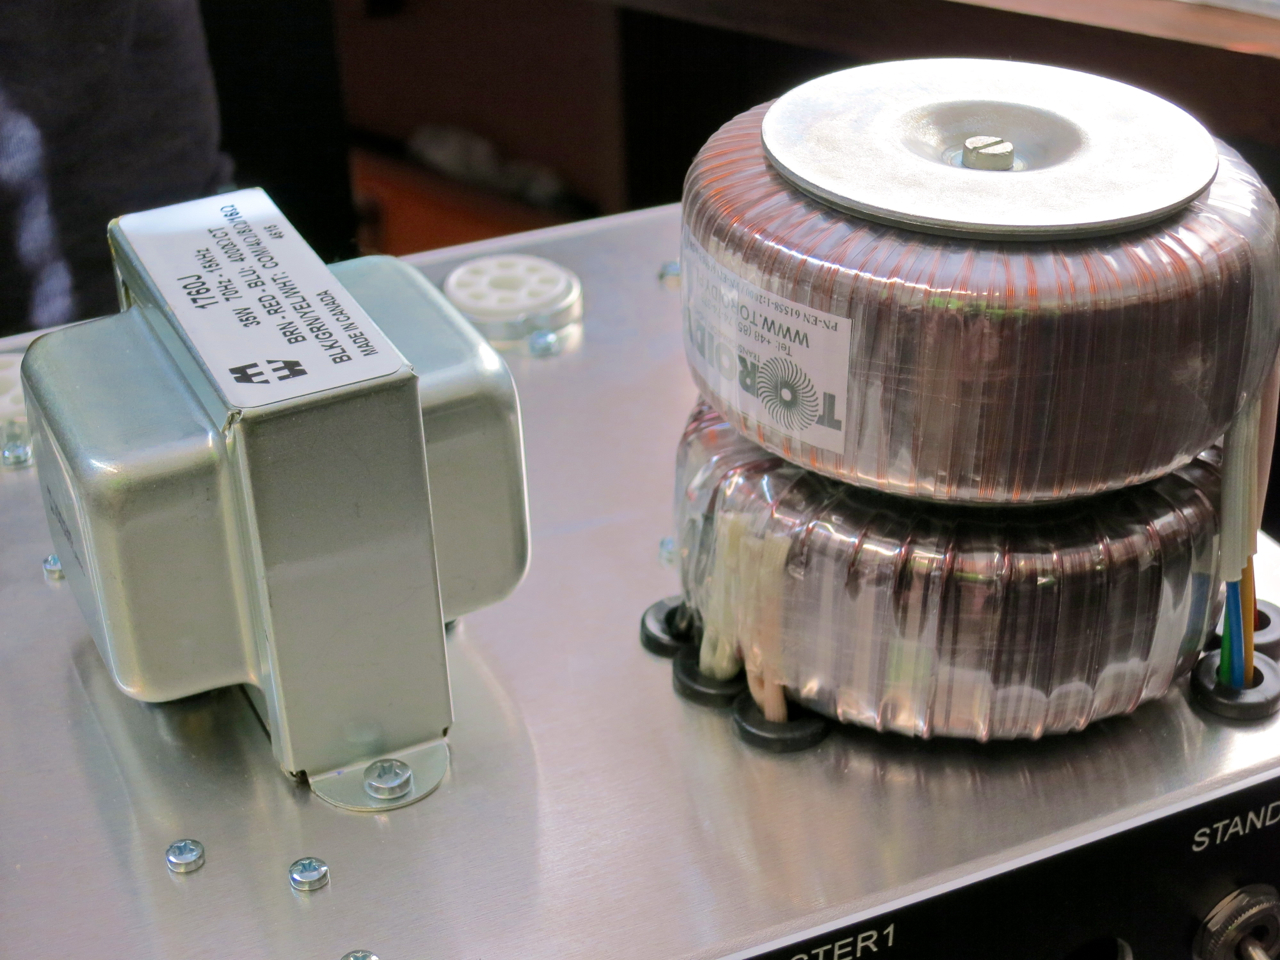
The large power transformer mustn’t radiate electromagnetic hum into the audio signal, which is why it is always placed as far as possible from the preamp valves. The power amp tubes, for their part, are best kept some distance from the audio transformer, to avoid hum and buzz induction. The audio transformer also has to be angled correctly in relation to the power transformer to keep things as quiet as possible.

Bluetone Crossroad – transformers

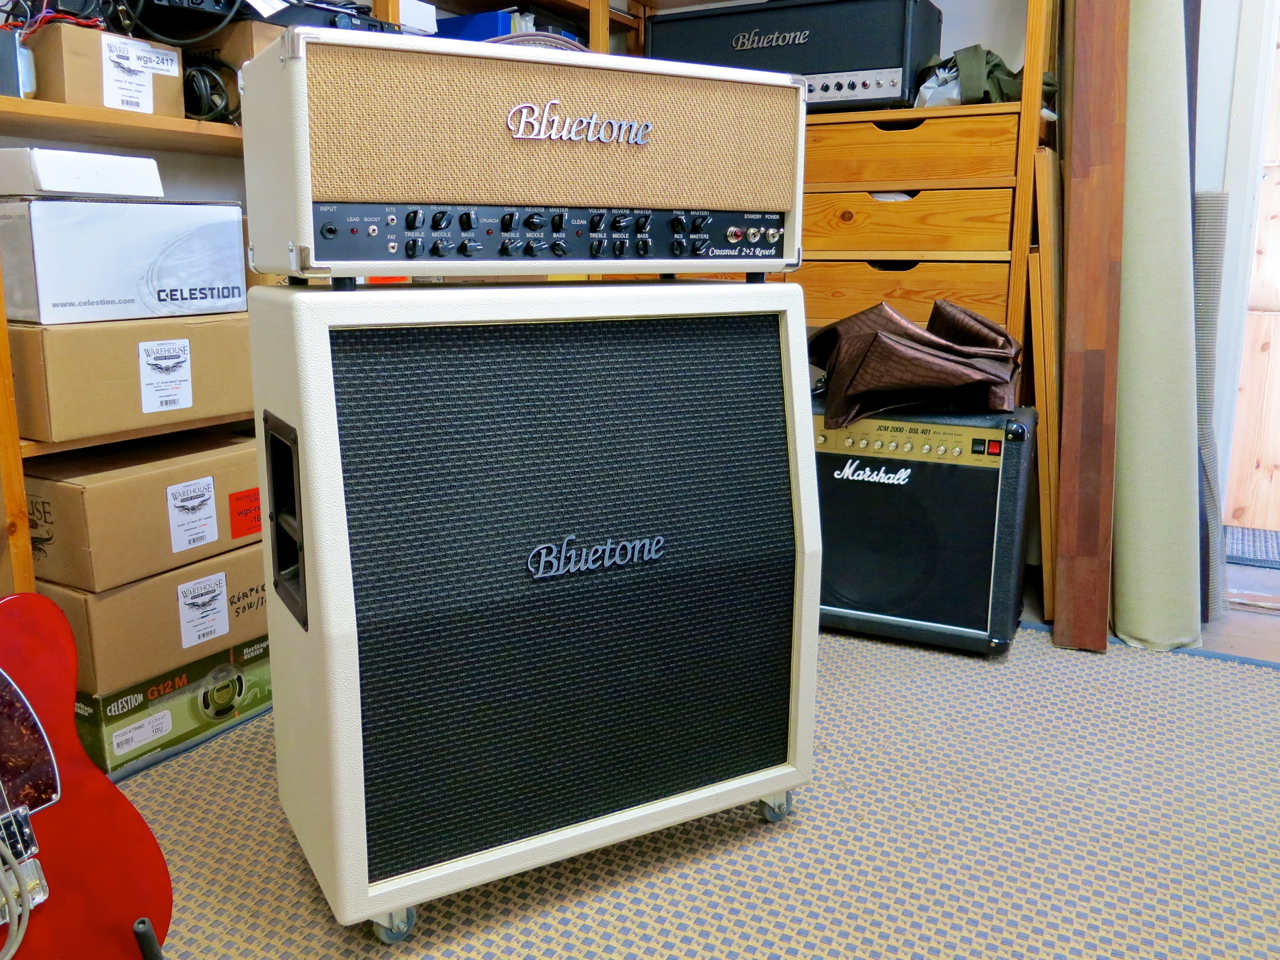
One special feature of Bluetone-amps is their use of (doughnut-shaped) toroidal transformers as power transformers, which is still quite rare in guitar amplifiers.

This is despite the advantages a toroidal transformer offers in comparison to a traditional laminated core transformer. A toroidal transformer weighs less than a similarly spec’ed traditional design, and it also radiates less electromagnetic hum, which makes it easier to find a good spot for the power transformer in the amp.

Bluetone’s Harry Kneckt puts it like this: ”If the toroidal transformer had been available to Leo Fender back in the 1950s, he would have used it in all his amps. I’m pretty sure of this!”

Bluetone Crossroad – boards and phone jacks

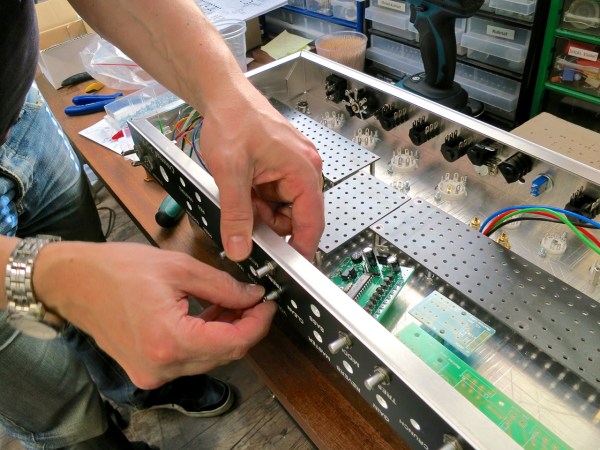
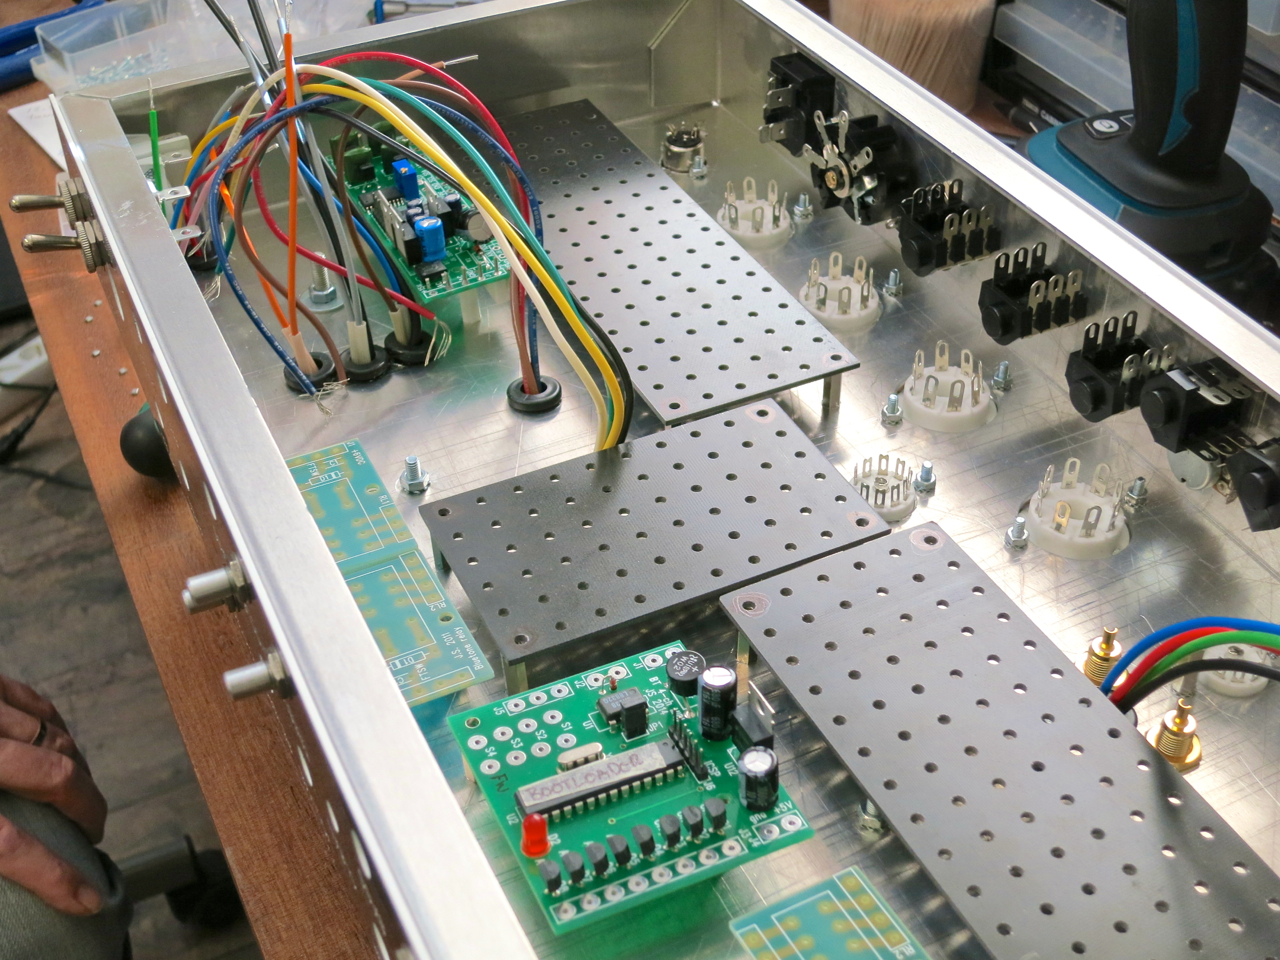
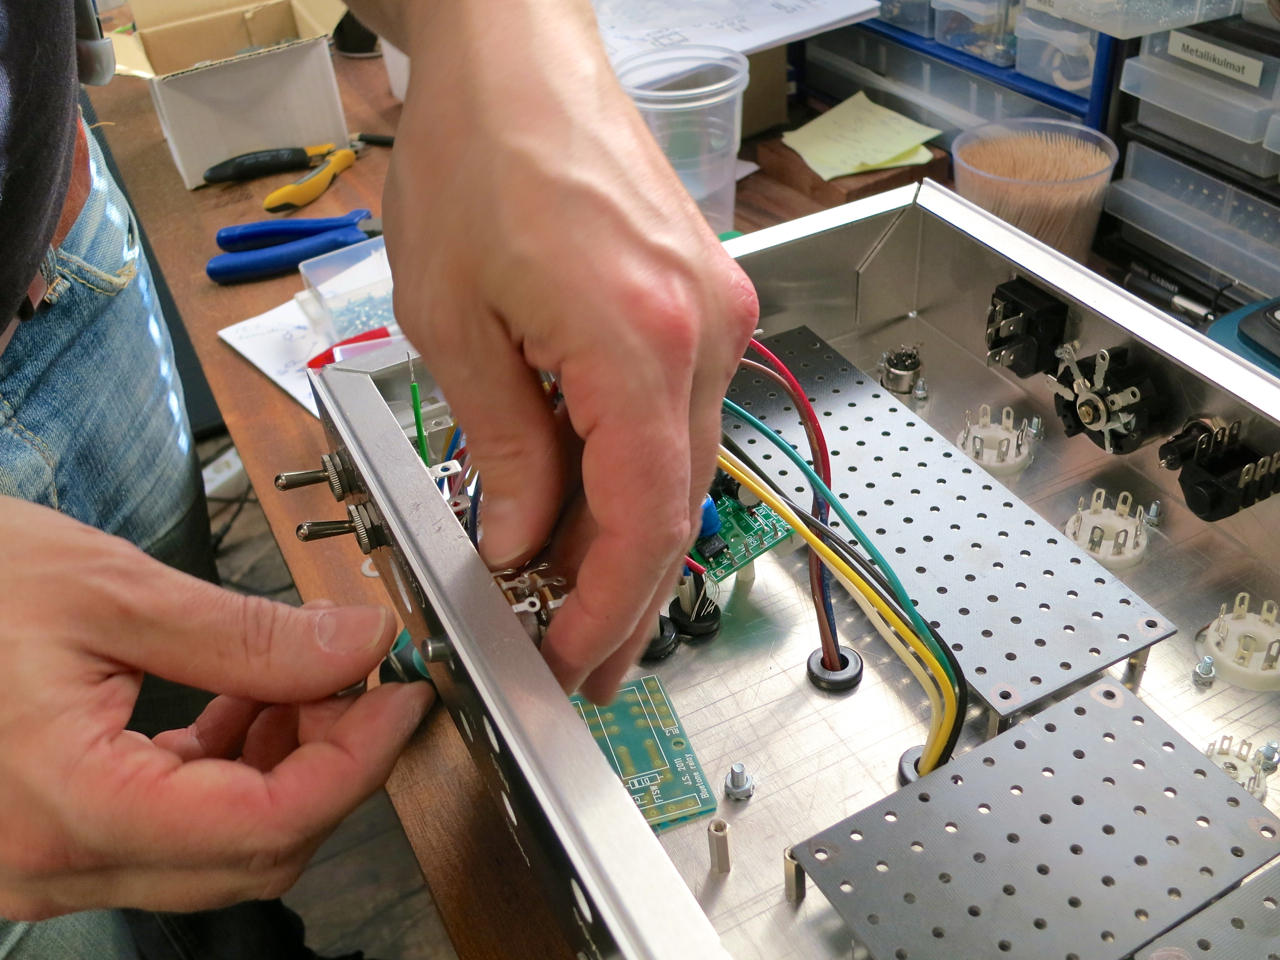
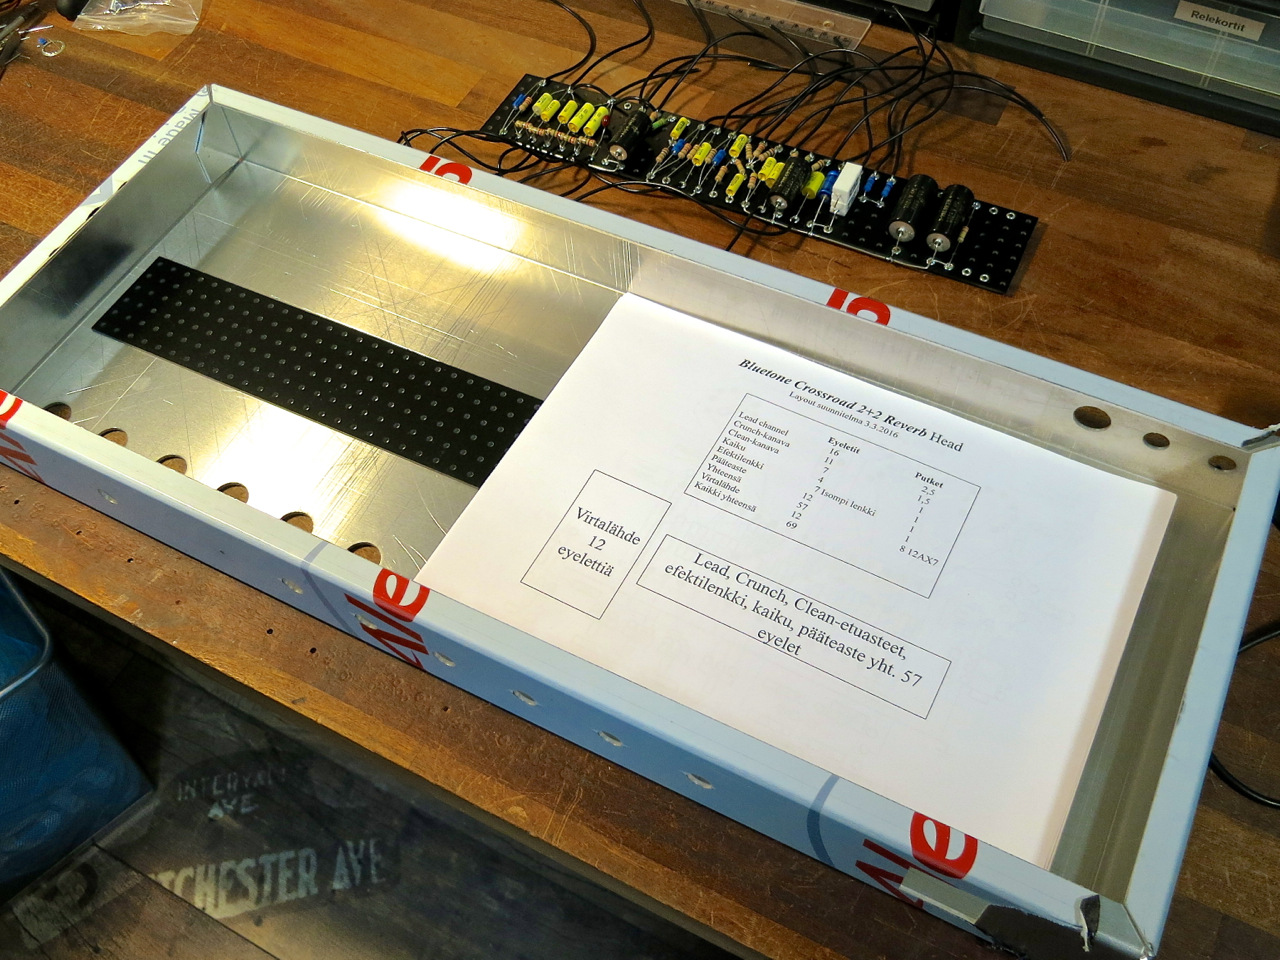
Matti Vauhkonen has first installed the transformers, tube sockets (the white components), and the output jacks (the black parts on the right) into the amp chassis.

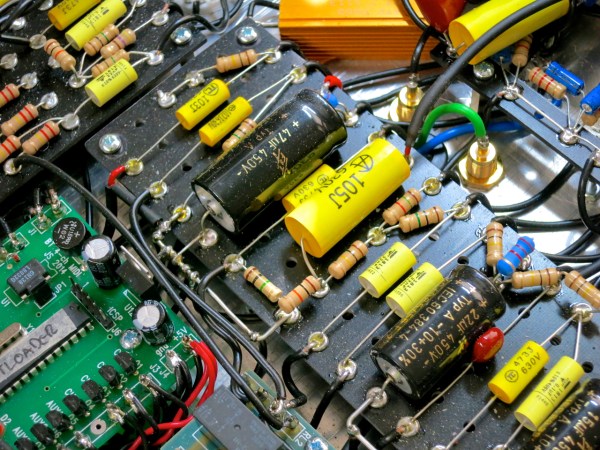
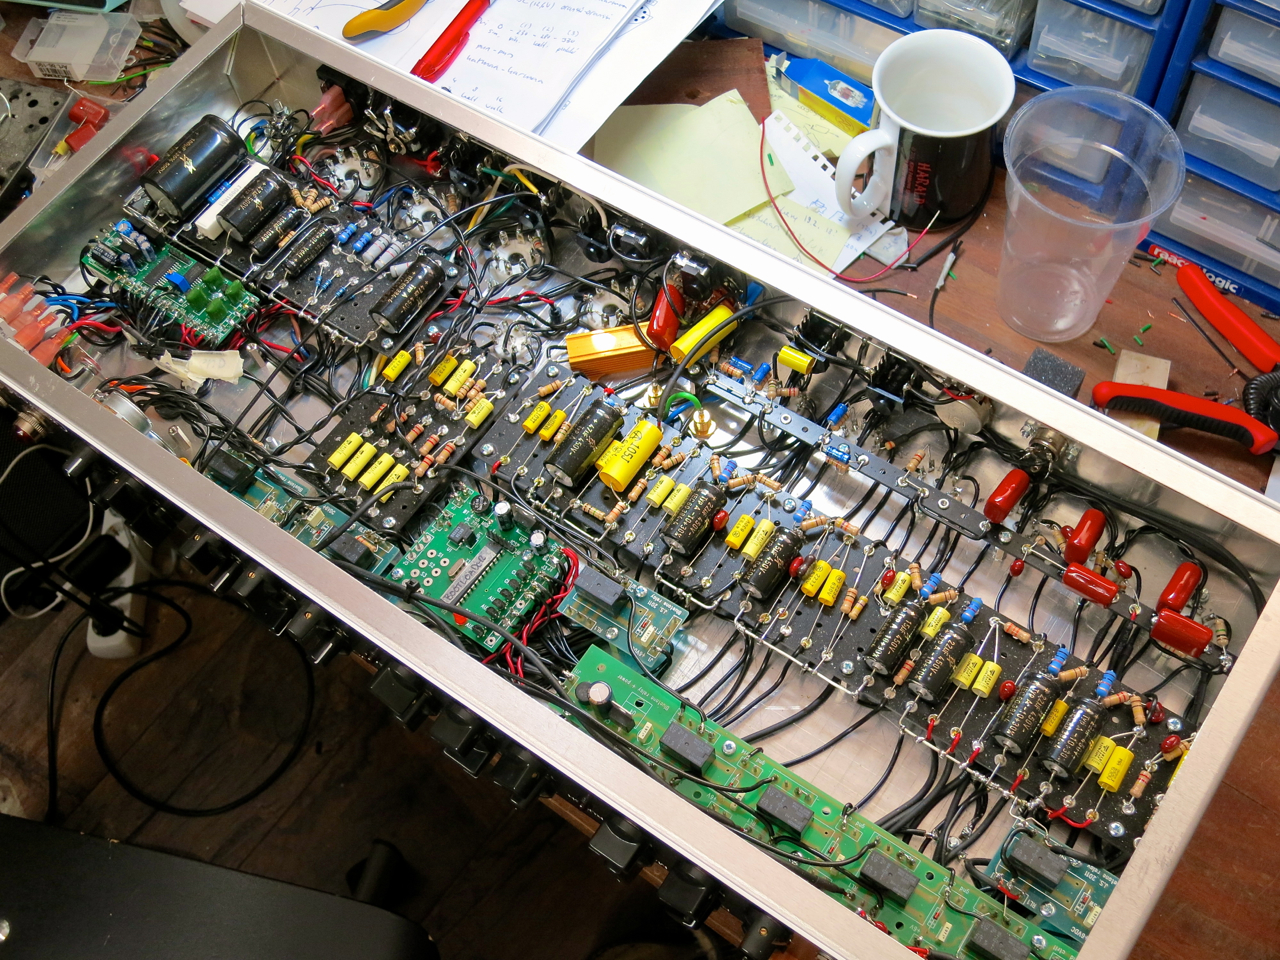
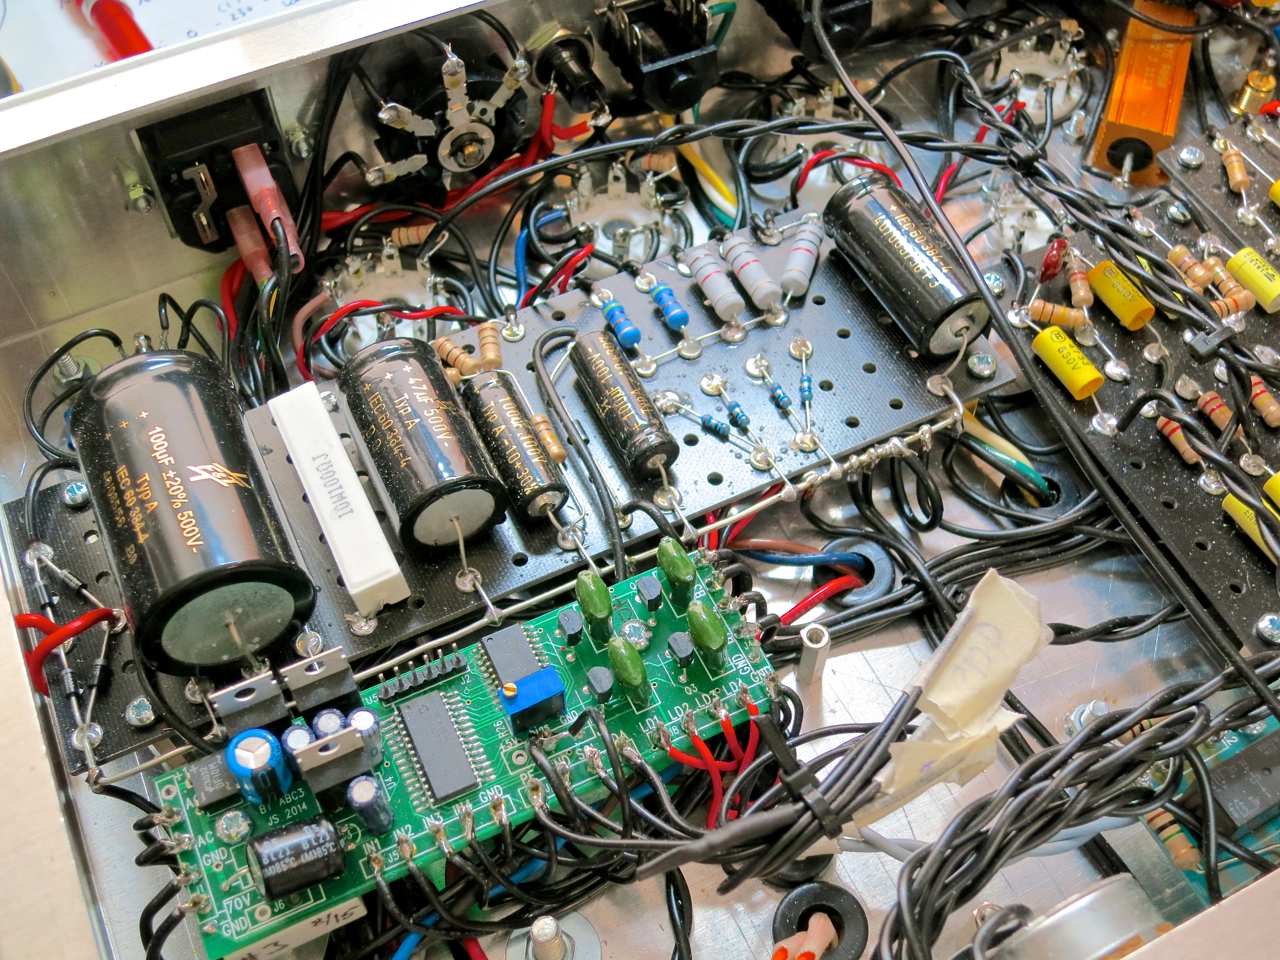
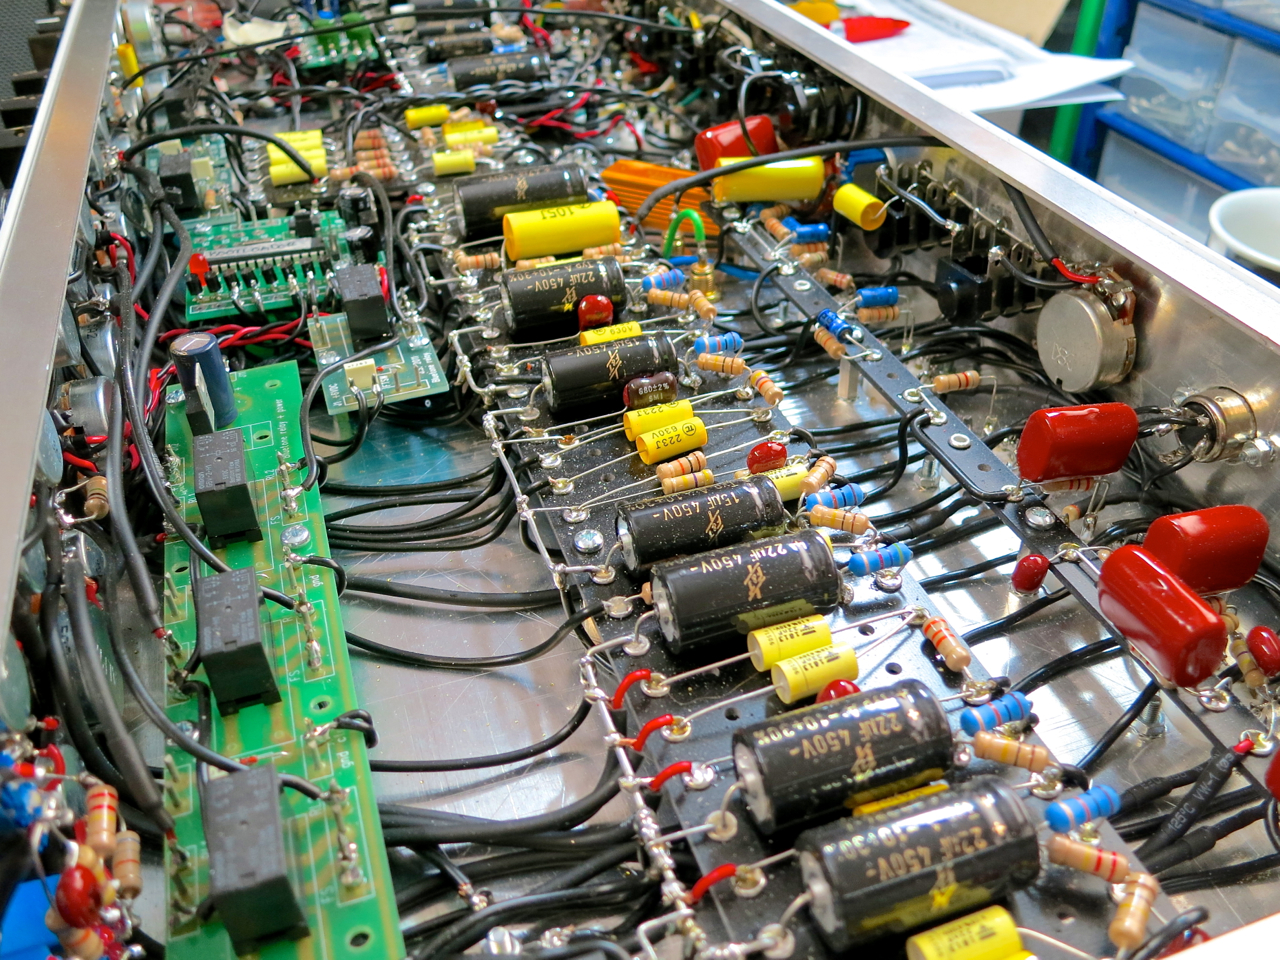
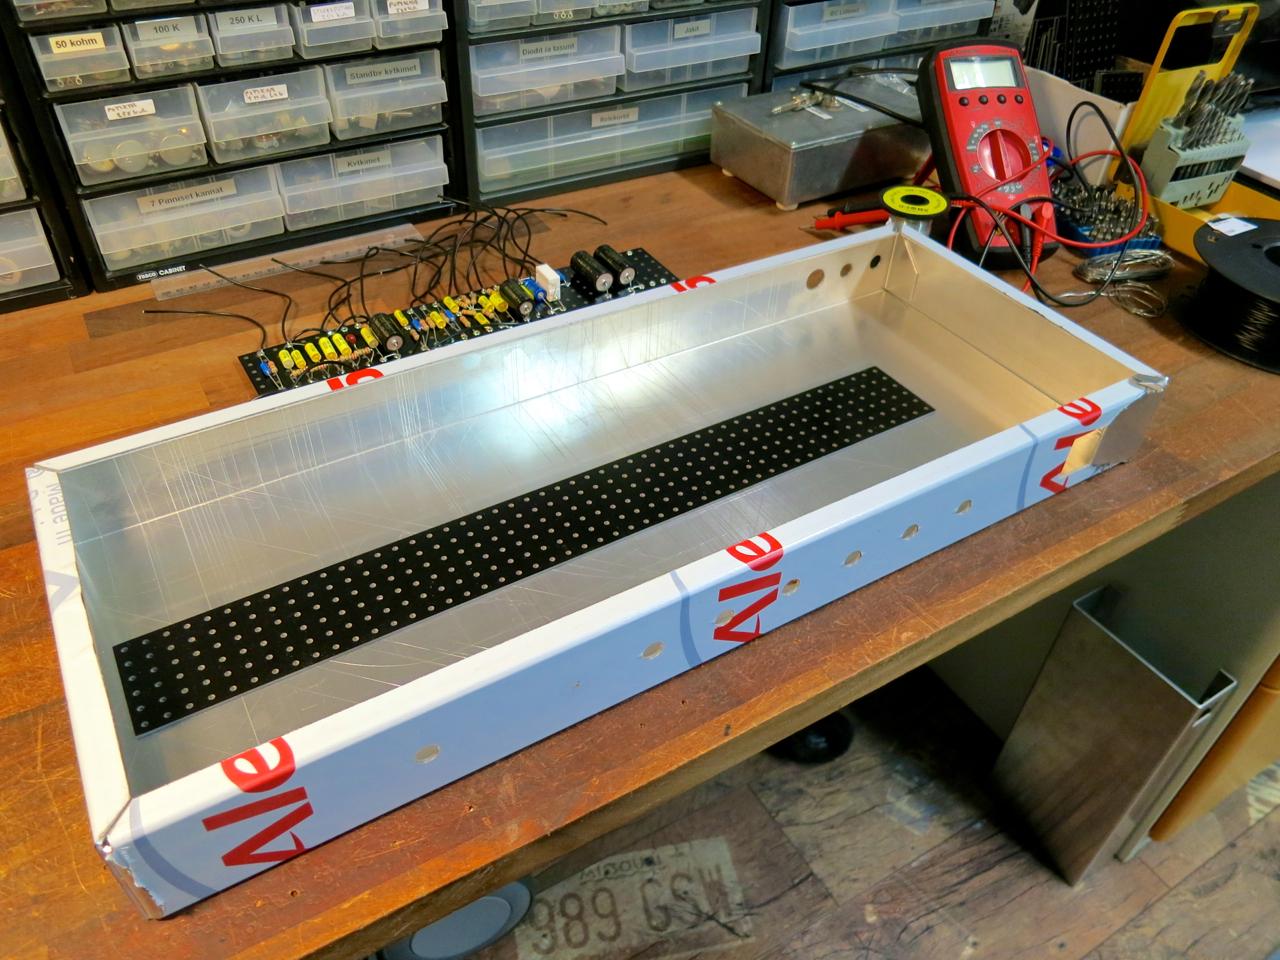
The eyelet-boards and PCBs were added for these pictures only to give an idea of their placement inside the Crossroad head. The audio signal in all Bluetone amps runs through a pure, point-to-point soldered analogue-and-valve path, but for modern control features, such as channel switching via MIDI or tube biasing via WiFi, the company naturally uses modern technology.

Bluetone Crossroad – mounting control pots 3

Bluetone Crossroad – mounting control pots 2

Bluetone Crossroad – mounting the pilot light

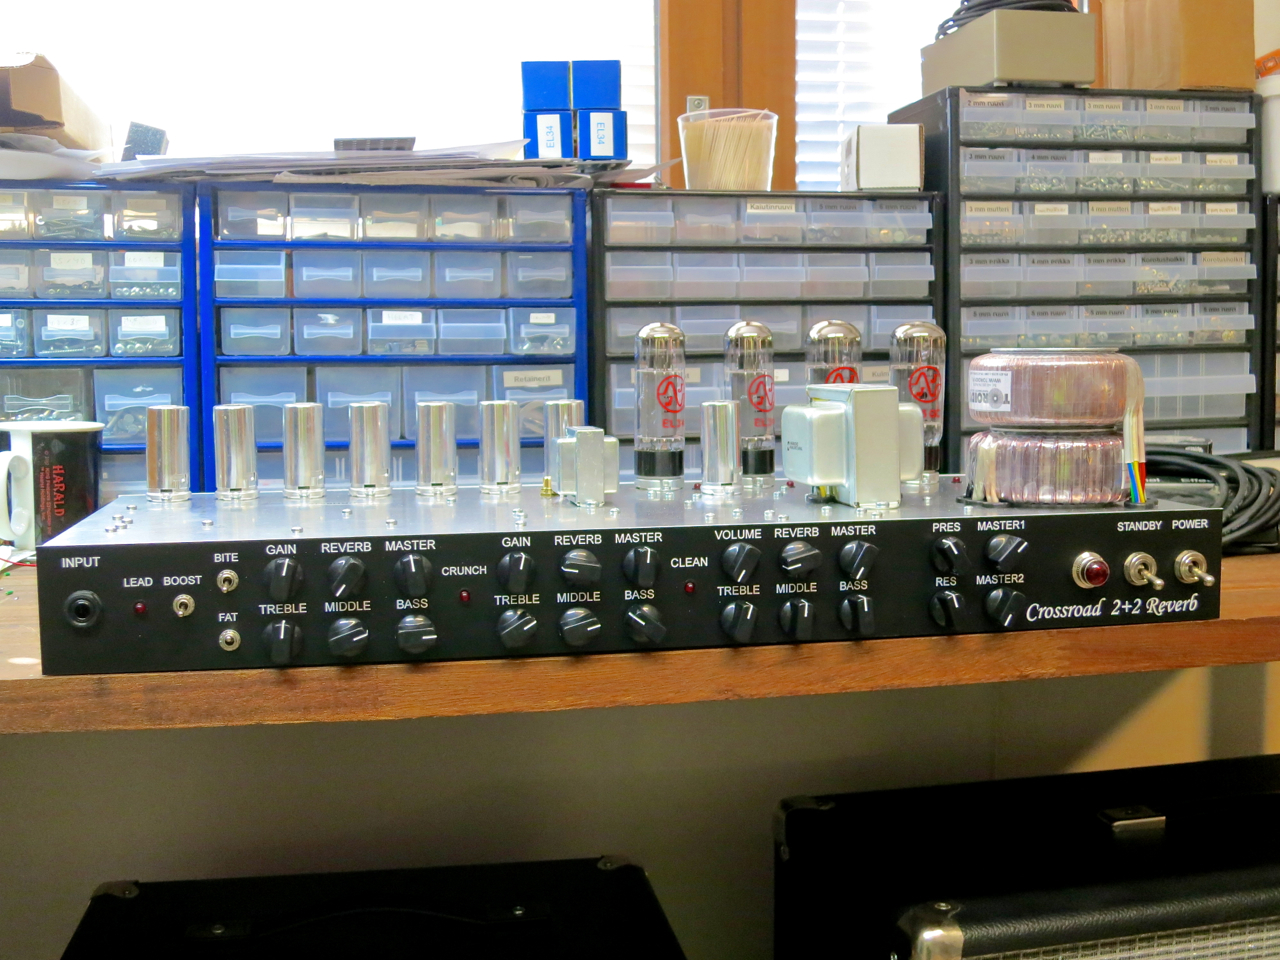
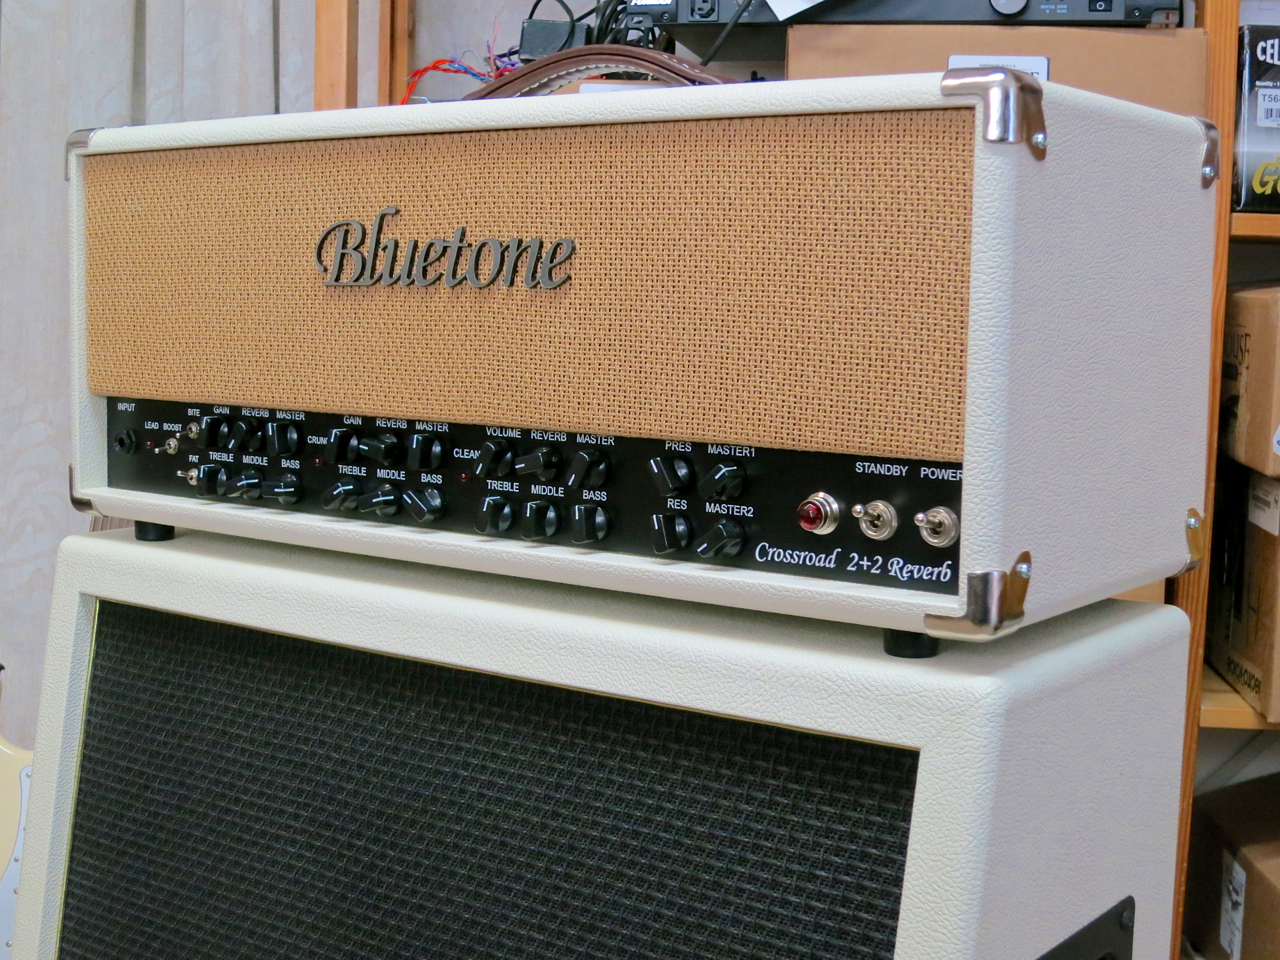
The next step is the installation of all the front panel parts, such as the control pots, switches, and the pilot light.

Bluetone Crossroad – amp cabinet 1

Bluetone Crossroad – amp cabinet 2

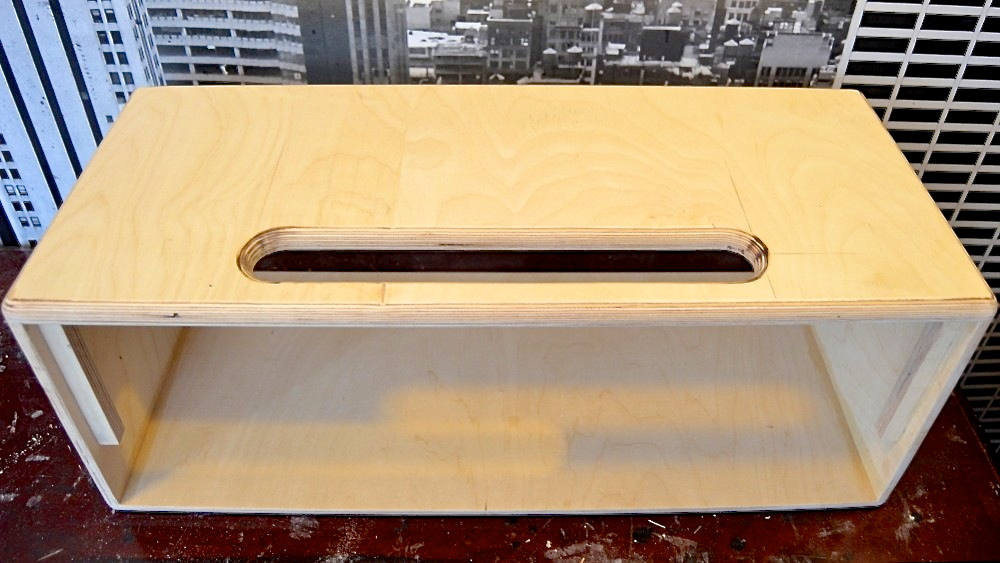
Bluetone makes some of their cabinets in-house, depending on their current workload. For the head featured here, Bluetone ordered the arctic birch ply amp cabinet from their subcontractor.

Bluetone Crossroad – handwired board 3

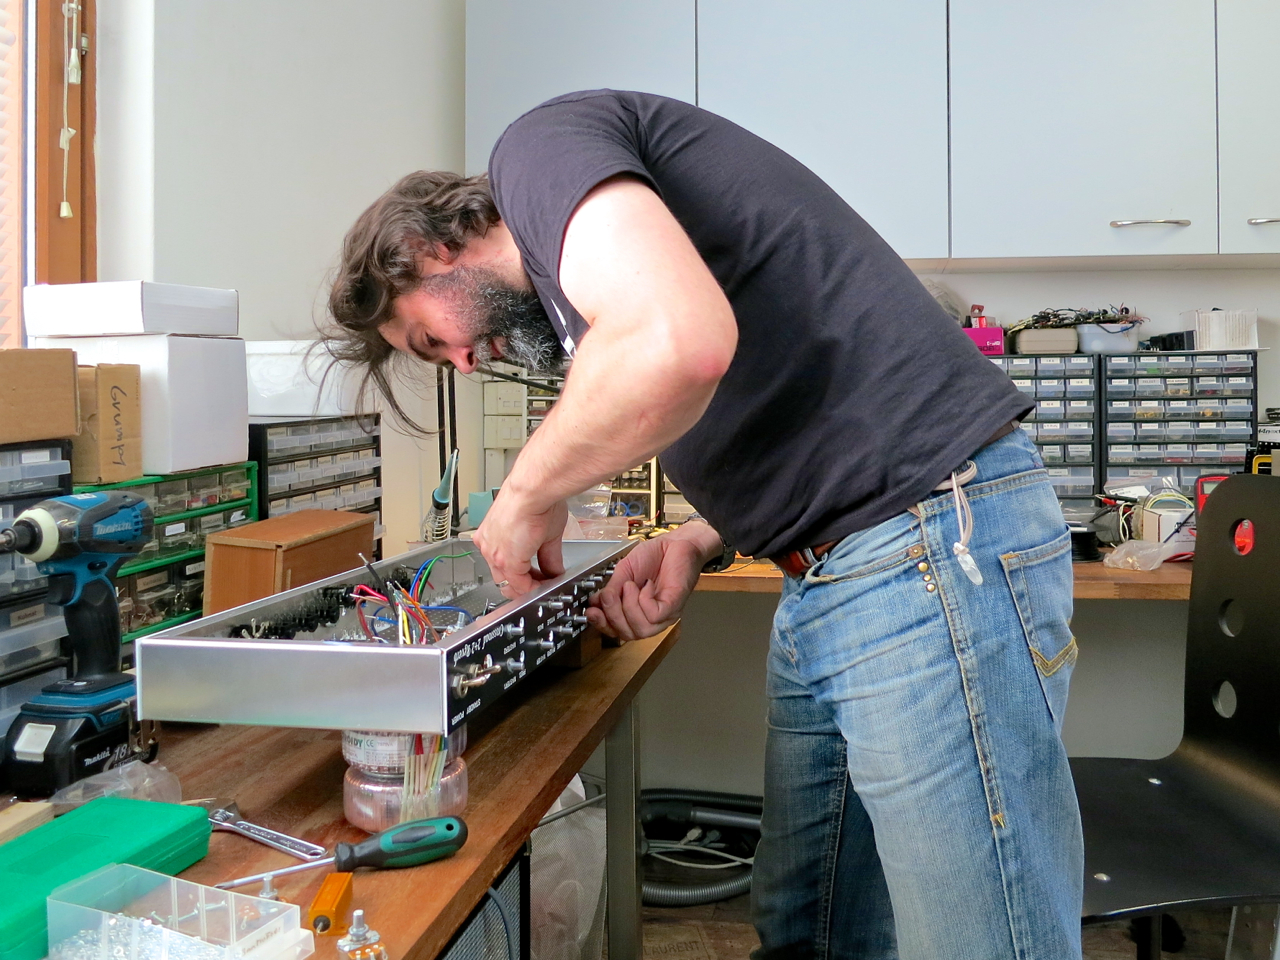
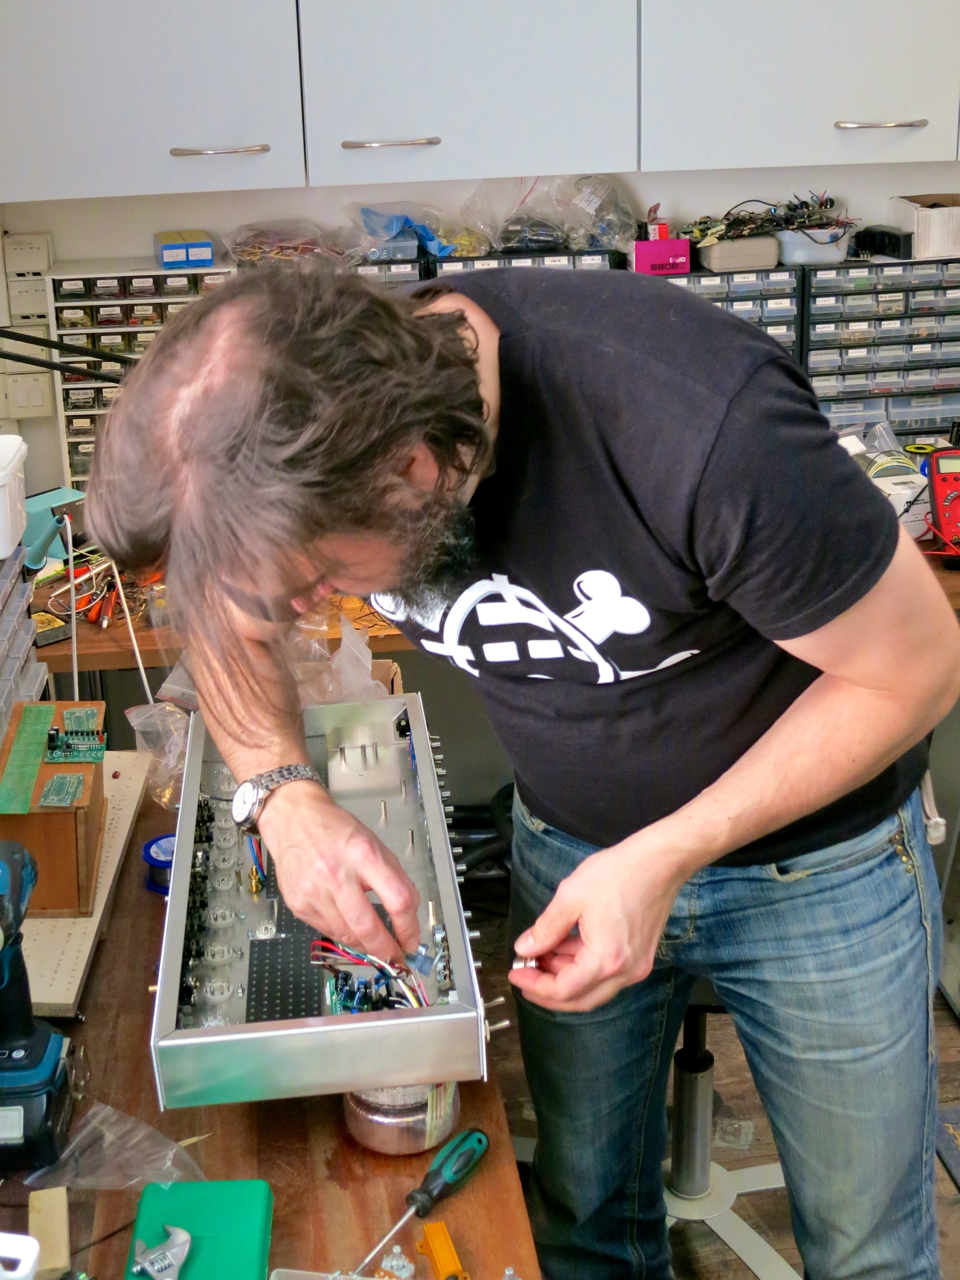
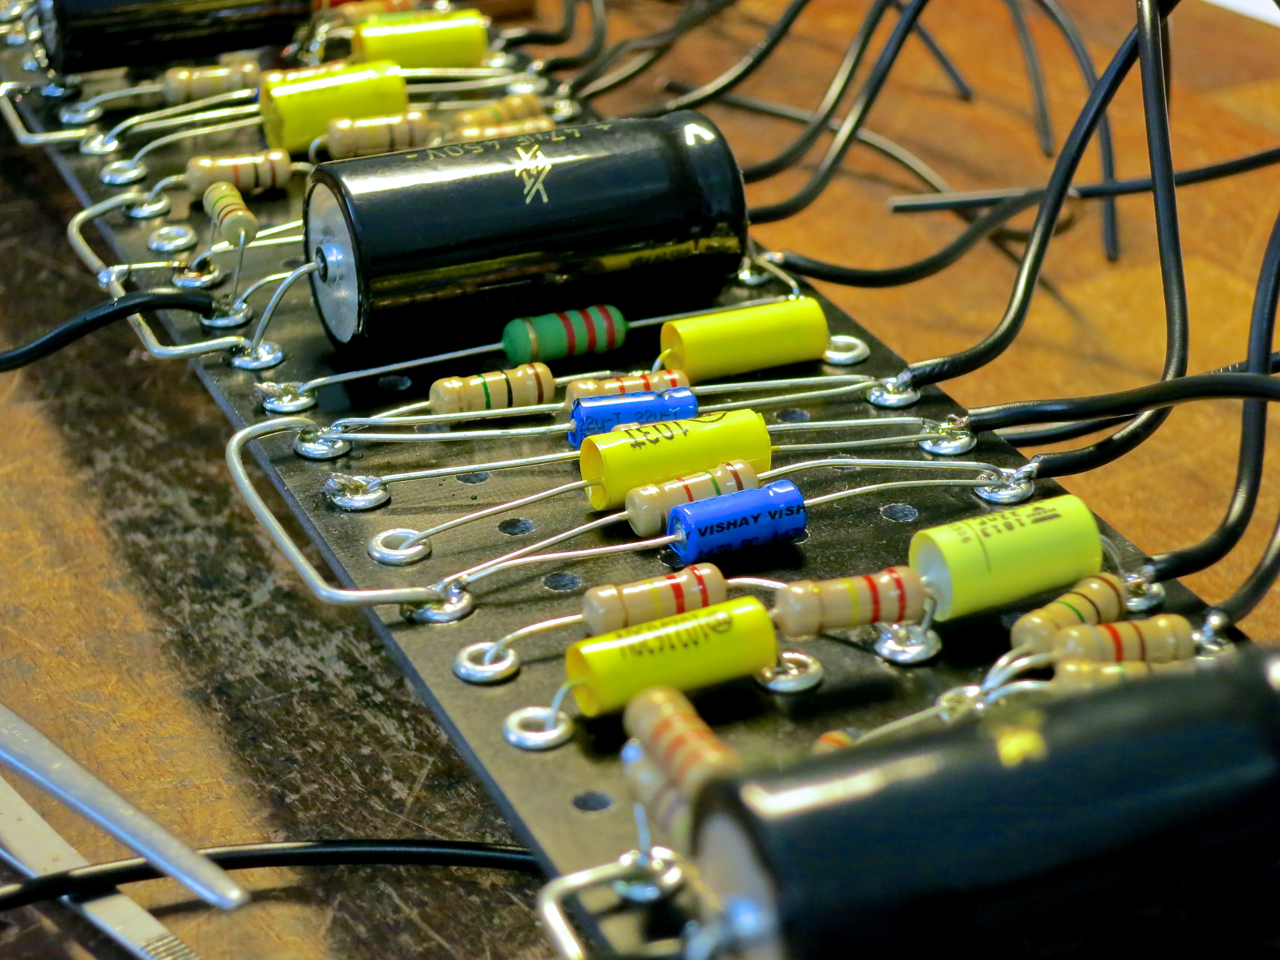
At this moment Matti Vauhkonen is dealing with the time-consuming business of soldering and assembling the heart of the amp (here’s a picture of another Bluetone-model). Hand-soldering a point-to-point valve amp is something you shouldn’t do in a rush, if you want to avoid very time-consuming troubleshooting.

Näin syntyy Bluetone-vahvistin – osa 2

Bluetone Crossroad – logic board

Bluetone Crossroad – layout sketch

Bluetone Crossroadin kaltaisessa, hyvin monipuolisessa putkinupissa on monta eri komponenttia. Osien toimiva sijoittelu vaatii hyvää suunnittelua.

Kuvassa näkyy Matti Vauhkosen merkinnät piiri- ja eyeletlevyjä, sekä muuntajia varten. Koteloon on porattu kaikki tarvittavat reiät putkikannoille, säätimille, tuloille ja lähdöille, levyjen kiinnikkeille, sekä johtojen läpivientiin.

Bluetone Crossroad – layout test

Putkivahvistimen tekijän täytyy miettiä nupin suunnittelussa osien sijoittelua useasta eri näkökulmasta – ei riitä, että kaikki osat vain mahtuvat koteloon.

Esimerkiksi isokokoinen verkkomuuntaja ei saa säteillä elektromagneetista huminaa kitarasignaaliin, minkä vuoksi muuntaja ja etuvahvistimen putket sijoitetaan aina niin kauas toisistaan kuin mahdollista. Audiomuuntaja ja päätevahvistimen putket taas ei kannata sijoittaa liian lähellä etuasteputkia, koska näidenkin osien välillä syntyy elektronista häirintää. Myös audiomuuntajan kelojen oikea fyysinen suuntaaminen verkkomuuntajaa nähden pitää häiriöääniä loitolla.

Bluetone Crossroad – transformers

Yksi Bluetone-vahvistinten erikoisuuksista on rengassydänmuuntajan (engl. toroidal transformer) käyttäminen verkkomuuntajana, mikä nähdään – ainakin vielä – melko harvoin kitaravahvistimissa.

Rengassydänmuuntajalla on useampi etu perinteiseen malliin nähden. Rengassydänmuuntaja on mm. kevyempi kuin perinteinen muuntaja samoilla spekseillä, ja laadukkaan rengassydänmuuntajan elektromagneettinen säteily on myös perinteistä huomattavasti pienempi, mikä helpottaa muuntajan sijoittelua vahvistimessa.

Tai miten Bluetonen Harry Kneckt sanoo: ”Jos Leo Fenderillä olisi ollut 1950-luvulla mahdollisuus käyttää rengassydänmuuntajia, hän olisi käyttänyt niitä. Tästä olen varma!”

Bluetone Crossroad – boards and phone jacks

Matti Vauhkonen on ensin kiinnittänyt koteloon Crossroad-nupin muuntajat, putkikannat (näkyvät valkoisina) ja takapaneelin jakit (mustat osat).

Eyelet- ja piirilevyt on lisätty koteloon vain näitä kuvia varten havainnollistamaan niiden lopulliset sijainnit. Vaikka Bluetone-vahvistimissa kitarasignaali kulkee aina ja vain käsinjuotetun point-to-point putki- ja analogielektroniikan kautta, käytetään luonnollisesti nykyelektroniikka, kun toteutetaan sellaiset ominaisuudet kuin esimerkiksi kanavanvaihdot MIDI:llä tai pääteputkien seurantaa ja biasointia Wifin kautta.

Bluetone Crossroad – mounting control pots 3

Bluetone Crossroad – mounting control pots 2

Bluetone Crossroad – mounting the pilot light

Seuraavaksi lisätään etupaneelin osia, kuten säätimet, kytkimet ja statusvalo.

Bluetone Crossroad – amp cabinet 1

Bluetone Crossroad – amp cabinet 2

Samanaikaisesti Bluetonen alihankkija on jo saanut nupin vanerikotelon valmiiksi. Aikataulusta riippuen Bluetone valmistaa myös osan koteloista omassa verstaassa.

Bluetone Crossroad – handwired board 3

Seuraava vaihe – joka on tällä hetkellä meneillään – on vahvistimen varsinaisen ”sydämen” valmistus (tässä kuva toisesta Bluetone-mallista). Näitä point-to-point juotostöitä ei kannata tehdä kiireellä, jos halutaan välttää turhauttava ja aikaa vievä vianetsintä. Maltti on valttia myös putkivahvistimen rakentamisessa!

The Making of a Bluetone Amp – Part 1

crossroad

Bluetone Crossroad head – 1

Finland’s Bluetone Amps, which is run by Harry Kneckt and Matti Vauhkonen, has already garnered quite a reputation as a maker of high-quality valve amplifiers.

The company offers quite a large range of different models – starting with small combos, such as the Barfly, with large-wattage tube heads, such as the AcDcII– or the Bugaboo, at the other end of the spectrum. Bluetone also make bass amps, as well as guitar and bass cabinets.

Each and every Bluetone amp is made by hand, using point-to-point construction and top drawer components. This type of dedication to a pure tube signal path doesn’t mean, however, that we’re dealing with a backward-facing company. Quite the opposite is true – Bluetone amps include some of the most cutting edge features, when it comes to making their products user-friendly. One great example is a special metering tool the company sells, which makes it possible for a regular Jane or Joe to bias their amplifier’s output valves by themselves with the least possible amount of fuss.

Bluetone genuine python skin

Bluetone is a genuine custom maker, because virtually all of their amps leave their workshop with customer-specified modifications. Bluetone have their basic model range, but there’s a lot of scope for customisation, both when it comes to the technical specifications as well as on the cosmetic side of things (you can even specify the font used for lettering the front panel).

Kitarablogi.com has been offered a chance to follow the making of a Bluetone head, all the way from the customer’s order to the finished product:

This specific head is basically a Bluetone Crossroad amplifier with a 2+2 power amp. Bluetone’s own 2+2 power amp uses the four output valves in two pairs, with one pair being dedicated solely to the clean channel (usually running a pair of 6V6 or 6L6 tubes), with the second pair being reserved to handle all crunchy and lead tones (normally a pair of EL34s). The advantage of Bluetone’s 2+2-system lies in the fact that you’re dealing with the ”correct” classic tones of the power valves used, so there’s no need for any modelling or tube amp ”voodoo” to achieve Marshall-type drive tones from Fender-type tubes, or vice versa.

The list of specifications on this Crossroad 2+2 is more than impressive:
• Lead-channel: modified Friedman Brown Eye-type
• Crunch-channel: modified Marshall JCM800-type
• Clean-channel: modified Fender Deluxe Reverb-type
• Bluetone’s special valve spring reverb with dedicated controls for each channel
• Bluetone’s own buffered tube-based effects loop (with level controls)
• Channel- and effects-switching controllable via MIDI
• Main valve status control and biasing using the Bluetone ABC-system (Auto Bias Control)
• Power tubes can be biased either with a Bluetone ABC-metering tool or using a mobile device app via WLAN
• Power amp has built-in Variac (think: ”EVH Brown Sound”)
• Adjustable line output
• Adjustable headphone output
• Presence- and Resonance-control in master section

This is how the journey begins:

An empty steel chassis, a fibreglass eyelet-board of the correct size, and the customer’s order, which Harry Kneckt has already used to draw the necessary schematics and put together a list of the necessary components.

Bluetone Crossroad head – 2

Näin syntyy Bluetone-vahvistin – osa 1

crossroad

Bluetone Crossroad head – 1

Harry Knecktin ja Matti Vauhkosen luotsaama Bluetone Amps on tunnettu laadukkaista putkivahvistimistaan.

Firman mallisto on yllättävän laaja – se ulottuu pienestä Barfly-combosta isowattisiin AcDcII– tai Bugaboo-nuppeihin. Bluetone valmistaa myös bassovahvistimia, sekä kitara- ja bassokaappeja.

Bluetone-vahvistimissa signaalitie rakennetaan täysin vailla kompromisseja käsin point-to-point-periaatteella. Mutta tästä huolimatta tämä firma ei toimi katse taakse käännettynä, vaan uusia teknisiä ratkaisuja ja ominaisuuksia lisätään vahvistimiin tekemään käyttäjien elämästä helpomman. Bluetone valmistaa esimerkiksi vahvistimiin kätevän lisälaitteen, jolla maalikkokin voi biasoida firman vahvistimia vaivattomasti itse.

Bluetone genuine python skin

Bluetone on todellinen custom-paja, sillä käytännössä jokainen heidän rakentama vahvistin on asiakkaan toiveiden mukaan tehty, vaikka se perustuukin johonkin firman perusmalliin. Asiakas voi vaikuttaa niin styrkkarin teknisiin ominaisuuksiin kuin myös kosmeettisiin ratkaisuihin (jopa naamataulun fonttiin).

Kitarablogi.com sai nyt tilaisuuden seurata uuden Bluetone-nupin syntymää tyhjästä metallikotelosta valmiiseen vahvistimeen:

Asiakas on tilannut kolmikanavaisen Crossroad-nupin Bluetonen omalla 2+2-pääteasteella. 2+2-pääte tarkoittaa, että vahvistimen neljää pääteputkea käytetään niin, että yksi pari hoitaa puhtaan kanavan (tavallisesti joko 6V6- tai 6L6-putket), kun toinen pari on käytössä särösoundien kanssa (tavallisesti EL34). Bluetonen 2+2-systeemin suuri etu on, että soittaja saa käyttöön näiden eri pääteputkityyppien ominaiset, aidot soundit ilman mitään tarvetta mallinnukseen tai muuhun elektroniseen voodoohon.

Tämän Crossroad 2+2 -nupin speksilista on todella vaikuttava:
• Lead-kanava: modattu Friedman Brown Eye
• Crunch-kanava: modattu Marshall JCM800
• Clean-kanava: modattu Fender Deluxe Reverb
• Bluetonen omaan suunnitteluun perustuva putkijousikaiku omilla kanavakohtaisilla tason säädöillä
• Bluetonen omaan suunnitteluun perustuva bufferoitu putkiefektilenkki lähtötason säädöllä
• Kanavanvaihto ja efektien hallinta MIDI-ohjauksella
• Pääteputkien hallinta ja biasointi ohjelmistopohjaisella Bluetone ABC (Auto Bias Control) -järjestelmällä
• Putkien biakset voidaan säätää joko ABC-mittarilla tai langattomasti älypuhelimella/läppärillä WLAN-sovelluksella
• Virtalähteessä vahvarin sisäisen päätetehon ja putkien jännitteiden säätö (Variac, eli ”EVH Brown Sound”)
• Säädettävä line out -lähtö
• Säädettävä kuulokelähtö
• Presence ja Resonance-säätimet pääteasteessa

Ja tästä matkamme valmiiseen custom-nuppiin siis alkaa:

Tyhjä metallikotelo, sopivan kokoinen eyelet-levy lasikuidusta, sekä asiakkaan tilaus, jonka perusteella Harry Kneckt on jo kasannut osien listan ja piirtänyt kytkentäkaavion.

Bluetone Crossroad head – 2

Pidä blogia WordPress.comissa.

Ylös ↑